How to Replace Fuel Door Latch 2006-12 Nissan Altima
Created on: 2019-05-23
Learn how to remove and replace a broken or stuck fuel door latch on your 06-12 Nissan Altima. The 1A Auto experts will guide you through this job!
-
step 1 :Removing the Fuel Door Latch
- Inside the trunk, remove the plastic retaining pin securing the trunk liner on the driver side wall
- Pull the passenger side trunk liner down
- Pinch the locking tabs on the fuel door latch to disengage them from the body
- Push the fuel door latch to the outside
- Disconnect the latch cable from the latch
-
step 2 :Installing the Fuel Door Latch
- Connect the latch cable to the latch
- Insert the latch into the mounting hole while pulling on the cable from the other side
- Press the latch in to engage the locking tabs
- Replace the trunk liner
- Replace the trunk liner retaining pin
Hey friends, it's Lin down at 1A Auto. Today I'm going to be working on a 2010 Nissan Altima. We're going to be doing a fairly simple job, replacing the fuel door release latch. It's going to be easy. A few basic tools, or a couple, I guess, and I want to be the guy that shows you how to do it.
If you need any parts, you can always come to 1A Auto and check us out.
We're going to come under, inside of the trunk. We've got ourselves a little push clip right here. What I'm going to do is I'm going to try to take a small screwdriver. I'm going to try to lift that center part out. Once it's almost all the way out, we should be able to take this pin out.
I've got it right here. Just going to try to pry it, lift it. I'll show you what it looks like, just a little push clip. Essentially when it's up like this, these are nice and loose. When you push it down, it locks them out.
Okay. Now I'm going to pull this down. I'm not sure if you can see, but we've got the cable right here. This is to release that. The cable comes through. It'll sit inside this area right here, and then the internal part of the cable comes up and sits in there. Then when you pull on your release upfront, just pulls this. It makes that go.
Okay. What we're going to do, as we can't see behind here very well, we could try to use a mirror or whatever we want to do. Let's just go with our imagination and we're going to imagine that this is in. I'm going to look, it goes this direction.
Okay. What I'm going to do is I'm going to follow the cable, dodododo, I'm going to find this plastic, bring my hand all the way up so I can hopefully find these. I'm going to try to squeeze these. If I can't squeeze them by hand, I could try to use some pliers. Once I get them squeezed, I can try to push out the release latch right here, and once it's out, we'll try to pull it through a little further.
Okay. I'm going to try to reach my hand back there. I found my cable. I'm going to follow the cable. All right. I think I got it. Here we are.
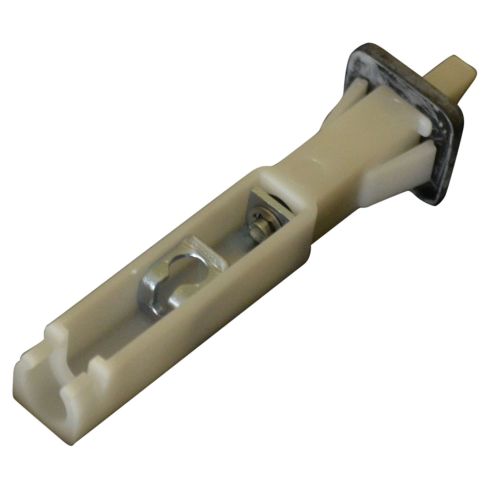
I'm going to try to take this piece up and out of the plastic area. Okay. There we are. We have our fuel door release from a 2010 Nissan Altima. This is the original, as you could tell, it's not in the best condition, which is why we're going to replace it with a quality 1AAuto part.
What I'm going to do is I'll just hold them up. I'll show you the comparison in length. As you can tell, they match up that way. The internals look the exact same, so that's great. We've got our clip right there, clip right there. We've got our angle. Very important. Both clips.
All right. We can get rid of this. We'll recycle it. It's plastic. Now we're going to install our quality 1A Auto part.
Here we are. We've got our cable, moves nicely. That's great. If you notice that it was rusted or anything, you would probably want to replace this cable, and that's a project for another day. What I'm going to do today though, is I'm just going to install this latch.
Here we go. We've got our cable with our little ball on it. That goes inside here. I'm going to put that in first and I'll show you how it looks. Okay, Let's see if I can do it so the camera can see. Yeah, here we go. I'm going to put the ball straight in that hole just like that, and I'm going to bring it down. Now it's nice and locked in. I'm going to take this, I'm just going to squeeze it, give it a little tug.
It moves a little bit, but the one thing that you need to pay attention to, is it doesn't go this direction. It can go that direction a little bit. That's okay. We can't have it going this direction, because when we pull, it's going to want to pull this metal piece this way, squeezing essentially. It really can't go that direction. That's perfect.
Now what I'm going to do, I'm going to bring it and try to grab that cable. I'm going to try to pull it back through. You could try to push it through with just the plastic, but by doing that, you're just going to push on that cable and it might not really want to work that well for you. Let's just do it the right way.
If the cap's in the way, just give it a little twist. We're going to listen for a couple little snaps. Hopefully we'll hear a snap. There it is. Okay. I'm going to go up and I'm going to pull on the release up there, and you just watch right here and let me know what happens. I guess you can't let me know, but let's watch it.
Perfect. We can give it a little try. Wonderful. Just double check, make sure that's clicked. Now, we'll go ahead and we'll put in our little push pin over here. We're just going to line this all up, here we are. We've got our little push pin with that still out. We didn't lock it in, if we did, just unlock it. Okay. It's going to go right inside that hole. Let's see, here we are. Locked in.
We'll close our trunk. Now we've completed our service. If you need any more instructions on either something like this or any other vehicle, you can always leave it in the comment section below. Thanks for checking in.
Thanks for watching. Visit 1AAuto.com for quality auto parts shipped to your door. The place for DIY auto repair. If you enjoyed this video, please click the subscribe button.
Shop Products
How to Replace Fuel Filler Pocket 2009-14 Ford F-150
How to repair, install, fix, change or replace a rusted, damaged, rotted, bent or leaking fuel tank filler pocketon 11 Ford F150
