How to Replace Front Window Regulator 2007-13 GMC Acadia
Created on: 2016-10-18
New Window Regulator from 1AAuto.com How to repair, install, fix, change or replace a slow, stuck, cracked or damaged window regulator on 07, 08, 09, 10, 11, 12, 13 GMC Acadia
-
step 1 :Removing the Door Panel
- Pry off the trim piece inside the door pull with a pick
- Pry off the wood trim piece on the door handle with a pick
- Remove the T30 Torx screw from the door handle
- Remove the two T30 Torx screws from the door pull
- Remove the trim from the door lock with a pick
- Pry out the door panel with a door panel clip tool or putty knife
- Lift the door panel up
- Press the door latch cable tabs and remove it from the opening
- Slide the cable through the notch and remove ball from the release
- Disconnect the door panel wiring harnesses and clips
-
step 2 :Removing the Window Regulator
- Pry off the plastic clips from the foam pad
- Remove the foam pad
- Remove the weathershield
- Remove the two plugs from the door
- Remove the two 10mm bolts that hold the window to the regulator
- Raise the window by hand
- Hold the window in place with painter's tape
- Remove the 10mm bolts from the window motor
- Remove the two 10mm bolts from the regulator
- Disconnect the window motor lead
- Pull the window regulator out through the door
-
step 3 :Reinstalling the Regulator
- Insert one of the bolts into the window regulator
- Push the regulator into the door
- Hang the regulator by its bolt
- Insert the two 10mm bolts into the regulator
- Insert the 10mm bolt into the window motor
- Remove the painter's tape from the window
- Lower the window onto the regulator
- Insert the two 10mm bolts that hold the window to the regulator
- Insert the two plugs into the door
- Replace the weathershield
- Insert the foam insulator into place
- Tighten the clips to the foam
-
step 4 :Installing the Door Panel
- Press the door panel connectors into the door
- Connect the door panel wiring harnesses
- Insert the door latch cable into the opening
- Set the retainer into the latch
- Line the panel up
- Snap the retainers into the door
- Tighten the T30 Torx screw to the door handle
- Tighten the T30 Torx screws in the door pull
- Press on the trim piece in the door pull
- Press on the trim piece inside the door handle
- Press on the lock cover
Tools needed
-
Razor Blade / Gasket Scraper
Socket Extensions
T30 Driver
Painter's Tape
10mm Socket
Ratchet
Pick
Hi, I'm Mike from 1AAuto. We've been selling auto parts for over 30 years! We're dedicated to delivering quality auto parts, expert customer service, and fast and free shipping, all backed by our 100% satisfaction guarantee. We've created thousands of videos to help you install our parts with confidence. That saves you time and money, so visit us at 1AAuto.com, your trusted source for quality auto parts.
In this video, we're going to be working on our 2012 GMC Acadia. We're going to show you how to remove and replace your front window regulator and motor assembly. If you like this video, please click subscribe. We have a ton more information on this vehicle, as well as many other makes and models. If you need this part for your car, you can follow the link down in the description over to 1AAuto.com
Here are the items you'll need for this repair: 10mm socket, T30 Torx bit, ratchet, socket extension, painter’s tape, flat head screwdriver, razor blade, pick tool
Locate this notch in this cover panel inside of the door handle. Pull down. We're using a 90 degree hook pick here, but you could also use a trim tool or a small flat blade screwdriver. We'll also remove this cover inside the interior door latch. Again, there is a specific notch for you to pull from. Pop that panel out as well. This screw and the two behind the first cover we removed come out with a T30 Torx socket, a ratchet, and an extension. Lift up on your door lock. Using that same pick, we'll go in and release this panel to remove the actual lock.
On the bottom of the door panel, you'll find this notch which is designed for a plastic interior trim removal tool available from 1AAuto.com. You could also get this done with a pair of flat blade screwdrivers if you tape them up to try to protect the paint and the plastic panel, but these are the best solution for it. You want to push this up in between the panel and pry out until the plastic clip pops. You'll be able to see more of them as you pull more of the panel off. Get the forked end of the tool on either side of the pin and pry out. Be sure to hold the panel out, otherwise when you're moving around looking for these pins, and they could fall back in and make you have to start over. Once you have a few of the pins out, you may be able to just reach back and pull the rest of the panel out by hand.
Once all the clips are released, you can lift up, release the door latch cable by pushing up on the leg at the bottom and prying down on the one at the top, pulling the cable through the opening. You can then get the bare cable out. Slide it through the notch. Rotate it around, and pull the ball out of out of the release. Disconnect the electrical connectors through the door panel. It's the bottom green and bottom gray. Remove this clip retainer. This is another place where an interior trim removal tool comes in handy. We'll have to remove the clip from its retainer here as well and the gray one below it. Disconnect these as well. You can now set the door panel off to the side.
Then we'll use our trim removal tool or you could use a pair of side cutters to get back here and pry or a screwdriver, but this is the best way to do it without damaging the panel. Pry out on the two clips: one there and one down here at the bottom. Once the foam is out, we can remove this weather shield. The adhesive they use here can be pretty tough, so sometimes it's nice to take a razor blade and just cut right down the middle of the adhesive.
Once you get it going it's a lot easier to remove. We use our trim tool again, and pop out these two rubber plugs here inside of the door panel. This one reveals one of the bolts to remove our window regulator, with this one is an opening to allow us to access the bolt that clamps the window together. We'll have to move the window up now until we can see that bolt in the opening. Reconnect these two connectors that go to the window motor and regulator on our door panel.
We'll turn our key on in the vehicle, and roll the window up until we can get our 10 millimeter socket through that bottom opening, and onto the clamp for our window. Right there is perfect. Now we'll shut our key off, disconnect the panel, but keep it close because we'll need it again in a moment. Using our 10 millimeter socket ratchet and extension, we'll fully remove the 10 millimeter bolt here at the bottom of the window, and the other one which we can access through this opening now that we rolled our window up. Once those bolts are out fully, we can slide our window up and tape it up out of the way so we can get our regulator out.
Make sure you have painters tape ready to secure the window at the top of the opening. Alternative to the tip because it's a little cold in our shop for that tape to be adhering to the window properly, is to use little strips of cardboard. You want to tear them off about that big, fold them in half. You're going to want a few of these. The same concept that I've done with our trim tool here, and if you have these this is another option. Without the trim tool, you simply take the cardboard and wedge it in between the weather strip and the glass nice and tight. Go ahead and do that in a few places, and it will hold our window up while we work.
Disconnect these three screws securing the motor and the bottom of the regulator here with a 10 millimeter socket and ratchet, as well as the bolt that lays behind the top plug we removed earlier. Once the last bolt comes out, reach in and move the regulator until we can get the connector off the bottom of our window motor. Push that red safety tab out, and pull the connector down. Then it's just a matter of finding the right angle to get this regulator out of the truck.
The window regulator will be reinstalled with the motor facing out, and this stud is the one that came through the opening over here. We'll go ahead and place it back inside of the window. Be very careful not to bend this in anyway, otherwise it could change the path of your window going up and down, and potentially cause it to break. Connect the electrical connector to the bottom of the motor, and push that tab in until it locks. Make sure that the window regulator is on the front side of the glass, being between you and the window when you feel it up at the top.
Realign all the holes, as well as getting the stud back through. Reinstall all of your hardware. Once all the hardware has been started, tighten it down with your 10 millimeter socket and ratchet. Now place a hand underneath the window and remove the cardboard wedges we installed. If they fall down somewhere you can't get them, push the window down some, and then work it back up so you can get finger onto the cardboard. Lower the window back onto the regulator. The regulator should come in the correct place to reinstall the glass, but if it doesn't, reconnect the switch the same way we did before, and move it to the appropriate location. Once the holes are lined up you can reinstall your two 10 millimeter bolts into the window brackets.
Since we have to reach through the opening here to install this bolt, we want to make sure it doesn't fall out of our socket. You can put a little bit of break grease or White Lip wheel bearing grease, whatever you have handy. Just get a good thick coat of it there around the sides of the head of the bolt. When we put it into our socket, it stays in there while we line it up. Then you can tighten down your bolts with your 10 millimeter socket and ratchet. Now you're ready to reinstall your door panel.
Reinstall the access plug into the side of the door. Reinstall the weather shielding inside of the door. Just pat down along all the edges to make sure that adhesive sticks back together. This stuff's pretty resilient so as long as you don't tear it up too bad removing it, it sticks back together nicely. Then we'll take our foam insulator here, line up the pins, and push them right back into place.
Reconnect your electrical connectors. Remember that these two here have to be snapped back into their spots on the door before we can reconnect the mirror sides. Reinstall the door latch cable into the opening at the back of the handle. Pull the cable out, and then set the retainer back in. Lift your door panel up over the lock rod here. Once the panel's lined back up, snap all the retainers back into place. Once the retainers are all clipped back in, you can reinstall your three T30 Torx screws. Reinstall the plastic covers. These ones have tabs on the bottom that need to be set in first, and then you roll the clips at the top over until they snap. The one behind the door latch simply snaps straight into place. Slide the lock cover over as far as it'll go. Snap the latch back in.
Thanks for watching. Visit us at 1AAuto.com for quality auto parts, fast and free shipping, and the best customer service in the industry.
Shop Products


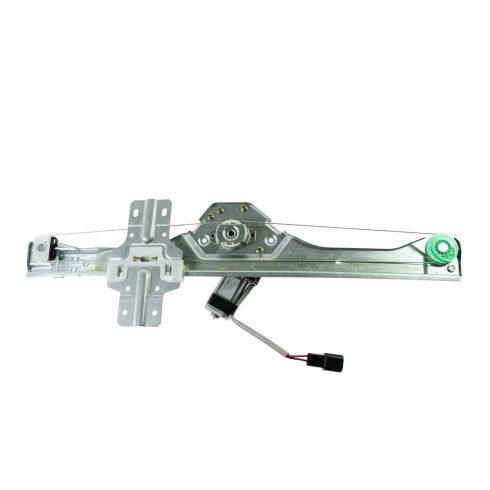
Chevrolet GMC Buick Saturn Rear Driver Side Power Power Window Motor & Regulator Assembly TRQ WRA52262
Part Details:
- Power
- 2
- No
- No
- Galvanized Steel
- Nylon
- Yes
- 7.87 in
- No
- 8
How to Replace Front Window Regulator 1999-2007 Chevy Silverado
This video shows you how to install a new window regulator on your 1999-07 Chevy Silverado.
