How to Replace Front Wheel Hub Bearing 2011-16 Ford F250
Created on: 2019-06-09
Check out this 1A Auto video that shows you how you can replace the front wheel bearing and hub assembly on your 11-16 Ford F250.
-
step 1 :Removing the Wheel
- Pry off the lug cap
- Raise and support the vehicle with minimal weight still on the wheel
- Loosen the eight 21 mm lug nuts
- Raise and support the vehicle
- Remove the lug nuts
- Remove the wheel
- Hammer or pry from behind the wheel if it is stuck
-
step 2 :Removing the Wheel Hub
- Remove the tie rod cotter pin
- Remove the tie rod nut lock
- Remove the 21 mm tie rod nut
- Hammer beside the tie rod on the knuckle to loosen it
- Support the tie rod out of the work area
- Remove the 8 mm nut securing the ABS sensor to the knuckle
- Remove the two 8 mm nuts securing the ABS wire brackets
- Remove the two 21 mm brake caliper bracket bolts to remove the brake assembly
- Hang the brake assembly on a caliper hanger to prevent stress on the brake hose
- Remove the brake rotor
- Remove the ABS wire from remaining retainer clips
- Disconnect the ABS wire electrical connector
- Remove the three T27 screws from the locking hub cover
- Gently pry the locking hub assembly from the wheel hub
- Remove the axle snap ring
- Remove the four 21 mm nuts securing the wheel hub to the knuckle
- Remove the wheel hub from the knuckle
- You may want to use additional rust penetrant, a hammer, or other methods to assist removing the wheel hub assembly
-
step 3 :Prepping the Wheel Hub For Installation
- Install the new mounting studs into the wheel hub assembly
- Tighten the mounting studs by tightening two nuts together and using the top nut to tighten the studs
- Clean the hub mounting surface on the wheel knuckle
- Clean the stud holes on the wheel knuckle
- Install the rubber seal over the mounting surface of the wheel hub assembly
- Lightly grease the mounting surface of the wheel knuckle
- Replace the brake backing plate on the wheel hub assembly
-
step 4 :Installing the Wheel Hub
- Insert the mounting studs through the holes in the knuckle
- Replace and tighten the four 21 mm hub assembly mounting nuts in a crossing pattern
- Install the axle snap ring
- Replace the brake rotor
- Replace the brake assembly
- Replace the 21 mm brake caliper bracket bolts
- Torque the 21 mm brake caliper bracket bolts to 166 ft-lb
- Replace the two 8 mm bolts securing the ABS wire brackets
- Replace the 8 mm bolt securing the ABS wire to the knuckle
- Replace the tie rod into the knuckle
- Replace the 21 mm tie rod nut
- Torque the 21 mm tie rod nut to 85 ft-lb
- Replace the tie rod nut lock
- Install a new tie rod cotter in and peen it over
- Reconnect the ABS wire electrical connector
- Replace the ABS wire in the remaining retainer clips
-
step 5 :Reinstalling the Locking Hub
- Clean off the outer gasket from the locking hub cap
- Remove the locking hub rubber O ring
- Install a new rubber O ring
- Place a new outer gasket and align it with the guide pin on the locking hub cap
- Insert the locking hub into the wheel hub with the guide pin fitting into one of the holes
- Replace the three T27 screws
-
step 6 :Replacing the Wheel
- Slide the wheel onto the lugs
- Replace the lug nuts and tighten them in a crossing pattern
- Lower the vehicle to the ground with minimal weight on the wheel
- Torque the lug nuts to 165 ft-lb in a crossing pattern
- Lower the vehicle completely
Tools needed
-
Socket Extensions
Hammer
Rust Penetrant
Pry Bar
Jack Stands
Liquid Thread Locker
Pocket Screwdriver
T25 Torx Socket
21mm Socket
Side Cutters
Brake Caliper Hanger
Snap Ring Pliers
8mm Socket
Floor Jack
Hey friends, it's Len here at 1A Auto. Today I'm working a 2013 Ford F-250. I'm going to be doing a front wheel bearing. It's going to be fairly easy. I want to be the guy that shows you how to do it. If you need this or any other part, you can always check us out at 1aauto.com. Thanks. Okay. So, we've got the vehicle safely raised and supported, so it's going nowhere. We'll just check the front-end. I just give it a little wiggle so I know what I'm dealing with. Do the same thing to the other side, just in case you need to replace any other front-end parts. At this point, I'm sure you know what you need and what you don't.
Anyway, I'm going to go ahead and remove this cover right here. It's a little slot. It takes something as basic as a rag, just so I don't mess up my wheel. I'm just going to go like this. These lug nuts are 21 millimeter lug nuts. Okay. And the wheel's going to be fairly heavy obviously, it's a 20 inch wheel. So, just keep that in mind when you're removing these and it's time to remove the wheel, it's going to be heavy. Now I can walk away, I don't have to worry about the wheel falling. I can put down all my lug nuts, so I can grab on to this securely or firmly. You can shake it around if it hasn't broken free. It's going to be fairly easy. All I'm going to do, if you take a rubber mallet or whatever you have and try to whack on the back of the wheel/tire. If you're using a metal hammer, obviously don't hit the wheel. But a rubber mallet, you can hit the wheel. It's okay, it won't hurt it.
But what I'm going to do is I'm going to use a long pry bar, I'm going to go between the knuckle right here and wheel and I'm going to pry it out. I still have that lug nut on there, so this wheel will not come off and hit the ground and come flying and hurt me or anything like that. So, I'm just going to go like this. I'm going to use a little bit of leverage, it should want to break free. Here we are. Pretty corroded on there. Okay. Take off this last lug nut. Here comes the heavy wheel. Just going to shake it around a little bit. Woo. All right. We got that off. We'll wheel this over to a safe position and then we'll continue on.
So, we've got a little bit of penetrant spray. Let's go ahead and use it. Just going to spray here, okay. Any time you do front-end work, it's always a good idea to do an alignment, so any type of alignment areas that have threads, you want to do those, going up and around the whole thing. I'll do those later. But I'll continue with what I'm going to be taking apart. So, I'm going to be taking off these caliper bracket bolts. The odds that this penetrant's going to get in there is pretty nil, but I'll just put a little spritz on there. Of course I'm wearing safety glasses, just to mention, in case any of this sprays back up in my face. Okay. We've got a little bolt up here. This holds the ABS wire on. And there's a couple more up this way, so I'm just going to spray those. That's just going to help me get everything out down the line.
This rotor's going to have to come off, so I'll spray that. I just like to spray around all the studs. You can do you. You do you, boo boo. That on there. We're going to be taking off this right here. This is the locking hub, so there's a couple little bolts here. We'll just get everything sprayed ahead of time. This is your lock, obviously. It should want to turn. Obviously this one hasn't been maintained very well. God forbid you ever have to really turn it in the case of an emergency and have to put on your four wheel drive, right? But anyway, this should want to turn. So, you can grab pliers or whatever you want to do. Anyway, I'm not worried about that right now. I just wanted to show you spraying everything down ahead of time.
So, now that we've got that done, I'm just going to make sure that I got all the tools that I'm going to need. I'm going to take off this cotter pin and take off this little whatever you call it. Nut lock, I guess you'd say right here. It slides right up. And then underneath here, there's a nut. We're going to take this off and then put it back on just a couple threads, and we're going to whack right here with a hammer, okay. If you have a new one, you can go ahead and cut it. If you're reusing it, obviously be a little bit more careful with it. I have a whole bunch of cotter pins at my disposable, so I'll be replacing it. So, I'm really not too worried about damaging it. But essentially, you just want to do whatever you've got to do to get it out of here. This little thing right here, it should want to lift up. There we go. Okay. We'll put this aside.
Next is our nut right there, check my socket, 21 millimeter. You can use a ratchet, you can use your airgun, whatever you've got. I'm going to use an airgun. Okay. At this point, this could fall down, so you want to be careful obviously. I'm going to make sure that I'm safe. I'm going to put my nut back on. Okay. Just a few threads because I'm going to be taking it back off in a minute. But now that this is on, I can whack the knuckle right here with my hammer, and this should drop down. Once it drops down, it'll get caught by the nut and then I can continue on.
Here we go. I'm underneath. I'm going to be very careful obviously, I don't want anything falling down and hurting me. I'm going to use my big, fabulous hammer. I'm going to try to whack right here. You can put a little smiley face or whatever you have to do to make sure that that's where you hit. You don't want to obviously hit the rotor, this boot, the stud especially. Okay. So, anyway, just aim for it and hit it. Drop down. I can see the stud, wonderful. I'm going to come up and out from under here, lift up on it. Take this nut off and let this swing down. You can tie it up, you can do whatever you need to do. I'm not super worried about it right this second, but you know what? Maybe I will just tie it up, just for the purpose of the video, safety wise, but it's your prerogative.
So, now what we're going to do, so we make sure we don't stretch this ABS wire. Even though we're replacing it, it's always good to have it to make sure that you pay attention to that. And if you can overt it in any way, it's always just good habit to do that, okay. I know we're replacing it, so you can say what you want. You can even just cut it. You do you. But anyways, eight millimeter, eight millimeter. And up here, eight millimeter. Okay. I'm going to remove those by turning to the left, use whatever you've got to do it. Show you what this looks like. That's what the bolt looks like. You can tell that it's got the little shank there. That's where it goes through the wire, so that you can't really over tighten it, overtightened on these would be, well, broken. So, let's not over tighten them.
This one. It's very important to make sure that you remember these do need to pivot, okay, so that when you're turning the wheel side to side, back and forth, these can do what they're supposed to do. That's part of the reason for the shank. There we are. Same exact bolt as the other one. This one right here, I've got the shock in the way. I'm just going to go ahead and use a wrench, okay. Sticking with my eight millimeter though. It should be pretty much ready to come out. Come on. There it is. Same bolt as the other two. Easy enough to remember.
Now, we've got plenty of slack here. If you wanted to, you can go ahead and pop this one up too. I mean, whatever. It's going to have to come up either way. Here we go. Okay. Don't mind that. This is just how I hung the thing, so don't worry about it if your truck doesn't have a big, orange strap on it. I'm going to take my 21 millimeter. I'm going to remove this and this right here. Something to note is this caliper assembly is going to be super heavy, so when you remove it, you're going to want to make sure that you can hang it on something, maybe a spring here or whatever you can. But you definitely don't want to let it hang from this brake hose. Super important. You don't want to put a tug on this. This is under high pressure obviously, it's how you stop your vehicle. So, we don't really need to get into that so much.
But if you have something like this, it's metal, okay. Just hang it from here. We'll have it ready to go. I'm going to remove these. Once I get it off, I'm just going to hang it. You can use something like a wire tie or whatever you want to use. Just make sure it's strong enough so this caliper does not want to fall and put a tug on that brake hose. So, to continue, we'll take out our bolt. I'm just going to start it back in a couple threads, just so it can't fall down. I'll take this one out. That up there. It's the same as this one, by the way. Now, I'm just going to go ahead and take out this bottom one while I'm holding on to the caliper. Slide it off. Here we are. There's our caliper.
You can just take a peek if you want, make sure you don't see any fluid coming out. If you see any fluid coming out, well, you know what time it is. Time for a caliper, that's what it is. Obviously you'd want to replace those as a pair, by the way. So, anyway, I'm just going to hang it. That puppy's going nowhere. Nice. Let's keep rolling. I'm going to grab a lug nut, I'm going to put it on here. Just going to start it on, so this rotor can't go anywhere. Okay. Now what we're going to want to do is we're going to want to remove this rotor from the hub. To do that, there's multiple ways of doing it. It's kind of a preferential thing what you need to do. But basically, just get your rotor off. If you end up using a hammer, you want to be careful hammering on a braking surface obviously, you'll cause a pulsation. Keep that in mind.
Something that might be a great idea to do is to try to get a lot of this corrosion that's around here, get that out of the way, maybe try to pick it. And if you want to spray it again with some penetrant, it's up to you. And then we'll go ahead and start trying to get this rotor off. There's going to be multiple ways that you can go about doing this. You can try to hit it with your hammer along here, you also take the risk of hitting your studs, which you're going to be replacing anyway, that comes with the wheel bearing. So, it might be a great idea to go along here. It's completely up to you. Or you can just take something as simple as a piece of wood, whatever you might have access to, and just use that in between your hammer and your braking surface and try to bonk it off. Okay.
Whatever you decide you want to do, you do you. We just need to get this rotor off the hub. Make sure there's a little lug nut on there. Okay. We don't want this rotor being able to just go ... fall off, hit you on the foot, hit you anywhere. So, I'm just going to go this way for now. See if I can break it free. Give it a little spin. It's coming. not gonna have much wood after this. There we are. So, we've got it broken free. Now, we're just going to get our rotor off of here. It's going to be super heavy. There we are. We've removed our rotor. We'll check it out. It seems like it's pretty good. This is going to be a brake pulsation by the way, just to state. But it's not my truck, so I'll move along.
So, now I'm going to continue removing this ABS wire. This just runs along right here. Just going to use a small pocket screwdriver. See if I can get it off here. There we are. Our next wire's right under here. I'm going to use my little forky tool. Slide that out. There's a little red connector right there. That's actually a lock, okay. So, we need to unlock it. I'm just going to try to get it in between here and try to push it upward. So, whatever you need to do to get it up. Let's see if I can get it. Sometimes they stick. It'd be preferable if I didn't break it, which it looks like it's going to. So, I'm going to try to spray it with some penetrant, let it sit for a second, and we'll move along.
I've got this sprayed down now. It's been sitting for a little bit. Just going to take my small pocket screwdriver and I'm going to try to come in from the bottom right here. You can see a little red tip. I'm going to try to pull it up. And then like that, it just popped up. Now I can get that, cool. Right here, black tab in the center. I'm just going to try to squeeze that. Okay. At the same time, I'm going to try to pull down on this. If that doesn't work, you can always just come under here and do the same thing. I'm just going to pry, see if I can get my screwdriver in there. Sometimes you have to be a little forceful with things like this. But obviously, you don't want to break anything that we're not supposed to break, like this end of the ABS wire. Okay. You can, like I said, you can try to get under here. You can try to pry up on this. Try to give it a tug if you want, if it doesn't seem like it wants to come out that way. And it did.
But anyway, if it didn't seem like it wanted to come out that way, you just take some pliers, hold on to the backside, squeeze right up against here. That should give you plenty of grip to want to pull this down. Okay. Essentially disconnect it. Look up inside your wiring harness real quick. Look for any funny colors. You don't want any rainbow colors in there, okay. When it comes to electrical, rainbow colors are bad. All right. I'm just going to get the rest of this ABS wire out of the way. Okay. Turn this, I can see there's a stud that comes through from the wheel bearing through this knuckle and then it's held on by a nut there, a nut there, one over there and one over on the other side. I'm just going to spray those with some penetrant spray. I'm going to spray around where the wheel bearing goes through the knuckle as well.
And then I'm going to leave it and I'm going to move on to the next part, which would be removing the locking hub out front. So I'll grab my penetrant, eye protection of course just in case anything comes flying back, hits me in the face. Worst case scenario, it just messes up my beard, which would be horrible, but at least I'm not blind. There we are. Got plenty of penetrant on there now. Now, I'll move ahead to the next step, moving these tors head bolts right here on the locking hub. Okay. So, here we are. We've got Torx bits, or Torx head bolts, I guess you'd say. They're T27. This is what the tool looks like right here. Okay.
So, now I'm going to remove these three bolts right here. I'm going to use a T27 bit, Torx bit, 27, and I'm going to put him in here and I'll turn him to the left. Here's my bolts, all three are the same. That's nice. Now what I'm going to do is I'm going to try to separate the locking hub from the hub unit itself. You can use whatever you've got to do it. This is what I've got in my hand, so I'm just going to use this. Is it the right thing to do? I don't know. Don't judge me. I'm just going to try to pry here. There we are. We'll remove our locking hub unit. That's what it looks like. Nothing too crazy or special about it. We're going to replace the seal that should go right there. And yeah, now we can see inside there. Definitely looks like we had some water getting in there at some point.
There's a snap ring in there. That's probably going to be the hardest part of the job. You might hear me kicking and fussing and crying a little bit, but I'm sure we'll get it done. That's what we're here for. Here we go. Bring on the pain. We've got our snap ring. This is what's actually located in there. This is just the new one that came with the bearing. Thank you, 1A Auto. We've got some snap ring pliers. We want it to be able to go inside these little holes. And then when I squeeze, I want to be able to separate. You'll watch right here. That's going to separate and it's going to release from the axle. Once it releases from the axle, I'm going to try to pull it and work it out. And then I'm going to replace it with this quality new one right here. Okay.
When you're doing it and you're deep inside there, it might slide off a few times and you might keep going like this, bang, and squeezing your fingers. Bang, every time you're trying to get it on there, bang, you get your fingers in between here. It's going to hurt, okay. It might seem like it's easier just to grab it and go this way, but don't. Try to keep your fingers nice and safe and squeeze full-handed. Okay. That's just from doing this seemingly forever and hurting myself plenty of times. A little bit of experienced passed down. So, here we go. Fingers are safe, everybody's safe. Just going to try to squeeze it. Holy cow. That's never happened before. All right. No crying or fussing or anything that time. That's my first time ever and it was caught on camera. I'm going to save that one.
I've got a 21 swivel. All right, swivels, extension, half-inch air gun. You do you. But it's a 21 millimeter nut back there. Safety glasses of course. I'm just going to turn these to the left, try to blast them off. We've got all those out. We've got one still on there a little bit. Our next step is to separate the bearing from the knuckle. This is the good luck part, okay. Probably the second hardest part. Well, I guess it really wasn't that hard to do that snap ring this time. But generally speaking, it really isn't that fun. So, as long as you've got that snap ring out of there, now you're clear to get this bearing out of here. Okay.
Okay. Here we go. I want to show you a pretty neat trick on trying to remove the wheel bearing from the knuckle. All we want to do basically right now is break it free. That's going to be the hardest part. Once we break it free, we can get some penetrant in there and we can really get to working at it. But a lot of times, getting it to break free from the knuckle is super hard, causes a lot of banging and issues and it's just going to be a pain. So, we're going to do something different. We're going to grab our nut for our tie rod. I'm going to get my tie rod back here. Just going to get back into the knuckle where it belongs.
I'm going to use my 21. I'm going to re tighten it on there. There we are. A 21 short. This is a impact socket, by the way. You don't want to use chrome. We're going to use an extension. We're going to go to one of our studs that we have in the back here. We're going to make sure that we have a nut on there, at least five, six turns in. And then what I'm going to do is I'm going to get inside the vehicle and I'm going to start it up and I'm going to turn the wheel to the left, and that'll press my extension up against this right here. Once it gets to the point where it's bottomed out, I'm going to continue. And just the force of the power steering on this, because it's super strong, it's going to apply pressure to the wheel bearing and try to separate it for me. So, hopefully the truck will do the majority of the work for me in this instance.
All right. So, I'm going to hop in. I'm going to spark it up. I'm going to turn the wheel and I'm going to hope it works. Okay. So, here we go. What I'm going to do is just by hand, I'm going to try to turn this just so I can get this all lined up and just barely touching. And then I'm going to go ahead and make sure that everybody's safe and clear. And I'm going to turn the wheel up inside the vehicle with it running. I'm going to get it so it's lined up where I want it, just like that. That's going to be a perfect pressure point. It's going to put pressure between this right here, the knuckle, and it's going to hopefully press my bearing out. Okay. It can't come out all the way. I've got nuts on there and everything, so we don't have to worry about that, but safety first. Make sure you don't have anybody's face anywhere near there when you're doing it. I'm going to get up in here, I'm going to start the vehicle. Might be a little loud, this is a diesel. Here we go.
All right. Now I'm going to release it. I'm just going to see if it worked. Yes. We've got separation. That's all we need. All we needed was a little bit of separation. Perfect. So, now that we've got that, we're going to go ahead and blast it with our penetrant again, let it work its magic, and then we'll continue on. All we need is just a little bit and it gave us what we needed. So, now we're going to go with the assumption we have our tool in here, we know what we're going to do.
Something that I like to mention is that when you're in there and you do start up the vehicle, you don't want to step on the brake because your caliper will squeeze and there's going to be nothing there for it to squeeze against, so you're going to push your caliper pistons out and it's going to cause an issue. Also, when you start the vehicle, if your ABS wire isn't plugged into the vehicle still because we already disconnected it, you're going to get an ABS light. Maybe you already have one or maybe you don't. At this point, you can go ahead and reconnect this if you want or don't, but you're going to have an ABS light if you don't, okay. So, at that point, you just need to get it cleared, whatever, blah, blah, blah.
Now that you know, don't step on the brake, if you don't want an ABS light, plug back in this. Now that you know that, we'll continue on and I'm going to show you how to remove the wheel bearing. So, now I'm going to remove our 21 millimeter head nut right there. This is going to fall down again. So, we want to be careful for that. Whatever you use to put it up before, whether it was strapping or you just let it dangle, whatever you did, just have it ready. Okay. It's been pressed back up in here, so once again, keep your nut on there. Bonk on the knuckle. This is going to come down, and then you can situate it however you need to do, okay. Nut's on there, I'm safe. I've got my safety glasses. I've got my big, fabulous hammer. I'm going to whack the knuckle. Bing, bing. Winner, winner, chicken dinner. Get this back down. Bring it over here. I'm just going to get it tied up for safety's sake.
With our new bearing, it's important to remember it comes with brand new studs, okay. So, the bearing itself doesn't come with new nuts. So, you don't want to go ahead and mess up these nuts. We want to make sure we save these, okay. But it does come with new studs, so we're really not worried about messing up any of the threads. Now what you can do is you can take a hammer, bonk, bonk, try to get it out of there, being careful for your axle or damaging anything else that's around there. Try and try as you will. Try to get that one up there. You can probably spin the axle. You do you, boo boo.
What I'm going to do is I'm going to use my air chisel and I'm just going to try to drive it out, okay. I do want to make sure that that bearing does not fall out on its own while I'm hammering on this one. So, all I'll do is I'll just make sure that at least one of the studs, not one that I'm hammering on, has a nut on it. Okay. That's going to make it so this bearing can't fall off, hurt me, damage the floor, I don't know. Anything really. It's safe. Safety first. Here we go. I'm going to use my air chisel just right on the stud. I'm going to try to drive it out. See if anything's happening. It looks like it's starting to walk a little bit. It's coming out. Our penetrant spray's doing its job. Very nice. All right. Cool.
Now, you can go over here. Go over on the other side. Over here, on the other side. Just keep walking it back and forth because if you keep going on one side, what's going to happen? You're just going to kink the bearing in, it's going to get stuck. So, just turn it. I'll turn it. We're going to come in from this side and hit that one. Okay. Same thing. You do you. Use your hammer, use your air chisel, whatever you've got access to. Just try to drive it through.
Let's say you're hammering, you're hammering, you're hammering, it's not coming off. It's taking its time. It's becoming a real pain in the butt. You've had enough. What about if we took our hammer and we hit right here? Bang. Being careful for this obviously, you can get this out of the way. It doesn't matter, it's garbage. But we don't want to mess up our backing plate. You can hit here, try to break it free. Hammer on the other side, hit there, bonk, bonk, bonk, bonk. Essentially just get the bearing out of the knuckle. Whatever you have to do. There's plenty of options on what you can do. You can come from the back, you can come from the front. Whatever you need to do to get this bearing off. Just make sure you have at least one nut started on there, so the bearing can't fall off and hurt you.
Right. So, I'm just going to show you what I'm talking about. I'm going to use my big, fabulous hammer. I'm going to try to whack on this part of the bearing, okay. And I just want to separate it from the knuckle. Trying to be careful not to damage this backing plate. If you nick it, well, it's your truck. It's probably not really that big of a deal. It's not integral. You just have to try to straighten it out, so nothing hits up against your rotor. Okay. I'm just going to go ahead and whack this. Yep. First hit, right? But the bearing's coming, so that's nice.
Okay. So, we've got a gap there. I'll straighten all this out after, it's going to look better. We've got the nuts on the back side there. Those are actually what was stopping it from wanting to come out further actually, so that's nice. We are cruising. It might be a little harder to hit it from this side. It all depends on if you're a lefty or a righty. Obviously, this side of the backing plate I really don't want to try to bang. But yeah. We can just go ahead. We'll bonk over here a couple times, then we'll go back over there, back and forth, back and forth, and get this bearing off. Cool. That nut's getting pretty close now. I'm going to go back over the other side and check this side nut. That one's really close as well. So, I'm going to get it to the point that it's pretty much ready to come off. Just going to try to keep whacking over here and try to get this all the way over.
I think this is pretty much ready to come off. Now, I'm going to get my nuts off of here, hold my bearing. Got a wire ready to come off with us. There we are. Now we've got our bearing off with our backing plate. We'll go ahead and replace the bearing and we'll move along. We have our original wheel bearing from our 2013 Ford F-250 that we're working on, and we have our brand new quality 1A Auto part right here. This is a wheel bearing assembly. It comes with the studs that you need that go in here for mounting. They're brand new, so that's always great. Last thing you want to do is try to remove these and reuse them again. That's never any fun. Comes with a brand new sensor, okay. It's got the sensor wire. Perfect condition. It's all nice and bundled up, so it's not damaged. The sensor of course is part of the wheel bearing. You don't want to take the one out of your old wheel bearing and try to switch them because they're pretty much just geared up for each other, okay.
There's our sensor. There's our sensor. We've got our studs, studs. On the bearing right here, there's a little gasket, a little rubber O-ring. It goes all the way around. We've got a brand new one, okay. Comes with our new wheel bearing. That's very nice. So, as you can tell ... Oh, yeah. To continue actually. Eight lug studs, sorry. Eight lug studs. You can see inside, you've got all the grooves and everything. You've got the bearing in there. There we are. So now, as you can tell, we have a quality bearing that I would feel free to install in this vehicle and I'm pretty sure it will go in pretty easily. We've got all the parts we need. So, yeah. Let's do it. If you need this or any other part, you can always check us out at 1aauto.com. Thanks.
Okay. So, now we'll say that it's time to replace our bearing. We've got the old one out. We've got the new one right here. We've got our new studs and everything, so that'll make it come up to this height, just so you know. Anyways. New studs, new seal that goes on the bearing. But what do we have? We have the locking hub. This is just as important as the bearing itself. You want to make sure that it has this seal right along here. And also, there's a seal right here. And this helps keeps moisture and debris out, okay. You don't want any water getting in there, any type of debris, or else you might have a hub that looks like this. If this got in much further and it got into where the bearing and the axle and everything is in there, you would have more of an issue. Okay.
Also, let's say you were trying to take this off of your old bearing, which essentially goes right up on here, okay. You're trying to take out these bolts and ... one breaks or strips, or whatever the case may be. Now, you need bolts. Let's say that you need a tune up kit for that. You can go ahead and go on our site, you can get a hub service set. It comes with everything that you're going to need. I'll get that right there, this right here. We've got three brand new bolts, same exact as these. Perfect. Those will be great. We've got new seals. It came with two, just in case you're doing both wheel bearings or maybe you just want to have one for a bracelet, whatever. But essentially, that would go right here. Okay. So you can replace this of course. Set that aside.
Right here, we've got this seal, okay. This is essentially going to ride right along in here and or basically right there. And then this is going to go right there, okay. So, obviously if we're replacing all this stuff, you'd take this off, take this off, put on the new stuff. Obviously you want to get off the old gaskets, pretty basic. Then you just replace them with our quality set right here. This has everything you need to service your wheel bearing hub locker. Okay. The bolts, seal, seal. Right there, you've got a new bearing, why not just pay an extra couple bucks, get the service kit? Now we're there, you know your new bearing's protected.
Now it's time to install our studs on the back of the wheel bearing. They just go right in here. Brand new studs brought to you by 1A Auto Parts. There's multiple ways of putting these in. You could use something like locking pliers, or whatever you need to do. The best way that I've found to do it would be of course using some threadlocker. I'm just going to put a little bit on the threads here. I'm going to start it in and get it in as far as you need to go. You can get it in almost all the way by hand. That's great. We've got two of our nuts that we removed from the backside. They were essentially right here, except on the other side of the knuckle. So, I'm just going to bring those over and put one on like this, put one on like this. Now I'm just going to snug them up together. Okay.
So now that I've got these two locked together, they're not bottomed out on the bottom of the threads. I don't want to strip anything out. I can either use my wrench and try to tighten it, which would be great. Once you get another one in here, you can put a pry bar or whatever you happen to have, you can go that way, or you can just go ahead and do this. There we are. Now I'm going to hold the bottom nut and I'm going to reverse this top nut off. Just like that. I'll take this one off. Now we haven't damaged any threads. This is in nice and tight with our threadlocker and we can move along to doing the rest of the other three.
So now I'm going to get to cleaning here. My mom always told me to clean up my room. I've got to clean up my mess. I've got to do this too. Cleaning, cleaning. It's all I do. I guess I'm on my own now and I'm still cleaning, but here we go. I'm just going to get all this gunk out of here. Just try to get it as clean as possible. I'm going to put on some new grease, get nice and lubed up. Something to mention here is that this black thing in here, this is a seal where your axle rides, okay. See if I can get it to do its thing. Here we go.
So, our axle rides on the inner portion of that seal, so you want to make sure that it's in good shape, it's not torn or ripped or anything like that. This one looks pretty great. Try to clean up around here too. It's going to take maybe a piece of sandpaper or scuffing disc. Just try to clean it up a little bit. Try to get everything as nice and clean as possible before we go ahead and prep our bearing for installation. I've got my little scuffing disc here. I'm just going to try to smoothen out this surface. I don't want to take off any of the metal here. All I want to do is try to get off the debris. All right. So, there was a lot of really high spots there. They had a lot of buildup. That would've caused an issue with mounting the bearing because then the bearing and the backing plate and everything wouldn't have been sat on there correctly, or sitting on there correctly.
So, it's very important to make sure you clean that up. Of course clean this back up again. Try to get off the majority of the grease first, so hopefully it'll accumulate as little as possible. I want to get off as much of this metal debris as I can. I don't want anything to get in here and scour up the seal that's in there. If you're worried about and the holes are too dirty for you, you can go ahead and clean those out as well. You can do that with something as simple as a boar brush or whatever you might have. Just a boar brush. This being completely clean really isn't that big of a deal. It's just where the studs go through, so you don't really have to spend too much time.
There we go. Just going to grab a collection receptacle. I'm going to put it under there and then I'm just going to blast this a little bit with some cleaner and try not to get too much on the seal there, I don't want to dry it out. But essentially, the holes, maybe a little bit on a rag and try to clean this up the rest of the way. Okay. Got a clean rag. Hand protection, eye protection. I'm just going to go ahead and blast the hole. Try to get out the majority of that. Spray a little bit on my rag here. Just get all in there. This is nice and clean as possible. That looks pretty good. Clean enough for my house.
We've got our seal. This is going to ride right inside the lip on the wheel bearing here. Okay. So, you can take it. You can use a little bit of silicone paste, Vaseline, whatever you want to use if you want to. First, I like to put it into the bearing just like that. Okay. So, now this is situated, it's pretty much ready to go. All right. Come up here. And you can use something like silicone paste if you want. Just going to go right along here. This is right where the seal's going to ride. So when I slide the bearing in, it's going to be able to go in nice and easily without kind of peening over or anything like that. Okay. And I'm going to put a little bit here. It's all nice and clean stuff, not using old, dirty junk. There we go. Cool.
We've got all that done. I'm going to use a little bit more threadlocker. This is preferential. You don't have to use threadlocker if you don't want to. You don't really have to do anything if you don't want to. Who wants to replace the bearing on a Saturday? Nobody, but we're going to do it anyway. There we go. Just put it on there. That's where the nuts are going to ride. Okay. That's ready to go. We are cruising. Next we're going to need our backing plate. We're going to put it right on here, then we're going to slide it into the knuckle up there. And then we'll start putting the nuts on and bolting it down. I'm going to use some of my cutters. Just going to cut this wire tie, get it right out of the way. We'll recycle that later.
I'm going to take my wire. I'm going to put it up through my backing plate, just like this. This up in here. There's a little weight on that. Just get this stuff lined up. It should just want to push on. As you saw, I did nick it with the hammer, so I fixed it the best I could. There we are. Now we're clear to install this into the knuckle. Here we go. We're just going to get the studs into the holes in the knuckle. Slide it in just like that, being careful for our ABS wire of course. Get that up and out of the way. Okay. We've got our studs shining through. Okay. Now if you're lucky enough to having access to having brand new nuts, I would go with those. We bought some, so I'm going to use those. But if not, you can go ahead and use your old ones.
Now I've got my new nuts. Like I said, you can go ahead and use your old ones if you want. I recommend using some sort of threadlocker. I'm just going to start them all on and then I'm going to snug them up. I'm going to do this in a criss-cross pattern. Like I said, criss-cross. I'm going to start on the bottom over here. Once I get all these on, I'm just going to go around one more time. I got those tightened down. I just want to let you know that I did look to see if there was torque specs. I couldn't find any. So, I just went ahead and made sure that they were tight. I went in a basic criss-cross pattern like I showed you, just so when I tighten it up, it won't just be one side's tight and then I try to pull this side in, maybe it's sitting kind of cockeyed. I don't want that, so I went in criss-cross. Okay. It's the best I could do. I made sure they were tight. These puppies aren't going to come loose. We're good to go. We'll move along.
Our next step would be putting on this snap ring. If you went ahead and you tried doing this on your own and maybe you haven't watched this part yet, you haven't gotten to this point, you might have an issue getting this on. And that's because when you're doing this and you're putting the wheel bearing on, you can push this axle in a little bit. Okay. So, all you'd want to do is use a pry bar or a screwdriver or whatever you've got. Just give it a little push. There we are. And now we'll be able to get to the groove on the axle where our snap ring's going to go. Okay. Easy peasy. Hard part's going to be getting this on. I'm going to give it a try though. Switch over here. I'm a righty. Going to get it up close and I'm going to see if I can ... here. Once you feel it get in the groove, there we are. Yep. All right.
Now I'm just going to check it. I'll give it a couple little bonks. Just going to take my little bar. Just going to go around it. Make sure it's all tapped in. I can't move it around. It's definitely not falling off. It's okay if it spins a little bit, it is what it is. But as long as it's not going to come out of that groove. That'll never come out. Well, unless you use the pliers. Okay. So, it's time to put on this rotor. We can either put this one on or of course you could go on 1aauto.com and get a new one. It's really up to you.
Like I said, these marks right here. Some people say it's just a stain, but I can run my finger along it and I can feel it raised. That right there just means that water was sitting there for quite a while and its did its thing with the metal. Now, it's got raised bumps. So, every time that you step on the brake, your brake pads are going to squeeze on this. And then as it comes around, bump, bump, bump, bump. Your steering wheel, bump, bump, bump, bump, bump, bump as you're braking. Okay. You feel a brake pulsation, there's your culprit. But for the purpose of this video, I'm just going to go ahead and clean this up. I want to try to make sure I don't have any big rust pieces in between where the hub and this rotor are going to meet. Okay. They need to be directly right up against each other. There can be nothing in between them. Very nice. That looks pretty good.
We'll take a little bit of our copper never seize and we're just going to coat the bearing right along where the rotor's going to ride. That's just going to make it easy to get off someday for when I do decide to do that rotor. Let me grab the rotor. We're going to get it right up on here. Okay. Holding on to it. I'm just going to put on one lug nut. Get it on as far as I can, hopefully make it so the rotor can't flop around. There we are. Very nice. We'll get that out of the way. Let's give it a little spin. I don't hear any backing plate rubbing against the rotor. That's always nice. If you do hear it, now's the time to fix it. It's easy ... take this off, bong, bong. Give it a couple bonks. That's my thing. All right.
We still have the tie rod off, so we can give this a nice turn. We've still got this nice and loose, so we don't have to worry about giving it a tug. We can take our caliper bracket. We'll slide it back over the rotor. We'll put in our caliper bracket bolts and tighten those up. We'll torque them and everything, and then we'll move along. These mount the caliper bracket to the knuckle, okay. Get a little bit of threadlocker. You don't really need a lot. It kind of looks like I put on a lot, and maybe I did, but you don't need that much. Just enough to really hold them in. These are going to be torqued down to 166 foot-pounds anyway. So, the odds of them loosening up on their own, well, it's pretty doubtable. But I like to use threadlocker. You do you, boo boo. It's your brakes.
I'm going to take this, bring it around, being careful for my ABS sensor of course. And you also want to watch your brake hose because when you spun it around, maybe you brought it around completely. Now it's making a cute little curly Q squiggle. Maybe you like that. It's not actually very practical for your braking system. So, let's try to make it so it's in a nice straight line, fluid can flow without restriction. It's always very important. Just get the caliper going on. The hose is going in a nice straight line. It's not twisted or anything like that. It looks good. A little bit of a curve, but that's okay. As long as it's not twisted around. A little pig tail or whatever you call those. Torque on these. It's going to be 166 foot-pounds, which is quite a bit, so the odds that you're going to tighten them up too much by just blasting them on real quick is pretty low, but I am going to torque it once I get it bottomed out. Just grab my torque wrench and go 166.
It's with my 21 millimeter socket. So, now we're going to put a little never seize on the bolts that we took out, that hold the ABS wire. One, two, three. We've got our three eight millimeter head bolts. Just get these all started in here. You just want to be careful because with the tie rod undone, this can swing very far, which could put a tug on your ABS sensor wire, so keep that in mind. Once you start bolting this in, you want to make sure that you don't turn that tie rod. Okay. And we remember that when these are fully tightened originally or when they were on, these could move around quite a bit. That's very important. It's a shanked bolt. So, when you're tightening it, it does need to be tight to the point that this doesn't move. That means that you way overtightened them. Okay. I'm just going to tighten those up with my eight millimeter and move along.
It looks good. This out of here. It still moves. It still moves. Everything can flow freely. It seems pretty good. Just take our cable, plug it in the little hole here. There we are. We'll dangle this off the side. We're going to plug this in, in a minute. We've got our tie rod. Get our nut. Our little castle nut thing. Just going to bring it up through here. We're going to tighten this up with a 21 millimeter and then we're going to torque it down. Just going to bottom this out. Now I'm going to torque it to 85 foot-pounds. Got our cotter pin. We've got our little lock. We want to make sure that one of these slots, which there's a whole bunch of them, line up with the hole in that stud, okay. Keep turning it. Easy peasy.
We're going to stick our cotter pin through and then we're just going to bend it. It's got two little legs, so you can make one go one way, one the other if you want. All that really needs to happen is this thing's bent and it can't work its way out, so this pops off and this nut somehow breaks free. I mean, does it seem like any of it's really possible? No, but precautions, precautions, precautions. There we go. We've got all that together. Now we can move on. We're going to go ahead and we're going to put on the rest of our ABS wire and then we'll get our locking hub in. We've got this little clip, got a little channel on that. Couple little prongs on this. Just slides in. See if I can get it. It's always the most delicate stuff that's the hardest. Just lock that in. It's going nowhere. Cool.
Just going to grab a little bit of silicone paste. I'm going to put it right inside the electrical connector for the vehicle. Make sure it's clean obviously, clean paste. You don't want to put something dirty in there. But anyway, that'll just help keep the moisture out of there. I'm going to connect the two together now. There it is. I've got my little lock, squish that down and bring this over. I'm going to put it in its slot right there. There we go. It's happy to be home. We've tightened everything up. Torqued, torqued, it's torqued. Perfect. Let's move along to the locking hub.
I'm going to use a little copper never seize. I'm going to go all inside all these little channels right here. You can do that or you can use some kind of grease if you have it. It's just going to make it so it can slide in easy. And then somewhere down the line, if you have to take it back apart for some reason, it'll come out easy. It's pretty good. All right. Let's clean this off. There we go. Now I'm going to grab our set. It's going to come with a new gasket and new bolts and everything like that. If you didn't get the set, I recommend it. You can go right on our site. But anyway, I would use a new set. You need new gaskets. Assuming you don't have it, I guess just clean it up, do the best you can, and put it together.
All right. We've got our kit. We've got our locking hub. Kit, locking hub. Perfect. Let's get to work. This right here is this gasket, okay. You don't want to put this gasket on over that. Just take a little bit of time, clean this off. You can use something like a razor blade, whatever you have access to. Just get it off of there, okay. Once you get this completely off, we'll clean up the edges, making sure that you got off all the little bits. You want a nice, smooth surface. I've got it cleaned it up as good as I could. There's no raised surfaces, it's a little bit discolored, but I'm really not too worried about that. I can take this seal, I can slide it on, or I can go ahead and open this up and grab one of these cool kid bracelets, put it on my wrist. I'm going to save it for later. I'm going to use this one. Replace that with a brand new one. Very nice. Okay.
Now, I'm just going to take this and slide it over. Right here, there's a little guide pin, so I'm just going to slide that right over. Okay. There's a small hole here. There's a big hole in the gasket there. Small hole, big hole, small hole, big hole. So, I'll just put the guide pin through one of the small holes and the others should line up. Now, I'm going to grab my bolt kit, my tools, and I'm going to go back over the vehicle.
I've got my little kit with my bolts. I'm going to carefully open it. I guess I could take off my bracelet now. I'm going to take my locking hub. Just going to slide it in. You might have to give things a little bit of a twist. See if you can get them slid in. That little guide pin right there just slides into any of the holes, okay. You don't have to be too worried about which one. It just goes in. There we are. Three holes, three bolts. Very cool. We'll go ahead and put these in. So, I'm going to go ahead and put these in. I'm using my T27 Torx bit, okay. That's this thing. Same thing I used to remove it, I'm going to use to install the new ones. I'm just going to start it in. I'm not going to fully tighten it until I get all three started in.
Okay. Now I'm just going to go ahead and snug these up. I'm going to use a ratchet for that, so I can make sure they're snug. They're just small bolts. They're really not very heavy duty or anything like that. So, use your best judgment. Once you get it bottomed out, you can maybe just give it a little bit extra, but that's pretty much it, you really don't need very much torque on these, okay. The seals are in there, they're going to do their job, assuming I can get this tightened at some point. There we are. Cool. There we are. Get that all installed. Now we can go ahead and remove this lug nut. We'll get our wheel back up on here. We should be good to go.
It's time to lift this bad boy. As you can tell, it's super heavy. So, I don't want to come down like this, try to grab it, lift with my back. Oh. I'm just going to come over like this. I'm going to put my leg right up against it, okay. I'm just going to lift it up using my biceps, my leg muscles and my abs. Easy peasy. Put on one lug nut hopefully. There we go. That wheel's going nowhere. Now I'm going to grab the other seven. I'm going to bottom them out, and then we'll torque them down. Now here we go. We're going to tighten these up. We're just going to bottom them up in criss-cross pattern, make a nice snowflake. All right. Grab this one again. Here we go. I'm going to bring it down on the ground and make it so the wheel's just barely touching so it won't spin. I'm going to torque these puppies to 165 foot-pounds with my 21 millimeter socket.
Now it's time to torque these puppies down. We're going to go in a snowflake pattern, boom, boom, boom, boom, boom, boom, boom. It's going to look good, real pretty by the time we're done, and it's going to be torqued down to 165 foot-pounds. Here we go. All right. I'm just going to go around one more time. Now that it's already torqued down, I can just go in a circle. And it's completely preferential if you want to even go around a second time. You do you, boo boo. It's just your wheel. Now we've got our center cover. We're just going to line these up with our lug nuts, put it over. You can use a rubber mallet, try to bonk it on there. I would recommend a rubber mallet. Don't do this at home, kids. Here we go. Use my rubber mallet and off we go.
Thanks for watching. Visit 1aauto.com for quality auto parts shipped to your door. The place for DIY auto repair. And if you enjoyed this video, please click the subscribe button.

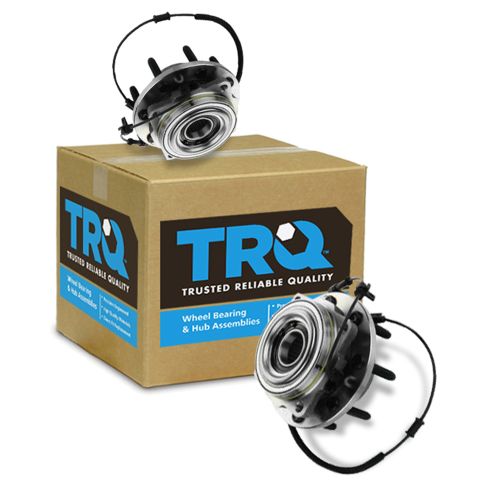
2011-16 Ford Front Driver & Passenger Side 2 Piece Wheel Bearing & Hub Assembly Set TRQ BHA53736
Part Details:
- 2 Piece
- (1) Front Driver Side Wheel Bearing & Hub Assembly
- (1) Front Passenger Side Wheel Bearing & Hub Assembly
- Taper
How to Replace Front Wheel Bearing 2000-06 Toyota Tundra
How to repair, install, fix, change or replace a worn out, vibrating or groaning wheel bearing hub on 00, 01, 02, 03, 04, 05, 06 Toyota Tundra
