How to Replace Front Wheel Hub 2012-17 Ram 1500
Created on: 2019-07-17
Watch this video to learn how to replace the wheel hub and bearing assembly on your 09-18 Dodge Ram 1500. 1A Auto makes it easy with this video!
-
step 1 :Removing the Wheel
- Loosen the lug nuts with a 22 mm or 7/8 in socket and breaker bar
- Raise and support the vehicle
- Remove the lug nuts
- Remove the wheel
-
step 2 :Removing the Brakes
- Remove the 13 mm caliper slider bolts
- Pry between the brake rotor and the caliper to compress the pistons slightly
- Remove the caliper and hang it to keep tension off the brake hose
- Remove the brake pads from the brake caliper bracket, prying them if necessary
- Remove the two 21 mm caliper bracket bolts
- Remove the caliper bracket
- Remove the brake rotor retainer ring. It does not need to be saved.
- If the rotor is stuck, hammer around the rotor being careful not to hit the wheel studs
- Remove the rotor
-
step 3 :Removing the Wheel Hub
- Disconnect the ABS wire electrical connector
- Follow the ABS Wire to the hub and remove it from all retaining clips
- Remove the 36 mm axle nut
- Loosen the 21 mm upper ball joint nut
- Loosen the upper ball joint in the wheel knuckle
- Remove the 21 mm nut and the ball joint from the knuckle
- Hammer the axle end through the wheel hub enough to access the hub assembly bolts
- Remove the three 21 mm hub assembly bolts
- Remove the wheel hub
- Hammer around the rim of the wheel hub, not the backing plate, to assist removing the hub if it's stuck
-
step 4 :Installing the Wheel Hub
- Clean the inside rim of the wheel knuckle
- Feed the ABS wire through the backing shield
- Install the wheel hub assembly with the backing shield between the hub and the knuckle
- Install the three 21 mm hub assembly bolts
- Torque the 21 mm hub assembly bolts to 134 ft-lb
- Slide the CV axle into the hub
- Insert the upper ball joint into the wheel knuckle
- Install the 21 mm ball joint nut
- Torque the 21 mm ball joint nut to 40 ft-lb
- Install the 36 mm axle nut
- Torque the 36 mm axle nut to 185 ft-lb
- Attach the new ABS wire to the retaining clips
- Reconnect the ABS wire electrical connector
-
step 5 :Installing the Brakes
- Clean the rotor surfaces with brake parts cleaner
- Slide the rotor onto the wheel studs
- Temporarily thread on a lug nut to hold the rotor in place
- Install the brake caliper bracket and secure it with the two 21 mm bolts
- Torque the 21 mm caliper bracket bolts to 130 ft-lb
- Install the brake pads into the brake caliper grooves
- Remove the caliper from the hanger
- Compress the brake caliper pistons with a compressor tool or clamp
- Install the caliper onto the caliper bracket
- Install the 13 mm caliper slider bolts
- Torque the 13 mm caliper slider bolts to 31 ft-lb
- Remove the temporary lug nut
-
step 6 :Installing the Wheel
- Install the wheel onto the wheel studs
- Install and tighten the lug nuts by hand
- Lower the vehicle with minimal weight on the wheel
- Torque the 21 mm or 7/8 in lug nuts to 130 ft-lb in a star pattern
Tools needed
-
13mm Socket
Socket Extensions
Hammer
Ball Joint Press
Pry Bar
Jack Stands
21mm Socket
Flat Blade Screwdriver
Brake Caliper Hanger
7/8 Inch Socket
Plastic Fastener Remover
Brake Caliper Compressor Tool. Single Piston. Screw Style.
Floor Jack
1/2 Inch Breaker Bar
36mm Socket
22mm Socket
Hi, I'm Mike from 1A Auto. We've been selling auto parts for over 30 years.
What's up, guys? I'm Andy from 1A Auto. Today I'm gonna show you how to replace the front wheel hub assembly on this 2016 Ram 1500. If you need this part or other parts for your vehicle, click the link in the description and head over to 1aauto.com.
We're gonna loosen up these lug nuts, we're gonna use a 7/8 socket and a breaker bar, you can also use a 22-mm socket. Loosen these up.
I'm gonna raise and support the vehicle, we're using a two-post lift. If you're doing this at your house, you can use a jack and jack stands.
We're gonna take these lug nuts off, just use the socket.
Take the lug nuts off, grab the tire, pull it down.
I'm gonna loosen up these two 13-mm bolts, I'm gonna use a 13-mm socket and a ratchet. And right now the caliper slide is spinning, so ... I'm gonna use a pair of pliers on here to hold the slide while I loosen up the bolt. Once it's pretty loose you can do it by hand. Take those out.
You're gonna take a straight-blade screwdriver, get in between the rotor and the caliper, just pry back a little bit, slide the caliper out, that's just gonna compress the piston a little bit. And then I'm gonna take this brake caliper hanger, we actually sell these at 1aauto.com, slide it into this hole here, and we can slide it on the coil spring, it's gonna hold it and take the pressure off the brake hose. Just slide it like that.
Now we're gonna take a straight-blade screwdriver, take these pads off, just get in between the pad and the rotor, pry it out. These are on there pretty good, frozen a little bit. Just slide those out, slide this one out as well. Just like that. Do the same for the outside.
I'm gonna take a 21-mm socket and a breaker bar, I'm gonna loosen up these two bolts for the caliper bracket. Loosen up the top one. As soon as they're loose, I can switch to a ratchet. Take that bolt out.
Since this is loose enough, do it by hand, support the bracket with your other hand. Pull the bolt out, then slide the bracket right off the rotor.
Now we're gonna take this little retainer off. They only use this to hold the rotor on at the factory, it's not required, so we're just gonna take it off, we'll cut it off and throw it out. I'll use some side cutters, just grab it right here, pry it out a little bit. Once you break it, it's pretty easy to get it off. Slide it out.
Now, to get the rotor off, we're gonna use a hammer, we're just gonna hit in these locations, being careful not to hit the studs. There we go. Grab the rotor, slide it off.
We're gonna disconnect this ABS wiring harness back behind this shield here. Slide this out. That's where the connector is. Take a straight-blade screwdriver, there's a little lock on here, little red tab, so just slide that up. Slide that up like that. Now we can push down on the button, release it, disconnect it. Just take the straight-blade screwdriver, release it right here from the retainer, slide that off.
Over here it's connected to the brake hose, just slide that off. Over here there's another retainer. Use the screwdriver to release the clip, and we'll let that hang like that.
I'm gonna loosen up this nut. Before I do that, I wanna brace this so that it doesn't spin, so I'll use a long pry bar and just have this close to the ground. Then I'll take a 36-mm socket and a breaker bar, loosen up this nut just like that. Once that's loosened up, you can just take a ratchet and the socket, take it off. Just like that.
I'm gonna take this nut off of the knuckle, this is for the upper ball joint. I'm gonna use a 21-mm socket and a ratchet. I'm just gonna loosen it up, I'm not gonna take it off completely, just wanna have a couple threads still on there. And I'm gonna break this free.
Now, before I take this nut off, I just wanna loosen this up, separate the ball joint from the knuckle. I'm just gonna use this front end tool, slide this into position. You could also tap this with a hammer, tap upwards, but you wanna be careful because this is aluminum, you don't wanna break it. Let's get this in position. There's other pullers that might work better than this one. This is what I have, so I'll give this a try. Just take a wrench, tighten this up. And it popped free. Remove the tool.
The reason I leave the nut on there is so when this separates it doesn't come flying out and hit me or damage anything. So then I can take a pry bar, just hold this upper control arm down, take this nut off. Take the upper control arm ball joint out of the way, just slide the knuckle out.
At this point I'm just gonna take a hammer, lightly tap on the axle on the front CV joint. I don't wanna ruin the threads. If you use a brass hammer, that would work a little bit better. If we're doing that, that'll make it so it's easier to access the bolts on the back side.
I'm gonna loosen up these three bolts on the back side of this knuckle, I'm gonna use a 21-mm socket and a ratchet. This might be a little bit difficult because the knuckle isn't too stable, you've kinda gotta hold it. Just loosen that up a little bit. I'm not gonna take that top one out yet, I'm gonna get the other two out first. You can move the axle out of your way. Get this other lower one out.
Pull that bolt out. Now we're gonna move to the other side, just gonna swing this knuckle around a little bit, pull on the steering rack. It's a little bit easier to push on this side, the opposite side, to get the steering rack to move.
I'll take the 21-mm socket and ratchet, just make sure the axle's out of the way. Just break it free, then we can switch to a ratchet. Pull that bolt out.
Now I'm ready to take the top bolt. More likely than not the hub is not gonna just slide off, it's normally on there pretty good. Pull that. But just keep your hand in front of it just in case. At this point I'm just gonna take a hammer, gonna tap it off. Just give it a tap from this side ... and pull it off just like that. Slide the dust cover out of the way. And there's your hub.
If this is rusted on there really good and you can't just hit it off with a hammer, you can always use a slide hammer. You can always reinstall the upper ball joint, the upper control arm, just to stabilize it so when you're trying to get it off it's a little bit more stable.
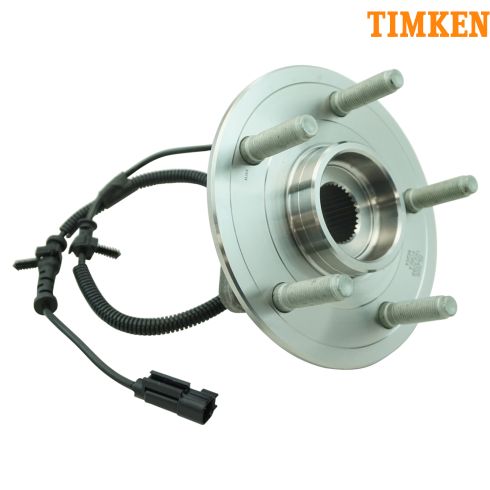
Here's our old hub, here's our new hub assembly from 1aauto.com. As you can see, the studs are in the same position, it's machined the same, it's the same height. Flip it over to the back side, the back side is the same, this with the wheel speed sensor and connector. Get your at 1aauto.com and you'll be ready to rock and roll.
We're just gonna take a wire brush, we wanna clean up this knuckle, little bit of corrosion on here, it is aluminum. We wanna make it so it's easy when we go to install the new hub. I'm gonna also take a file and get in here for anything that's built up. You don't wanna file it too much, just get some of this junk out of here.
Now we're gonna take this shield, make sure you install this the correct way. Take the ABS wiring harness, slide it through the shield, get that into position like that, and just hang it over here so it's out of the way. Slide the hub into position. You can use a little anti-seize if you want to on the knuckle, that way it'll come out easier if you ever have to do it again. Take one of the bolts, get the top bolt started.
That's started. Once you get that in, then we can start the other two bolts. We can take our 21-mm socket and ratchet, start to tighten these down. Make sure the ABS wiring harness isn't in the way, you don't want to get that stuck between the hub assembly and the knuckle.
I'm gonna use a 21-mm socket and torque wrench, I'm gonna torque these bolts down to 134 foot-pounds.
If you have to, you can use a pry bar to hold it, or you can try to reinstall the upper control arm. But the CV joint's probably gonna be in your way. If you have swivel sockets, you might be able to do it a little easier.
Now we're gonna slide this knuckle back into position. Take the CV axle, make sure you slide that through the hub. Once that's in position, then we can get the upper arm. Take a pry bar, slide it under here through the spring, pry down on it, take the nut, get that started.
I'm gonna tighten this nut down, I'll just use a ratchet and a 21-mm socket. Just pry down on the knuckle with the pry bar, it just makes it a little easier while you're tightening this down. I'll snug it up first.
Take a 21-mm socket and a torque wrench, gonna tighten this down to 40 foot-pounds. The knuckle's gonna try to move on you a little bit, so try to hold the knuckle while you tighten this. Just like that. If the stud is spinning on you, what you can do is you can use a wrench, tighten that nut up with a wrench, and then put a socket on the end of the stud so that it stops spinning.
I'm gonna reinstall this nut. Take a ratchet and a 36-mm socket, we'll snug this down before we torque it.
I'm gonna tighten this down to 185 foot-pounds, I'm just gonna use the pry bar to hold the hub from spinning. You could also lower this down the same way how we took it off ... and have the ground hold the pry bar.
We can take a trim tool and remove these retainers from the old wheel speed wiring harness. Just slide them underneath here. You could have done this while you were taking them off. Sometimes these are a pain to get off, so sometimes I just reuse them, take them off the new one. This new wheel speed sensor wiring harness comes with them. So just slide this out, just like that. Same with this one, just like that.
Take the new wiring harness, slide this retainer into position, push it in like that. This is gonna go behind here. This little piece is gonna slide onto where the brake hose is, just push it into this area just like that. This is gonna go to the upper control arm, and then we'll plug the connector in. Line that up, lock it in place, and then take that little lock tab, push it down, and slide this retainer into the shield just like that.
I'll take the new rotor, we're gonna put it on backwards first, take some brake parts cleaner and clean off the back side of the rotor. There is a protective coating on it, so we wanna wipe that off. Now we'll flip it around, do the same on this side, spray some brake clean, wipe it off.
To make this easier to install, I'm just gonna take a lug nut, just put this on temporarily so it's easier to install the brakes.
I'm gonna take the brake caliper bracket, line this back up over the rotor, and then take the caliper bolts. There is some threadlocker on these bolts, you can apply new threadlocker if you would like. Get those started. I'll take a 21-mm socket and ratchet, and I'll snug these bolts up.
I'm gonna take a 21-mm socket and a torque wrench, I'm gonna torque these bolts to 130 foot-pounds.
Now we're gonna take some brake caliper grease, we'll just put it on the brake pad clips right here. We'll do it on the other side as well, and also on the back of the pads, I'll just put a little bit on the back of the pads just like that. I'll install this one on the outside, be careful not to get grease on the pad material itself. Now we'll do the same with the other one.
We're gonna take the brake caliper, take the hanger off, slide that out of there. Flip the caliper over, take one of the old brake pads, slide this into position, and we have this brake caliper compressor tool, we sell this at 1aauto.com. This is only a single-piston tool, we have two pistons here. It will still work, you're just gonna have to go back and forth with it. Just get this started, I'm just gonna compress this slowly.
As we're compressing this piston, the piston's moving into the caliper, it's pushing brake fluid through the hose, through the lines, back up into the master cylinder, and back into the reservoir. It's a good idea to check your reservoir after you're done your brake job and adjust the fluid level accordingly. Just go back and forth. Loosen it up, go back to this side.
Once those pistons are completely compressed, make sure the rubber seals, the dust seals, are not in the way, they're in there properly. Make sure the hose is not twisted. Line this back up on the caliper bracket. Take the bolts that hold this on, get this started. Get the lower one started.
Next I'm gonna use a 13-mm socket and a torque wrench, I'm gonna tighten down these bolts to 31 foot-pounds. I am gonna use a pair of pliers to keep the caliper bolt from spinning, the caliper slide from spinning. Do the same for the top one. That's good.
I'm gonna take this lug nut off. Install the tire and wheel, slide that in position, and take the lug nuts and install them. Just take the socket, make sure these are all snug. I'm gonna lower the vehicle and torque them.
Now I'm gonna take a 7/8 socket or a 22-mm socket and a torque wrench, I'm gonna torque these to 130 foot-pounds. I'm gonna tighten these down in a star pattern, that'll make sure the wheel gets tightened down evenly. I'll just go around again, make sure they're all tight. Those are good.
After we do a brake job, we wanna make sure that we get back in the truck and we pump the brake pedal, because there's gonna be an air gap between the caliper piston and the brake pads. So just pump it slowly. Once you feel that the pedal is hard, then you're good to go.
After we're done, we wanna make sure and check the brake fluid level. The level right now is at the max line, there's a max line here, min line there. You're gonna wanna adjust this level accordingly. If you have to add fluid, just take the cap off, add fluid. If you have to suck some out, just get it in between those two marks, preferably near the max line.
Thanks for watching. Visit us at 1aauto.com for quality auto parts, fast and free shipping, and the best customer service in the industry.
Shop Products


How to Replace Front Hub Assembly 2006-10 Ford Explorer
Learn how to replace a bad, failed, or noisy hub on the 06-10 Ford Explorer with the steps in this video
