How to Replace Front Wheel Bearing Hub 1993-2004 Dodge Intrepid
Created on: 2011-04-08
Watch this video to learn how to replace the front wheel hub and bearing on your 93-04 Dodge Intrepid. 1A Auto shows you how step bu step!
-
step 1 :Remove the wheel
- Loosen the lug nuts
- Raise and secure the vehicle
- Remove the lug nuts and the wheel.
-
step 2 :Remove the brakes
- Turn the wheel to better access the caliper
- Use a flat blade screwdriver to compress the caliper piston
- Remove the two 10 mm bolts to remove the caliper.
- Fasten the caliper up with wire ties out of the way
- Remove the rotor, hammering it off if its rusted onto the hub.
-
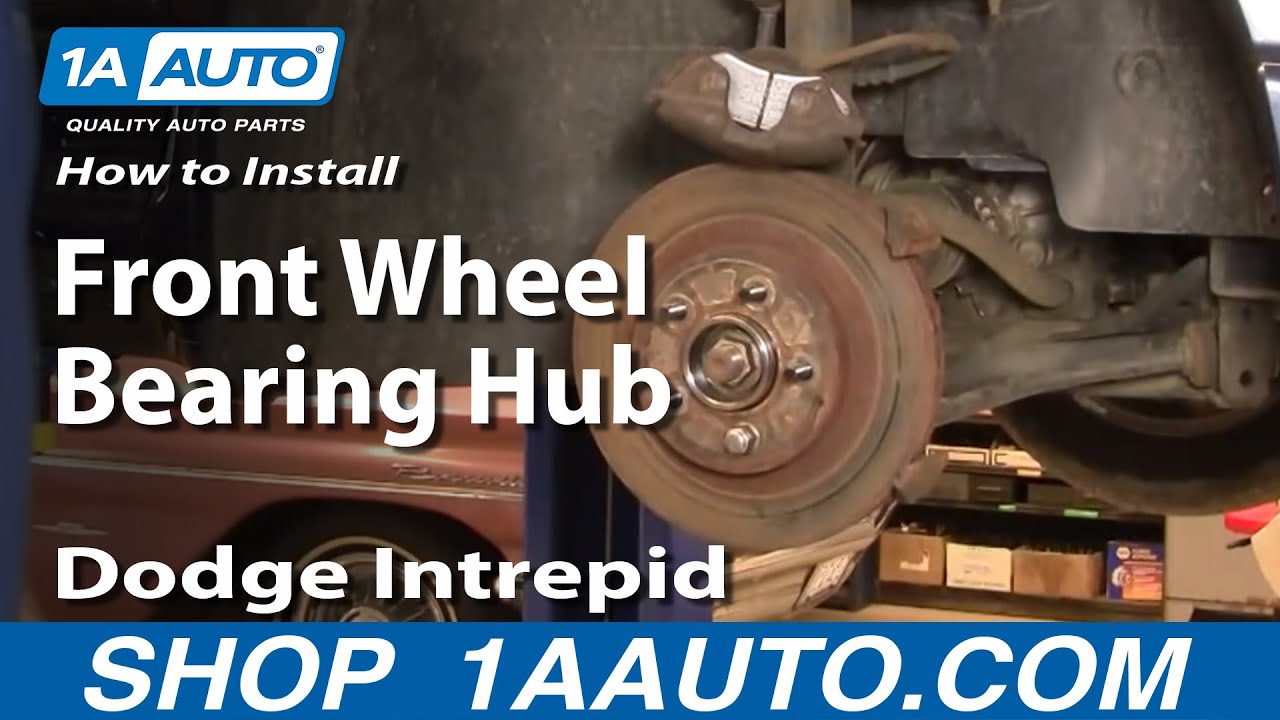
step 3 :Remove the hub
- Remove the hub nut with a 34 mm socket and impact wrench.
- If you don’t have an impact wrench, put the wheel and lug nuts back on and lower the car and use a breaker bar.
- Unbolt the three 18 mm hub bolts.
- Take caution not to damage the CV boot.
- Break the hub loose with a hammer and remove it.
-
step 4 :Install the new hub
- Place the hub onto the steering knuckle and work the axle into place.
- Bolt the three 18 mm bolts into place.
- Torque them to 90 ft lbs, rotating so they get torqued evenly.
- Replace the hub nut, but do not tighten all the way.
-
step 5 :Reassemble the brakes
- Put the rotor on and put a lug nut on just to keep it from running away on you while you put the caliper back on
- Put the pads into the caliper and compress the piston with a c-clamp
- Bolt the 10 mm caliper bolts back in
- Put the wheel back on and hand tighten the lug nuts
- Torque the hub nut to 105 ft lbs
- Torque the lug nuts to 90-100 ft lbs using a star pattern.
- Pump the brakes a few times to recompress the caliper pistons and do a few 5-10 mph stops in the driveway before road testing.
Tools needed
-
Large C-Clamp
Socket Extensions
Torque Wrench
Pry Bar
18mm Wrench
19mm Wrench
18mm Socket
19mm Socket
10mm Wrench
34mm Socket
Large Hammer
10mm Socket
Ratchet
Brought to you by 1AAuto.com, your source for quality replacement parts and the best service on the Internet.
Hi, I'm Mike Green. I'm one of the owners of 1A Auto. I want to help you save time and money repairing and maintaining your vehicle. I am going to use my twenty plus years of experience restoring and repairing cars and trucks like this to show you the correct way to install parts from 1AAuto.com. The right parts installed correctly, that's going to save you time and money. Thank you and enjoy the video.
In this video, we will be showing you how to remove and replace the front hub bearing on this 2004 Dodge Intrepid. The hub is the same for all '93 to '04 Intrepids. For the '98 to '04, it should be the same. For '93 to '97, the procedure should be similar, maybe some differences.
Tools you will need: Jack and jack stands, various millimeter wrenches (10mm, 18mm, 19mm), sockets with extensions, large screwdriver or pry bar, 34 millimeter socket with a breaker bar, large hammer, large C-clamp, and a torque wrench. If you are just working with hand tools, you want to loosen your lug nuts while the wheel is on the ground, first. Then, raise up and support your vehicle. I have the benefit of air tools, so I am going to use it. We will fast forward through the rest of removing the wheel. We use fast forward in this video quite a bit when I am doing monotonous tasks. Now you want to turn your wheel so you can reach your brakes easily, either by pulling it like this or using the steering wheel. This piston is pushed out. As your brakes wear, the piston pushes out more. You can actually reset it by sticking a large screwdriver or small pry bar like this in and just prying on the brakes. That does two things for you, it pushes that piston out down in there and it also helps to get your caliper up and on easily.
To remove your caliper, you are going to remove two 10 millimeter bolts. One there, and one down there. That is easily done with a small ratchet or wrench. Now your caliper comes up and off. Just stop the action here for a second. You saw something drop out there, those are the little slides and you will see how to re-install them later in the video. Obviously, if you drop anything out, you want to keep hold of it. Obviously here is your hub. This is a 34 millimeter nut here. If you are using hand tools, you want to take the little cap off the center of your wheel and with the car on the ground, you'll want to use a breaker bar or even a big piece of pipe or something to get leverage to remove this nut. I've got the benefit of an impact wrench, so I am going to use it. Hang the caliper up there, just like that, for now. Really easy, the rotor comes right off. Next, we are going to break the axle free from the hub. What you're going to do is take a large hammer ... you don't want to beat on this thing because you could ruin your CV joint, but if you have to give it a couple of whacks until you get it to move, then that's all right.
What I have done here is I have turned my wheels all the way to the outward position and now the hub is held with three bolts. They're 18 millimeter, one here. You can see I've got my socket and extension on to that one there. Be very careful not to damage your CV boot here. There is also a third one on this side, right here. I will turn my wheels back to get to that one.
These bolts are going to be tight, so I'm going to suggest a breaker bar like this. You can even use a piece of pipe. It gives you even more leverage. Once you get them, they start going pretty good. My top bolt is still in a little bit, but I am going to break my hub free here.
Now that we have that broken loose, we will speed it up here as I just removed that top bolt the rest of the way. A new hub from 1A Auto. Exact same as the old hub. Everything is going to go in and bolt in, everything the same. These vehicles, if you have ABS, you have an alternate sensor over here and they actually have a different axle, so the ABS doesn't really make a difference. You just want to put the hub on, get it started on the axle a little bit, push it in, and start one of these easy bolts first. Make sure you push the axle on flush to the steering knuckle. Just shake the bolt around. You'll feel it start. We'll start with this bolt here. Now I will start with this one on the top. You want to start them all first and then snug them up and tighten them.
We will speed it up here as all I am doing right now is getting those bolts snug. You want to put them in, start them all first, then just tighten them up snug, and then you will torque them to 90 foot pounds afterwards. Now I am going to use my torque wrench. I am going to go to 90 foot pounds with these. I am going to put my center nut back on. I am going to use my impact wrench and I am just going to tighten it up primarily. I am going to watch the back as it gets sucked in. I am not going to tighten it up all the way until I get the wheel back on the ground.
What I like to do is just put a lug nut on here just to hold the disc in place while you are putting the brakes together. Before you go to put your calipers back on, you want to make sure that your piston is reset all the way into your caliper. Hopefully, if you've pried it out, that's already the case, but if you didn't have something to pry it with, you can use a large C-clamp. Put your old pad back in there and then use your C-clamp to push that piston back into your caliper. The rear pad has that clip on it. You just press it into the caliper. The front pad has this butterfly clip on it, just take it and pull that clip out a little bit and snap it down in there. You've got your pad back into your caliper. These are little slides, they actually just hang off of here so you put the lower one on.
Take your caliper and make sure that these boots are back on the bolts or these sleeves here. What you want to do is put your pad against it and push out on your caliper. The shoes, or the pads, have little teeth that go onto your slide. You do have to pull it out and put it down on. This upper slide, basically you can just push your pad up like that and then pull your rotor and pad back a little bit and slide it underneath. It goes in just like that. A close up on what that should look like and down here, what it should look like. Now take your bolts, put them on the back side, just push on the caliper a little bit. Get them started, get that one started and 10 millimeter. We have a torque wrench we are going to use and tighten these up to 25 foot pounds. Now we can remove this lug nut. We will fast forward as I remove that lug nut then I'm obviously going to put the wheel and tire back in place. I am going to thread the lug nuts on by hand and then use my air ratchet just to tighten them preliminarily.
Here, I am going to tighten that center hub nut to 105 foot pounds and torque it up. Again that is 105 foot pounds. Then, I am going to put on my 19 millimeter socket, torque the lug nuts to 90 to 100 foot pounds. Put the little center cap back on. Very important, you've taken your brakes apart, so before you drive the car, make sure you pump your brakes. Make sure the brakes work properly before you road test it. Put it in gear, make sure the car holds in gear and then do a 5 mile an hour stop and then a 10 mile an hour stop before you go out and road test your vehicle.
We hope this helps you out. Brought to you by www.1AAuto.com, your source for quality replacement parts and the best service on the Internet. Please feel free to call us toll free, 888-844-3393. We are the company that is here for you on the Internet and in person.
Shop Products


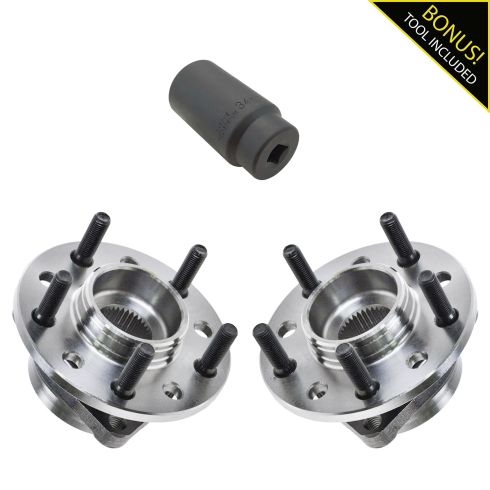
Dodge Chrysler Plymouth Eagle Driver & Passenger Side Wheel Bearing & Axle Socket Kit TRQ BHA86527
Part Details:
- (1) 34mm Axle Nut Socket
- Ball
- (2) Wheel Bearing & Hub Assemblies

How to Replace Front Wheel HubBearing 1999-2004 Jeep Grand Cherokee PART 2
Check out this video to learn how to replace the front hub and bearing on your 99-04 Jeep Grand Cherokee. This is Part 2.
