How to Replace Front Wheel Bearing 2008-12 Chevy Malibu
Created on: 2020-08-19
This video shows you how to install a new front wheel hub and bearing on your 2008-2012 Chevy Malibu.
Tools needed
-
Razor Blade / Gasket Scraper
Torque Wrench
Gloves
Hammer
Rust Penetrant
Pry Bar
Wheel Chocks
19mm Socket
Floor Jack
Safety Glasses
36mm Socket
Okay, friends, before we get started, make sure you safely raise and support your vehicle so your wheel is off the ground. Once you've done that, we're gonna remove all five of our 19-millimeter lug nuts. Remove your wheel. Just to say, we're gonna be servicing a lot of things on the front end of this vehicle, so if you see anything that's taken apart that isn't necessarily in the steps that you need to see, well just don't really pay too much attention to that, and just follow the steps ahead.
All right, now that we've got the wheel off, let's go ahead and remove the caliper bolts from the caliper bracket sliders. Using a small pry bar, I'm just gonna get right in between here and see if I can apply a little bit of pressure and push back this caliper a tiny bit. You can use a wire tie or even a bungee cord. Let's get our pads out of here. Remove your caliper bracket bolts, one here and one up here. Hold that bracket. Now it's gonna be time to get the rotor off of here. If you find that it's stuck on the bearing, just give it a couple loving bonks around this area here. Just be careful for your studs, and definitely don't hit the braking surface.
Now we're gonna use our 36-millimeter socket and remove our axle nut. I always like to spray down the area with some penetrant. So next, we need to push our axle out through our bearing. To do that, you never want to use the hammer directly on your axle, because you could peen over the threads, and of course, that's gonna cause an issue. What I would like to use is a center punch. Come right in the middle here, give it a couple loving bonks. If you don't have a punch, just go ahead and use the original nut here. Put it on there so it's pretty much flush, and then you can go ahead and give it a couple bonks that way. When you do that, you don't have to worry about damaging the threads.
Next, we need to remove our outer tie rod and nut. If you notice when you're trying to take off your outer tie rod and nut that the stud was just spinning inside your knuckle area, use some nice long pliers like this. And we're just gonna try to squeeze that outer tie rod end up against here. Try to reset that stud into the knuckle. Now I'm gonna continue on by loosening this. If you wanted to apply a little bit of heat to your nut, it might be helpful as well. Obviously, if your tie rod's in the same condition as ours, where the boot's just pretty much completely ruined slash gone, just go ahead and replace your outer tie rod end. All right, let's get this out of here.
Now it's time to get our ABS wire disconnected. Now we need to separate the knuckle from the actual strut itself. To do that, we're gonna remove these 18-millimeter nuts, and then push out these bolts. Get this out of the way. I'm just gonna start these back on so we don't damage the threads of the bolts. Now let's continue with a hammer. Give these a couple loving bonks. If you want to use a little bit of penetrant, it's probably a great idea. Now let's separate the two of these. Push in on that axle a little bit.
Now, with the bracket loose, I can see these right here. I'm just gonna give them a nice squeeze, see if I can get it to break free from the actual bracket itself. There we are. We'll set this aside. So now we can turn the knuckle any direction we want, and we can fully access these bolts. That's great. Use your 13-millimeter, remove all three. Let's take one of our bolts. We're gonna put it right through here with the knuckle in there. Let's spray down the area with some penetrant. Continue on with your hammer. Give this a couple bonks. We need to break it free from the knuckle.
Looks like it's barely starting to move. Now that we've got it starting to come off, let's remove that bolt. Continue on. There it is, friends. It's important to take a look inside the knuckle area. If you see any of this, like what I have here, that means that your bearing separated upon removal, and we need to continue getting the rest of it out. Now we need to clean up the mounting area for the new bearing. If you were to look along this area right here, I can see a lot of corrosion and a lot of raised areas. I need to make sure that this is nice and smooth, but we don't want to stop there. We need to continue on to this inner surface here, and make sure we get rid of any of the underlying corrosion that's there as well.
Once you have the area cleaned up, go ahead and use a little bit of copper never seize along all the areas that you just cleaned. Let's clean up the threads on the bolts. I always like to use a little bit of thread locker. We'll call it your prerogative. Now we're gonna take those bolts, the backing plate, and our brand new wheel bearing, and get ready for our install. First, I'm gonna take the backing plate, I'm gonna line it up just like this. You want to make sure that the slotted area is where your caliper is gonna go. Take your wheel bearing, carefully put it through, but you want to make sure that the wire area is facing up and out towards the rear of the vehicle. Make sure it's not caught on anything, of course. Line up all three holes, close as possible at least, and then start in all three bolts. We'll snug them up, and then we'll torque them to manufacturer specifications.
Okay. All three of those are snug. Now we're gonna torque them. Torque this to 85 foot-pounds. Something that we need to pay attention to before we go ahead and reinstall the knuckle up here is the corrosion that comes right along this area. If you have any corrosion along your knuckle, just make sure you get that off. I always like to put a tiny bit of copper never seize inside the bearing where the axle's gonna go. Let's get the axle back inside the bearing here. There we are. Bring the knuckle up, and now we're gonna start in our bolts. These bolts are gonna go from the front towards the rear. Let's get our ABS wire on here. Start on both of these nuts. We'll bottom them out, and then we'll torque them to 89 foot-pounds.
Connect in your ABS wire. Make sure it clicks in and locks, and then secure it right here. Let's put in our tie rod. Go ahead and put that nut on there. Now I'm gonna snug it up, and then we'll torque it to manufacturer specifications. Let's torque this to 18 foot-pounds. And now we need to turn it an additional 90 degrees, which basically means a quarter turn. So I'm gonna start my ratchet right here, and then I'm gonna come right along so it looks like this. That's pretty decent. If your tie rod stud has a castle nut like this, you want to make sure that the castle nut slot is lined up with the stud itself. Go ahead and put through a cotter pin if you have one, and of course, lock it in.
Next, we're gonna put on our axle nut. If you want to use a little bit of thread locker, we'll call it your prerogative. We'll bottom this out, and then we'll torque it to manufacturer specifications. The best way to torque this is to go ahead and take a nice long pry bar like this, put it flat across the studs, that way there the hub can not turn. Now we're gonna torque this to 159 foot-pounds. Torqued. Let's go ahead and put a little bit of copper never seize on our hub.
Time to install the rotor. And I always like to hold it on with a lug nut. That way, there can't wiggle around. Let's go ahead and get the bracket on here. I always like to use a little bit of thread locker on my bolts. Start them both in, we'll snug them up, and then we'll torque them to manufacturer specifications. Torque these to 96 foot-pounds. Go ahead and carefully put this in here. Put on the outer pad as well. Now we're gonna slide this right over the sliders, and of course, over the pads. Line up those sliders. We'll put in our slider bolts.
Now we're just gonna bottom these out, and then we'll torque them to 26 foot-pounds. Make sure you clean down your entire braking surface, just in case you have any fingerprints on it. All right. Let's just double-check everything that we fixed here. Looks great. We'll get the wheel up on. We'll start all the lug nuts, snug them up, and then we're gonna torque them to 100 foot-pounds. All right, 100 foot-pounds. Torqued.
Shop Products


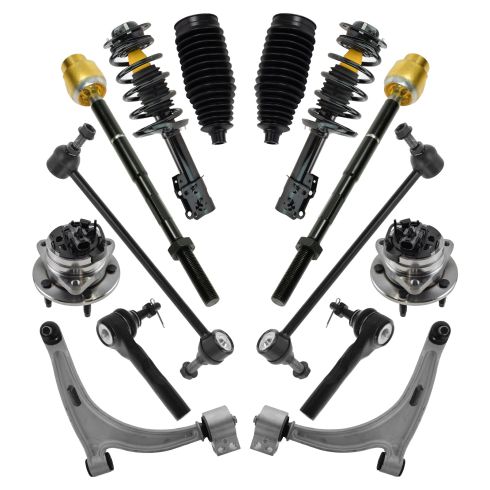
Chevrolet Malibu Pontiac G6 Front 14 Piece Steering, Suspension, & Drivetrain Kit TRQ PSA42230
Part Details:
- (2) Front Sway Bar Links
- (2) Front Lower Control Arms with Ball Joints
- (2) Front Strut & Spring Assemblies
- 14 Piece
- (2) Front Steering Rack & Pinion Bellows
- (2) Front Wheel Bearing & Hub Assemblies
- (2) Front Outer Tie Rods
- (2) Front Inner Tie Rods
How to Replace Rear Wheel Hub Bearing 2013-19 Ford Police Interceptor Utility
Watch this video to learn how to install a new rear wheel hub and bearing assembly on your 2013-19 Ford Police Interceptor Utility, or Ford Explorer.
