How to Replace Front Upper Ball Joint 1999-2007 Chevy Silverado
Created on: 2020-06-22
This video shows you how to install a new upper front ball joint on your 1999-2007 Chevy SIlverado.
Tools needed
-
Pickle Fork
Torque Wrench
Gloves
Hammer
Ball Joint Press
Pry Bar
Wheel Chocks
10mm Socket
Floor Jack
Safety Glasses
Pliers
Pocket Screwdriver
All right. So one of the first things you need to do is safely raise and support the vehicle. Once you've done that, you're gonna remove all six of your lug nuts. Remove your wheel. Now what we're gonna do is we're gonna get the ABS wire out of the way. The last thing we wanna do when we're doing any of the work on this upper control arm is to put a tug or damage this in any way. If you were to follow it up, you'll be able to see right where the connector is. I'm gonna remove that connector from the frame using my forky tool. Pull it down to where you can see it. Grab this tab. Lift it. Pull it off. These right here, you can remove. Just use a small pocket screwdriver or whatever you might have. Get right in between this area right there. We'll do the same down the line. Let's work on getting this brake hose off of the control arm now. We're gonna remove this 10-millimeter headed bolt. That's very common for them to break. Kinda wiggle it around. Get it off of there. The next thing we need to do is come right down here. We need to remove this upper ball joint nut. Once we remove that, we're gonna break the knuckle free from the upper ball joint control arm. There we go. Get that off of there. Put that nut on there. Just a couple threads and I'll show you why in a second.
The next thing we're gonna do is use our pickle fork and our hammer, then we're going to come right in between this joint and separate the two. When it separates, the knuckle is gonna wanna drop and move away. If it dropped and moved away, there's a possibility that it could put a tug on your axle or even maybe something such as your brake hose. We don't want that to happen. That's what this nuts for. It's a safety nut. Leave that there for now. So now I'm just gonna use a bungee cord or pretty much anything that you might have that can prevent this from falling down because we need to get that nut off there but we still wanna make sure we have control of this. There we are. Carefully set that aside. Let's spray this down with some penetrant. Take a peek right under here and make sure that you don't have a snap ring. A lot of vehicles won't, yours may. Now it's gonna be time to get our ball joint press set up on here. You're gonna need a cup that fits directly over the top of that ball joint up all along that control arm. You're gonna need a piece like this that has a spot in the center that the driver's gonna sit right into. Now we'll just go ahead and put this right over that ball joint stud and then we'll snug this up.
Now we're just gonna go ahead and tighten this up. And we're trying to press the ball joint up and through the control arm. You can't really see much of what's going on but what should be happening is the ball joint's gonna be coming up and separating. So it looks like that's working pretty well. I can see it starting to separate right there. So what I'm gonna do next is I'll loosen this back up and now I'm gonna try using something else as a spacer to continue driving this up. Get that boot off there. And there it is friends. Just a quick overview of the new ball joint before we go ahead and install it. If you were to look at it, it pretty much looks the same all the way around unless of course you took the boot off and then you took a peek underneath. If you look, you're gonna see there's a flat edge there and a flat edge here. You need the pivot point, which would be the opened areas of this ball joint, to be facing in and out of the vehicle or to the left and the right, not front to back. You don't want this to pivot front to back. That's not the way it needs to go. It would need to go this way so I can pivot in and out or left and right on the vehicle. All right. So we've got our ball joint here. You can see it comes with a little hole on the top. We're just gonna line that up facing straight out towards us. That looks pretty great.
Now I'm gonna take my ball joint press kit and I'm gonna use the piece that looks like this. That's gonna sit right over the top and that's where the driver is gonna go down against. You need to have something covering this ball joint. You cannot press directly against it. I'm gonna use a cup that has a hole in it on the bottom for the lower part. Come right in just like this. And having the hole in the bottom is gonna make it so that the stud will be able to come through as the ball joint presses in. Start that right on there. Now I'm gonna snug this up. All right. Let's go ahead and bottom this out. We're gonna bring the ball joint right down to the control arm. As we do this, you wanna make sure the ball joint's going as straight down as possible. If it seems as though it's going off-kilter in any direction, you need to stop, try to fix the ball joint, straighten it out. Now I'm just gonna take a look. I can see the ball joint is hitting directly against the control arm. I'm gonna double check to make sure it's all the way around. That looks perfect. While we still have the press on here and it's giving it a lot of force, I'm just gonna bonk on this control arm a couple times just to cause a little bit of vibration and maybe set this in if it's just got a little bit more to go. That's great. Let's get this out of here.
It's super important to make sure that you put your snap ring on here. The snap ring is gonna keep this ball joint from eventually or potentially working its way out of the control arm. Grab some pliers that look like this. They're gonna have two little pitons on them and they're gonna fit right inside the holes on the snap ring. Once you spread them, you'll notice that it opens up. We're gonna come right over the ball joint and we're gonna put it up into that lip that's up near the control arm. We've got that over there. Double check to make sure it's seated all the way around. It needs to be in there completely. That looks perfect. Let's grab the boot. So let's turn over our boot and take a little look right here. You're gonna see where the stud comes through. It has a little area that looks different than the rest. That area needs to be facing in-board or towards the inside of the vehicle. So we'll put that facing just like that and it's facing towards the frame. Now we can take some pliers or whatever you might have and we need to get the boot so it's sitting up on top of the ball joint. Double check the boot. Make sure it's sitting perfectly all the way around. As long as it is, now we're gonna grab the knuckle. Bring it up. We're gonna put the stud through. We're gonna need a little bit of leverage though.
I'm gonna use a nice long pry bar. Come across the top of the control arm here/ball joint and under the frame. I'll pull it down and then I'll start in the nut. Give this a little turn. Bring it up. Okay. Let's get our pry bar. Bring that ball joint down and into the knuckle. There we are. Let's start the nut on. Just go ahead and get this thing so it's snugged up. Okay. The torque for this nut is 37 foot-pounds. Will you be able to get a socket and a torque wrench in between here? Probably not. 37 foot-pounds isn't really very much but it is definitely tight. So bottom it out, give it a little bit more, and then we're gonna definitely make sure that the cotter pin hole is gonna line up between the nut and the stud. Okay. So now I'm just gonna take a peek and I can see where the slot and the nut is, and I can see where the hole and the stud is. You wanna line those up. Put the cotter pin through just like that. Now we'll just peen this down and then curl it over. This is gonna make sure that there's no way that that nut can loosen up on its own. At this point, we don't need this on there anymore. Let's get that ABS wire back connected. Give it a nice tug. Make sure it's completely connected and now make sure it's secured to the frame. The next thing you would wanna do is make sure you secure your brake hose.
Go ahead and put that bolt back in, assuming yours didn't break. If it did, you need to make sure you secure it with something such as maybe a tie of some sort, or even drill out the hole and re-tap it if you needed to. Now before we go ahead and put the wheel back up on there, just double-check everything. Make sure that your ABS wire is connected. Make sure your ball joint's sitting flush. The boot's on the way that it needs to be and you definitely have a locking cotter pin holding that nut on the stud. Now let's go ahead and torque our lug nuts to 140 foot-pounds. Center cap, go ahead and pop it on there. Now that you've finished your service, go ahead and take it for a road test and make sure you get it down to a local reputable alignment shop.
Shop Products


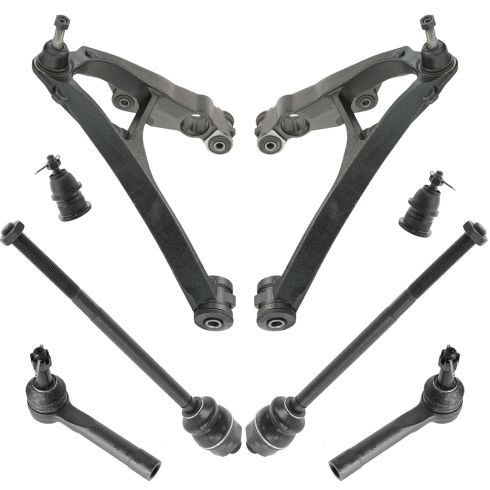
Chevrolet GMC Cadillac Front 8 Piece Steering & Suspension Kit TRQ PSA63535
Part Details:
- (2) Front Upper Ball Joints
- 8 Piece
- (2) Front Outer Tie Rods
- (2) Front Inner Tie Rods
- (2) Front Lower Greaseable Control Arms with Ball Joints
How To Replace Lower Ball Joint 1997-2002 Ford Expedition PART 2
This video continues the installation of the ball joint and CV axle, including some handy ways of completing the repair without special tools
