How to Replace Front Sway Bar Links 2002-06 Nissan Altima
Created on: 2017-09-12
How to repair, install, fix, change or replace a broken, busted, bad, loose, or damaged sway bar link on 02, 03, 04, 05, 06 Nissan Altima.
-
step 1 :Removing the Wheel
- Loosen the 21mm lug nuts with the vehicle on the ground
- Raise the vehicle with a floor jack
- Secure the vehicle on jack stands
- Remove the lug nuts
- Pull off the wheel
-
step 2 :Removing the Sway Bar Links
- Counterhold with an 18mm wrench
- Remove the nut with an 18mm socket and breaker bar
- Repeat the process on the other side
- Remove the sway bar link
-
step 3 :Installing the Sway Bar Links
- Insert the sway bar link into the strut
- Counterhold with an 18mm wrench
- Tighten the nut with an 18mm socket and breaker bar
- Torque the nuts between 59 to 72 foot-pounds
-
step 4 :Reattaching the Wheel
- Slide the wheel into place
- Start the lug nuts by hand
- Tighten the lug nuts preliminarily
- Lower the vehicle to the ground
- Tighten the lug nuts to between 73-86 foot-pounds in a crossing or star pattern
Tools needed
-
21mm Socket
Socket Extensions
Torque Wrench
Rust Penetrant
18mm Wrench
Jack Stands
18mm Socket
Ratchet
Floor Jack
1/2 Inch Breaker Bar
Hi, I’m Mike from 1A Auto. We've been selling auto parts for over 30 years!
Where you lift and support the vehicle, loosen the lug nuts with the wheel on the ground. Use a 21 mm socket and a breaker bar. Lift and support the vehicle. With the lug nuts loose, you can use the 21mm socket with just your hand. Finish removing the lug nuts, remove the wheel, and place it aside.
When replacing the sway bar links on the suspension, just keep an eye on left and right, and up and down orientation. These will only fit one way. Otherwise, you're going to struggle trying to get it to fit. This one matches up pretty well on this side. So this goes on the driver's side and the curves match the original part, and we'll put it in roughly the same place. These are ball joints on the end of this, so you can move them once they're installed, but, since this is pretty close, this is the one that's going to be for the driver's side.
Spray the upper sway bar link nut with some rust penetrant, and also spray the backside of the nut on the sway bar. You can use an 18mm wrench to counterhold. There is a hex head on the back of this sway bar link, so I want to counter hold it. And use an 18mm socket and a breaker bar. So you kind of hold it this way, pull it down, break it free.
With it broken free, I'll switch to a ratchet. Right, we should push out on the backside. I just have to work it out a little bit. It does have a ball joint. It will pivot. You can just pop it out. So that's loose now. I'm going to work on the bottom side. So, counter hold this with an 18 mm wrench and then use the 18 mm socket and breaker bar to get this in place. And use it to break it free. Go up. It's fairly loose when you use a ratchet. To keep the upper part of the sway bar link from bouncing around, I'm just going to throw the nut on it, just finger tight. Continue working on the bottom and do the top one, and remove the sway bar link.
This is the old sway bar link we pulled from our vehicle, and our new one from 1aauto.com. You can see they are very similar in design. Same curvature and same style with the counterhold points here so you can tighten them. It comes with new nuts so, if your sway bar links are broken or worn out, get these new ones from 1A Auto, and we'll get you going down the road.
Slide our new sway bar link up into place. Again, make sure you've double checked your right, left, and up and down orientation. You need to bend them a little bit to get them to go in. It's perfectly all right. Sometimes you need to just grab the ball joint in and just push it down. Capture the nuts in here by hand. The nuts on the backside of these to counter hold them are 16 mm. Put this in here. It's easier from this side. Use an 18mm socket and get these snug before we torque them. Do the same for the bottom.
The clearance to get to this lower sway bar nut with this control arm is a little tight. I kind of had to flex the sway bar a bit with the breaker bar to slide the torque wrench in here, but it's in here. I can get it out when I'm done. The torque on these is 59 to 72 foot-pounds. So we're going to do it at 65. So I'm going to counter hold this with my 16 mm wrench. I've got my torque wrench set to 65. Tighten this up, and there it is. And use that breaker bar just under the sway bar here. I'm just going to pry it a little bit and work that out of there. I'll do the top nuts. So, again, counterhold it with the torque wrench. Sway bar link is installed and torqued.
We reinstall our wheel, and we'll torque the lug nuts. I'm just going to use the socket to get these lug nuts as tight as I can by hand. We can torque the wheel afterwards once it's on the ground. The torque on the lug nuts is 73 to 86. I've torqued these to 80 in a cross pattern. The job is complete.
Thanks for watching. Visit us at 1AAuto.com for quality auto parts, fast and free shipping, and the best customer service in the industry.
Shop Products
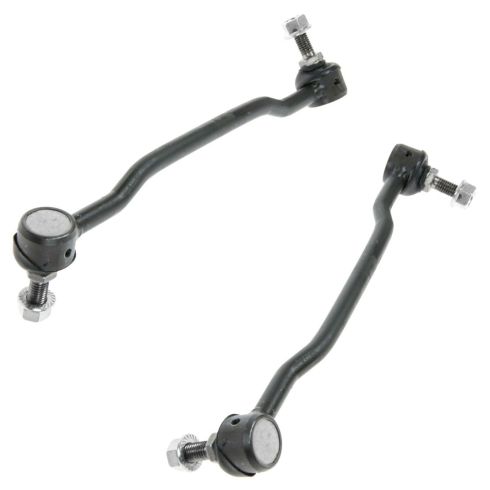
Nissan Altima Maxima Front Driver & Passenger Side 2 Piece Sway Bar Link Set TRQ PSA55658
Part Details:
- 2 Piece
- (1) Front Passenger Side Sway Bar Link
- (1) Front Driver Side Sway Bar Link
How to Replace Front Sway Bar Links 1980-2003 Ford F-150
How to remove, replace, and install a sway bar end link on 80, 81, 82, 83, 84, 85, 86, 87, 88, 89, 90, 91, 92, 93, 94, 95, 96, 97, 98, 99, 00, 01, 02, 03
