How to Replace Front Sway Bar Links 1988-2002 GMC Sierra 1500
Created on: 2020-04-27
Watch this video to learn how to install new sway bar links from TRQ on your 1988-2002 GMC Sierra K1500.
Tools needed
-
13mm Socket
Air Chisel
Torque Wrench
Socket Extensions
Hammer
Rust Penetrant
Pry Bar
10mm Wrench
10mm Socket
Swivel
13mm Wrench
22mm Socket
Safely raise and support your vehicle on the frame so your suspension can hang. Now that we've safely raised the vehicle, let's remove this by using a small pry bar right in this little slot.
Now you can see your 22-millimeter lug nuts; remove those.
And now we'll just do the same thing to the other side. Let's get this little plastic cover out of here. To get out the sway bar links, more than likely, you're gonna have to drop your sway bar. To do that, I would spray right inside this hole right here, try to spray the top area of that bolt, and then from the other side, spray this side as well. While you're at it, why don't you do the other side of the vehicle at the same time?
To get this one out, obviously, it's going to be a little bit difficult. You have minimal room here. Go and try to use some sort of pivoting extension or whatever you might have to get up in there. You could also use a 10-millimeter wrench if you have all day.
Let's do the same to the other side. I'm just gonna use a swivel socket to come through this hole. I want to try to find the bolt under there. I'm gonna hold that and then I'm gonna remove the nut on the top.
Okay, so that one broke. So now we're just gonna get the bar off of here. We can move this, try to get this separated real quick.
So now we have the sheath. This is a metal sheath that goes over this metal part of the bolt. Odds are that's gonna be completely rotted together. The best thing to do here would be to cut it. If you were to look right down along here, you can see exactly what I'm talking about. They left plenty of room for moisture to get in there. Let's carefully heat up the area. You obviously want to be careful for any rubber such as your axle boot, or even your ABS wire.
Now we have that nice and warm, let's go ahead and hit it was some penetrant spray. Let's clear the area, let that dissipate for a minute.
Let's get the rest of this off of there.
It doesn't look like the bushing wants to be coming out at the same time here. Get this out here, get that out of there.
Now when you're replacing the sway bar links or just the bushings, you want to obviously do those as a pair and when they're apart is the best time to do it. So now when we're getting ready to put this on, it's important to make sure you have the smaller bushing on the bottom side, that's going to make it much easier to get up through the hole in the bottom of the control arm.
Get that and the bushing right up in there. Now we're gonna go with the other bushing that has the washer on it like that. Slide it down, get your shank, slide that on there, you've got your other washer, a little thing on there. Slide that like that. This is gonna go through the bar. Now we'll grab our bushing with the washer, slide that right on there and get our locking nut, make sure you put that on as well, obviously.
Now we're gonna do the same to the other side and then we'll jump into putting back on the bushings. Now we're gonna take our 13-millimeter wrench, come through the bottom of that control arm right through the hole and try to hold the bolt. And we'll come up here with our socket and we're gonna snug this up and pay attention to the bushings for how much they try to squish down.
I'm just going to analyze these bushings real quick. What you want to look for is to make sure that they're actually touching up against the bar. They have no room for movement, and you also want to make sure that they're not necessarily squished down like a pancake. If you've done that, you're probably going to damage the bushing. All you want it to be is enough so it touches here, here, here, and then if you could see in there, of course it's touching as well. We'll do the same to the other side. Let's start all of our bolts in here that hold the sway bar bushings in.
We're gonna snug these right up. All right, make sure those are nice and tight and then do the same to the other side of the vehicle.
Time to get the wheel up on here. Start on one of those lug nuts. Now we're just gonna start on all the lug nuts. We'll bottom them out, and then we'll torque them to 120 foot-pounds.Torque these to 120 foot-pounds. It's torqued. We'll get our cover on here. Awesome. And now we'll just do the same thing to the other side.
Shop Products


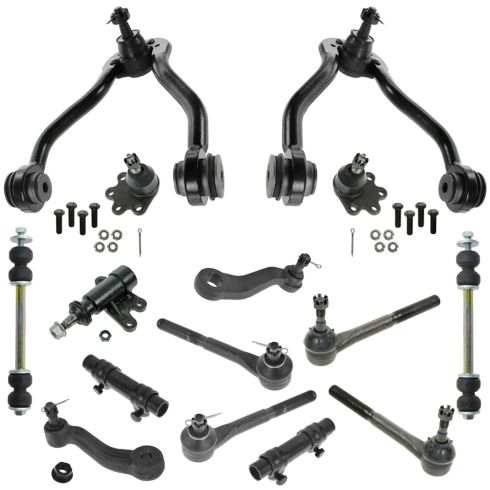
Chevrolet GMC Front 15 Piece Steering & Suspension Kit TRQ PSA60100
Part Details:
- (2) Front Sway Bar Links
- (2) Front Lower Ball Joints
- (1) Idler Arm
- (2) Front Upper Control Arms with Ball Joints
- (1) Pitman Arm
- 15 Piece
- (2) Front Tie Rod Adjusting Sleeves
- (1) Idler Arm Bracket
- (2) Front Outer Tie Rods
- (2) Front Inner Tie Rods
How to Replace Front Sway Bar Links 2002-07 Mazda 6
How to remove, replace, and install a sway bar end link on 07 Mazda 6.
