How to Replace Front Sway Bar Links 2007-16 Honda CR-V
Created on: 2018-08-08
How to remove, replace, and install a sway bar end link on 07, 08, 09, 10, 11, 12, 13, 14, 15, 16 Honda CR-V
-
step 1 :Removing the Wheel
- Raise the vehicle with minimal weight on the tire
- Loosen the five 21 mm lug nuts
- Raise and support the vehicle
- Remove the five 19mm lug nuts
- Remove the hubcap
- Remove the wheel
-
step 2 :Removing the Sway Bar Links
- Remove the 17 mm nut from the top end of the sway bar link, holding the stud with 6mm allen bit to prevent it from twisting, if necessary
- Remove the lower 17 mm nut from the sway bar link, using locking pliers if necessary
- Repeat on the other side
-
step 3 :Installing the Sway Bar Links
- Install the lower end of the sway bar link into place
- Install and tighten the 18 mm nut
- Install the upper end of the sway bar link into the strut bracket
- Install and tighten the 18 mm nut, holding the stud with 6mm allen bit to prevent it from twisting, if necessary
- Torque the bolt to 58 foot-pounds
- Repeat on the other side
-
step 4 :Installing the Wheel
- Slide the wheel onto the wheel studs
- Replace the hubcap
- Replace and tighten the 21 mm lug nuts by hand
- Lower the vehicle with minimal weight on the wheel
- Torque the lug nuts to 80 ft-lb in a star pattern
- Lower the vehicle completely
Tools needed
-
Socket Extensions
Torque Wrench
Hammer
17mm Wrench
Rust Penetrant
17mm Socket
Jack Stands
19mm Wrench
19mm Socket
3/4 Inch Wrench
6mm Allen Wrench
Large Locking Pliers
Ratchet
Wire Brush
Floor Jack
1/2 Inch Breaker Bar
Hi. I'm Mike from 1A Auto. We've been selling auto parts for over 30 years.
We have a 19 millimeter socket, an extension and a breaker bar. We're going to crack the lug nuts free. Now we're going to raise and support the vehicle with a two post lift. You can use a jack and jack stands. Now with the vehicle raised up we're going to take the lug nuts off. I'll pull the tire off. This sway bar link is a little bit rusty, so we're going to spray some rust penetrant on it. We'll spray some rust penetrant on this nut right here. We're going to take this nut off. We're going to use a 17 millimeter wrench to get it on there, but when we loosen it up this stud is going to start spinning so what we want to do is a little Allen in there, a little spot for an Allen.
We're going to use a six millimeter Allen and I'm just going to hammer it in because this one's a little rusty. I'll take my ratchet and I'll put it on the tightening setting and then I'll loosen this up. This nut is on there pretty hard so what I'm going to use is a hammer and I'm just going to tap on my wrench to get it started. Just like that. Then with my ratchet I'll hold the stud. You can actually go like this to an extent. This is pretty rusty. I'm going to just use a wire brush. Try to get some of this rust off of this stud. Maybe that'll help.
All right, so this nut's giving us some trouble. The next step, what you could do or what we could do would be cutting the stud off in the back. We could use a reciprocating saw or a Whizzer and get this stud cut. Before we do that, I am going to attempt to use an impact gun. What I'll use is some locking pliers on the back here first, just lock it onto the stud. I'm just going to work the nut back and forth. First I'm going to tighten it. Now I'll just go back and forth. This last time should take it off and there we go. Got it off.
I'll pull the locking pliers off. The lower nut for the sway bar link is right here on the backside. The end is just as rusty as the upper one, so I'll take my little wire brush. I'll just clean that off a little bit and spray a little more rust penetrant right here. So to prevent my stud from spinning on this joint, I'm going to put some locking pliers on the backside. Pretty much what's happening I'm just putting it on that to prevent it from spinning. I'll try to loosen this up. I'm going to tap it with a hammer and see if I can get the wrench to loosen up a little bit.
This nut wouldn't break free so we're going to heat it up a little bit. Just going to use a little bit of MAPP gas. This part of the sway bar link just popped off. There must have been a nylon seal or something in there so that just popped off right there like that. Taking this nut off. It's giving me a little bit of trouble but it's not impossible. All right, so this nut's almost coming off. If there was more room I could get a ratchet in there but really not that much room. You could use a ratchet wrench to get this off if it wasn't so tight. There we go. Got it off.
This is our old sway bar link. This is our new sway bar link from 1AAuto.com. If you look at it, it's very similar. The joints are the same. The new one comes with new nuts. Take those off. This is generally what goes bad on these. What'll happen is this will loosen up and this ball and socket will rattle when you're going over bumps. So get your new one at 1AAuto.com and you'll be ready to rock and roll. All right, we're going to install the sway bar link this way. Slide that stud in down below there and put the nut on into that.
I'll slide the upper stud in here and push it down a little bit. Slide that in through the strut and snug that up. I'm going to use a 3/4 ratchet wrench to snug this nut down and I'm going to use a six millimeter Allen socket to hold the stud from spinning. I'll stick my ratchet on there, just tighten this up and I'll put the ratchet on loosen and that will hold the stud while I'm tightening it up. All right, now we're going to torque this using a 19 millimeter socket and a torque wrench. I'm going to torque it to 59 foot pounds. Kind of hard to do this.
The stud is just spinning so I'm going to just lock the backside of this stud with these locking pliers. That's 58 foot pounds. Now I'm going to put the tire back on. Line it up with the studs and I'll take our lug nuts and put them on. It's easier to use the socket when you're putting the lug nuts on. All right. We're going to drop it down and torque them. Now we're going to use a torque wrench and torque it with a 19 millimeter socket. We're going to torque these to 80 foot pounds in a star pattern. That is going to tighten the wheel properly. Just like that.
Thanks for watching. Visit us at 1AAuto.com for quality auto parts, fast and free shipping and the best customer service in the industry.
Shop Products
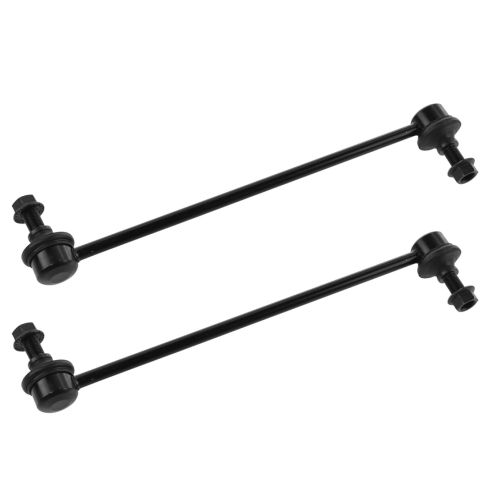
Honda CR-V Acura RDX Front Driver & Passenger Side 2 Piece Sway Bar Link Set TRQ PSA55852
Part Details:
- 2 Piece
- (1) Front Passenger Side Sway Bar Link
- (1) Front Driver Side Sway Bar Link
How to Replace Front Sway Bar Links 2002-07 Mazda 6
How to remove, replace, and install a sway bar end link on 07 Mazda 6.
