How to Replace Front Sway Bar Link 2008-14 Cadillac CTS
Created on: 2019-09-27
Check out this video to learn how to replace the front sway bar links on your 08-14 Cadillac CTS. With instructions from 1A Auto, this DIY job is a breeze!
-
step 1 :Removing the Wheel
- It is not necessary to remove the wheel, but helpful if you are working on the ground
- Loosen the 22 mm lug nuts
- Raise and support the vehicle
- Remove the lug nuts
- Remove the wheel
-
step 2 :Removing the Front Sway Bar Link
- Apply rust penetrant to the upper and lower nuts and bolts
- Remove the 18 mm nut from the lower link end, holding the stud with locking pliers if necessary
- Remove the lower link stud from the control arm
- Remove the 18 mm nut from the upper link end, holding the stud with locking pliers if necessary
- Remove the ABS sensor wire bracket
- Remove the second 10 mm nut from the upper link end, holding the stud with locking pliers if necessary
- Remove the sway bar link
-
step 3 :Installing the Front Sway Bar Link
- Insert the upper link end stud through the sway bar
- Install the 18 mm nut, holding the stud with an 18 mm wrench if necessary
- Torque the 18 mm nut 92 ft-lb
- Install the ABS wire bracket and secure it with the 18 mm nut
- Insert the lower link stud through the lower control arm
- Install the 18 mm nut and torque it to 55 ft-lb
-
step 4 :Installing the Wheel
- Install the wheel onto the wheel studs
- Install the 22 mm lug nuts and tighten them by hand in a crossing pattern
- Lower the vehicle with minimal weight on the wheel
- Torque the 22 mm lug nuts to 100 ft-lb in a crossing pattern
Tools needed
-
Torque Wrench
Locking Pliers
Rust Penetrant
18mm Wrench
Jack Stands
18mm Socket
Floor Jack
What's up, guys? I'm Andy from 1A Auto. In this video, I'm going to show you how to replace the front sway bar links in this 2008 Cadillac CTS. If you need parts for your vehicle, click the link in the description and head over to 1aauto.com. Now, if you're doing this job, you don't necessarily need to take the tire off. It helps if you're doing this on the ground so that you can have a little more room to work and stuff. But keep in mind when you're doing it, you don't necessarily have to have the tire off.
We're going to take this wheel off. I'm going to use a 22-millimeter socket and an air gun. If you don't have an air gun, you can loosen up the lug nuts on the ground with a breaker bar. Now, take the wheel off. I'm just going to spray a little rust penetrant and this nut before I take it off. I'm going to use the 18-millimeter socket and an air gun. Take this nut off. Now, what normally happens is once you get to a certain point, the studs going to start spinning. Actually, we were lucky on that one. It came off all the way. But if it was spinning, what can do is take some locking pliers, get it from the backside, or you can always use an 18-millimeter wrench. This has a little hex bit where you can put a hex bit and hold the stud from spinning and loosen it up with the wrench.
All right. Now, we can just try to slide this out. We have to pull down on the sway bar just like that. Spray a little more rust penetrant on that nut, and we'll take that one off. Now, I'm going to use an 18-millimeter socket. I'm going to use a small extension and a ratchet. Take this nut off right here. All right, take that nut off and then there's a little bracket right here. You can slide this bracket off. It just goes to the wheel speed sensor. Slide that out of the way. Use a little more rust penetrant. Now I'm going to take that nut off. I'm to use a deep 18-millimeter socket and ratchet. Loosen it up.
Now, as I do this, I can feel that the stud is starting to spin a little bit. So you can see where it's marked right there. Let's see if that moves. Not too much. So you can try to keep hammering this off, or I'm going to get some locking pliers and basically tighten around here on that side and see if I can get it off. All right, so I'm just going to put those locking pliers like this. Hopefully, that'll hold the stud from spinning. This is generally the easier way to do it versus using a wrench and a hex bit. There's we go. Let's take the ratchet, loosen this up. Seems like it's working pretty good or was working pretty good. Might have to tighten up on the locking pliers.
All right, I'm actually going to use a smaller set of locking pliers. The washer part of this came off, so it just started spinning again. Do that and keep loosening this up. That seems to be working better. Just going to let the pliers rest up against the strut. All right, so that takes a little bit of effort and we're able to get that nut off. It's kind of hot. And take the nut off, and you can apply the link right out. Here's the old part. Here's the new sway bar link from 1aauto.com. As you can see, the studs are the same, comes with new nuts. What's nice about these is these have this spot right here that you can actually put a wrench so the stud will not spin, unlike these where we had to use some locking pliers, which is sometimes fairly difficult. So this is pretty awesome that this has that. Get yours 1aauto.com, and you'll be ready to rock and roll.
You can take the nuts off the sway bar. Keep the ABS harness going the same way it was when you took it off. Just line the top part up first. You can always get the bottom one lined up. There we go. Just like that. Then for the backside so that the stud doesn't spin, I'll just use an 18-millimeter wrench. You can just slide that in there. Be careful of the boot. You don't want to rip the boot while you're doing this. It helps if you have thinner wrenches, but this will work. Take the new nut, slide it on the top. With the 18-millimeter socket and a ratchet, tighten that nut up while you hold the wrench. All right, it's tight.
Now, we'll take an 18-millimeter socket and a torque wrench, and I'm going to torque this nut to 92 foot-pounds. I'm going to reinstall this bracket that has the ABS wiring harness on it. Take this nut, put the nut on that holds that bracket on. We use an 18-millimeter socket and a ratchet, tighten that nut down. That's good, just snug. Line this lower control arm up with the sway bar link. Sometimes you can just pull down on the sway bar a little bit. Trying to get that to line up a little easier. There we go. Just us a 18-millimeter wrench. Put the nut on. Now, we'll take a 18-millimeter socket and ratchet, tighten this up. Now, we'll take a torque wrench and with your 18-millimeter wrench, torque this to 55 foot-pounds. Oops.
All right, take the wheel, re-install the wheel. Install the lug nuts. All right, now we're going to use a 22-millimeter socket and a torque wrench. Tighten these lug nuts to 100 foot-pounds, and I'm going to do this in a star pattern so that it tightens the wheel down evenly. And I'll just go around again.
Thanks for watching. Visit 1aauto.com, your place for DIY auto repairs, for great parts, great service, and more content.
Shop Products


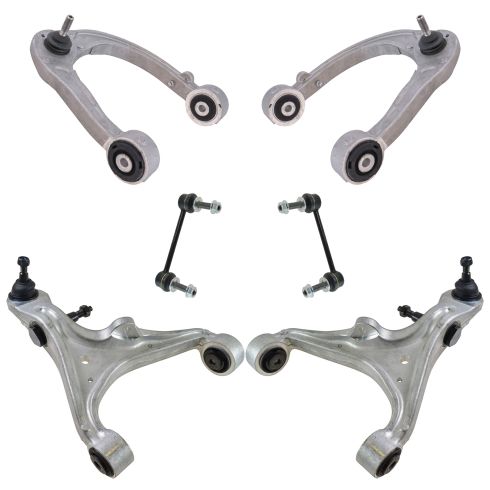
Cadillac CTS SRX STS Front 6 Piece Suspension Kit TRQ PSA69654
Part Details:
- (2) Front Sway Bar Links
- 6 Piece
- (2) Front Lower Control Arms with Ball Joints
- (2) Front Upper Control Arms with Ball Joints

How to Replace Front Sway Bar Links 2012-17 Toyota Camry
This video shows you how to install new TRQ sway bar links on your 2012-17 Toyota Camry.
