How to Replace Front Struts 2008-12 Chevy Malibu
Created on: 2020-08-13
This video shows you how to install a new front strut assembly on your 2008-12 Chevy Malibu.
Tools needed
-
Torque Wrench
Socket Extensions
Rust Penetrant
Jack Stands
18mm Socket
19mm Socket
Liquid Thread Locker
Socket Driver
Large Locking Pliers
Wheel Chocks
Center Punch
Chisel
Ratchet
Floor Jack
36mm Socket
1/2 Inch Impact Gun
Okay, friends, before we get started, the first thing that I want to mention is you want to be safe. So have hand protection and eye protection. The next thing we're going to talk about is safely raising and supporting the vehicle so the suspension is hanging. So come right underneath here, this is where you're going to support the vehicle in the front. Now with the front of the vehicle safely raised and supported, we're going to remove all 5 of our 19-millimeter lug nuts. Remove your wheel. Now that the wheel is off, we have a nice clear view of our front strut. With that said, anything that you're going to be removing bolts or nut-wise, you want to of course, spray it down with some penetrant.
First, what I like to do is remove the sway bar link from the front strut. So I'm going to use some locking pliers, come from the backside right here and just try to hold onto the stud so it can't spin. All right. Let's get this off of here. Let's get the brake hose off of here. What we want to do here is just kind of move this brake line a little bit so we can give some slack between the stud and the strut, that way there we can lift this right up and out.
The next thing we need to do is loosen our 36-millimeter axle nut. The reason for that is because when this knuckle is going to want to pull away from the strut, we don't want to put a tug on any of our axle boots. A little bit of penetrant. The next thing you would want to do is either with a center punch, come right into that little dimple and just try to drive this axle into the bearing a little bit, just to give a little bit of slack, or of course, if you don't have a center punch, just put the nut so it matches up evenly, give it a couple loving bonks this way. That's nice and loose.
Next, we're going to remove our 18-millimeter nuts located right here and there. They hold the knuckle to the strut. Grab this bracket, carefully set it aside. These bolts right here are actually going to have to be forced out of the knuckle area. So what I always like to do is just take those nuts and I'm going to start them back on there, a few good threads, and you want to make sure that we're not going to damage the thread of the bolts. Give it a couple of loving bonks. Keep your ABS wire clear, do the same thing to the other one.
If you look at these bolts, you can see they're both the same, and if you look, you can also see that it's splined. That's the reason why it was stuck inside the knuckle.
Now we're going to carefully try to separate these two, but we want to make sure that this doesn't come down too far because once again, we don't want to put a tug on our axle boots, and we definitely don't want to put a tug on our brake line. If you want to have a bungee cord or something that's going to hold it at least away, but safely, that's up to you. There we are. I'm just going to set this right like that. Now we need to get under the hood. Now that we have the hood up, you have a clear view of the strut tower here. With that said, you don't want to touch this center nut. We're only going to remove these three, but when we remove all three, we want to leave one on there just a couple of threads for safety, and then we'll get under, we'll hold onto the strut and then we'll remove that nut.
If for some reason your strut didn't drop down when you removed all three of your nuts like that, it's because it's probably frozen along this area here into the strut tower. Use a little bit of penetrant and then carefully bonk right along here until it finally breaks free. Down like this, I'm just going to hold onto that strut, remove that last nut, and then I can remove it. There it is, friends. One thing that's always a great idea before you go ahead and try to put your new strut into the vehicle, is just line up the strut cap with the way the original was. So a match up from the bottom, make sure it's facing a straight line, and then just set these where they need to be. You can do that fairly easily by just holding the bottom and then turning the cap itself. Okay, friends, now it's going to be time to get our brand new front strut in here. As we do this, I like to mention that I always like to use a little bit of thread locker right on these studs. We'll call it your prerogative, but I recommend it. When we put this in, we want to make sure we line up the bolt holes with the studs coming out of our strut itself.
We'll start on all of our nuts, and then we'll snug them down and torque them to manufacturer specifications. Something that's important to make sure that I mention before we go ahead and put our knuckle up into the strut, is if you were to look along the backside of the knuckle, you might find that there's a lot of corrosion buildup. That's due to the fact that somebody made the knuckle out of aluminum and they put it in with the steel. When you have aluminum with steel, it just corrodes and that's what happens.
So feel along the back. If it feels as though it's raised, you need to make sure you take a chisel or whatever you might happen to have and clean that out. Now that I've got that knuckle cleaned up, let's go ahead and put this up so it's going to line up the bolt holes. Obviously, you want to clean up the threads on your mounting bolts. Something I always like to use is a little bit of red thread locker, we'll call it your prerogative. Go ahead and start those through from the front to the back. Grab your two mounting nuts and of course, your bracket for the ABS wire, start it on there. We'll start these nuts, we'll bottom them out, and then we'll torque them to manufacturer specifications.
Torque both these nuts to 89 foot-pounds. Let's get our brake hose back in there. It slides right into this little groove, and then of course we'll tighten it up. Let's get the sway bar link connected to the strut. Let's torque this to 48 foot-pounds. After you've bottomed out your axle nut, torque it to 159 foot-pounds. I like to put a bar straight across these studs like this, you want to be careful and make sure it's flat and not at an angle because you don't want to damage your threads on your studs.
We're going to go ahead and put the wheel on here. We'll start all the lug nuts, we'll snug them up and then we'll torque them to 100 foot-pounds. Torqued. Now it's going to be time to make sure we go ahead and torque these down. Before we do that though, you need to make sure you have your wheel on the ground with the weight of the vehicle. Let's torque them to 18 foot-pounds.
Shop Products


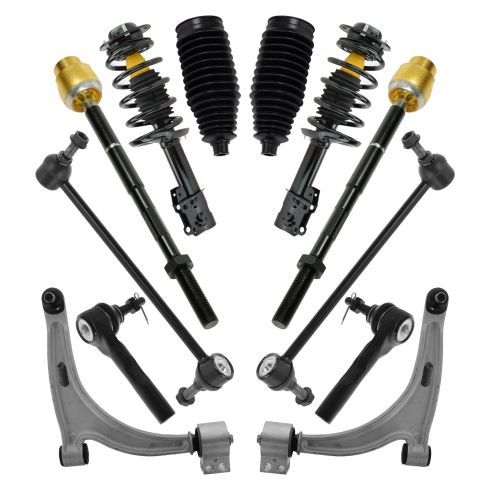
Chevrolet Malibu Pontiac G6 Front 12 Piece Steering & Suspension Kit TRQ PSA42229
Part Details:
- (2) Front Sway Bar Links
- (2) Front Lower Control Arms with Ball Joints
- (2) Front Strut & Spring Assemblies
- 12 Piece
- (2) Front Steering Rack & Pinion Bellows
- (2) Front Outer Tie Rods
- (2) Front Inner Tie Rods
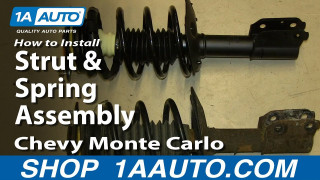
How to Replace Front Struts 2000-07 Chevy Monte Carlo
How to repair, install , fix, change or replace your front shocks with their loaded struts on 00, 01, 02, 03, 04, 05, 06, 07 Chevy Monte Carlo.
