How to Replace Front Struts 2001-12 Ford Escape
Created on: 2019-04-03
How to repair, install , fix, change or replace your front shocks with their loaded struts on 01, 02, 03, 04, 05, 06, 07, 08, 09, 10, 11, 12 Ford Escape
-
To prevent premature tire wear, the vehicle will need a professional alignment after completing this repair
step 1 :Removing the Wheel
- Loosen the lug nuts with the vehicle on the ground
- Raise the vehicle with a floor jack
- Secure the vehicle on jack stands
- Remove the lug nuts
- Pull off the wheel
-
step 2 :Removing the Axle Nut
- Secure the rotor with a pry bar
- Remove the axle nut with a 1-1/4 inch socket and breaker bar
-
step 3 :Removing the Front Struts
- Remove the clip from the brake line with pliers
- Remove the 10mm bolt from the ABS wiring harness bracket
- Remove the 10mm bolt from the ABS sensor and remove the ABS sensor
- Remove the upper sway bar link nut with a 15mm wrench and 5mm hex wrench and 17mm wrench
- Remove the upper sway bar from the strut
- Remove the loosen nuts from the strut with an 18mm wrench, 18mm socket, 1/2 inch breaker bar, and a hammer
- Hammer out the lower strut bolts with a punch and hammer
- Lower the vehicle
- Open the hood
- Hold the strut by hand
- Remove the four nuts surrounding the center nut from atop the strut with a 14mm socket and ratchet
- Remove the strut
-
step 4 :Installing the Front Struts
- Insert the strut into place
- Tighten the 14mm nuts atop the strut
- Torque the top nuts to 35 foot-pounds
- Connect the knuckle to the strut
- Insert the two lower strut bolts into place
- Tighten the lower strut bolts with an 18mm wrench and 18mm socket and ratchet
- Torque the lower strut bolts to 85 foot-pounds
- Line up the ABS wiring harness bracket
- Tighten the ABS wiring harness bracket with a 10mm socket and ratchet
- Tighten the 10mm bolt to the ABS sensor
- Insert the brake hose into the bracket
- Insert the clip to the brake hose with a hammer
- Tighten the upper sway bar nut with a 15mm wrench and 4mm hex wrench
- Torque the upper sway bar nut to 46 foot-pounds
-
step 5 :Installing the Axle Nut
- Secure the rotor with a pry bar
- Torque the axle nut to 221 foot-pounds with a 1-1/4 inch socket and torque wrench
-
step 6 :Reattaching the Wheel
- Slide the wheel into place
- Start the lug nuts by hand
- Tighten the lug nuts preliminarily
- Lower the vehicle to the ground
- Tighten the lug nuts to 100 foot-pounds in a crossing or star pattern
Tools needed
-
15mm Wrench
Torque Wrench
14mm Socket
Hammer
15mm Socket
Rust Penetrant
Pry Bar
Jack Stands
18mm Socket
4mm Hex Wrench
5mm Hex Wrench
1-1/4 Inch Socket
Center Punch
10mm Socket
Floor Jack
Needle nose pliers
1/2 Inch Breaker Bar
What's up, guys? I'm Andy from 1A Auto. In this video, I'm going to show you how to replace the front struts on this 2012 Ford Escape. If you need this part or other parts for your vehicle, click the link in the description and head over to 1aauto.com.
One thing you're going to want to do anytime you do any kind of front-end repair or suspension repair, you're going to want to go to a local shop and have your alignment performed. Otherwise, you're going to have premature tire wear.
I've raised and supported the vehicle, and I took the tire off, and now we're going to take this nut off. I'm going to use a pry bar and a 1 1/4 socket and a breaker bar. I'm going to use the pry bar to prevent the hub from spinning. I'm just going to set this up, just like that. Spin this around, and then the ground is going to support that from spinning. Just loosen this up.
Now that nut is loose. Now I can raise the vehicle up to chest level. I'm just going to use some pliers. I'm going to take this clip off that holds the brake line on. Just grab it and slide this out, just like that. And we can take this brake hose; slide it out of our way.
I'm going to take a 10mm socket, extension and a ratchet. Take this bolt out, right here. This holds the bracket for the ABS wiring harness. It's pretty rusty. If you have to, put a little rust penetrant on there. Pull that out. Slide that out of the way. Just so I don't break it, I'm going to take the bolt out, right here, that holds the ABS sensor in. I might be able to do it without taking this out, but I don't want to break the wire. Take that out. Pull this out of here. Slide that out of the way.
Before I take this nut off, I'm going to use a little bit of rust penetrant because—just make it easier taking it off. Let that soak for a little bit. With a 15mm wrench, I'm going to slide that over the nut, and then I can hold the stud with a 5mm Allen socket and a ratchet. Just put the ratchet on and tighten, and I'm going to loosen this. Loosen that up; get the nut off, like this. The backside, here—I can just take a 17mm wrench, hold the stud from spinning while I loosen up the nut. Alright. Pull that nut off and slide that out.
We want to take these bolts out. I'm going to take the—loosen up the nuts, right here. Before I do that, I'm going to spray them down with some rust penetrant. I'm going to take an 18mm wrench, 18mm socket and a breaker bar. I'm going to loosen up the nut—both of these nuts—and loosen up the lower one. Before I take these nuts off, I'm just going to take a hammer and I'm just going to tap them—tap the bolts out. The reason I left the nuts on is so that I don't mushroom the end of the bolts. Otherwise, you won't be able to reuse them.
Then I'm going to take a punch and the hammer. Just hammer it out, like this. This is going to move a little bit. Watch your fingers. Then I'll hammer this lower one out as well. Make sure you check the brake hose. Make sure there's not too much tension on the brake hose. That's good. Take those out and set them aside. Alright. So, these strut poles are not slotted, so you don't really have to worry about marking this. If these were slotted, you'd want to take a marker and just go around where the bolt holes are, or where the knuckle goes into the strut, so that when you put it back together, the alignment isn't very far off. It'll be less far off.
We lowered the vehicle and we opened the hood. And now we want to take these four nuts out, but we want to make sure we don't touch the nut in the middle because if you took that out, the spring is going to come separated from the strut and then it could be dangerous. So, just focus on those four. I'm going to use a 14mm socket and a ratchet. When I take this last nut off, I'll loosen this up. Before I take it off completely, I'm going to want to grab underneath here. Grab the strut itself—if you can grab it by the spring and hold it up, while I take that last nut off. Or you can have a partner helping you do this. Then once it's off, slide it down, just like that.
Here's our old strut assembly. Here's our new strut and spring assembly from 1aauto.com. As you can see, they look very similar. They both have the same springs. They both have a mount at the top. The new one comes with new nuts. The brackets on the bottom are the same—it's the bracket that holds the brake hose on, and the bracket for the sway bar link. These look the same. Get yours at 1aauto.com and you'll be ready to rock and roll.
Alright. So, before I install this, I want to take these nuts off. Then we're going to slide underneath, here, and slide it up. Get the studs lined up. Take the nut. Once you get some of the nuts on, then you can let go with a strut assembly—let it hang. I'll take a—for the new nuts, they're 15mm, so I'll use a 15mm socket and a ratchet. Now I'm going to use the 15mm socket and a torque wrench. I'm going to torque these to 35 foot-pounds.
Now we're going to reinstall this to the knuckle. Just slide the knuckle up. You might have to grab underneath. If you're doing this on the ground, you might be able to use a floor jack to raise this up a little bit. Pull that up. Take the strut bolts. Get that one in and then get this one in. Get the nut. Install that one; install this one. Take my 18mm wrench, 18mm socket and ratchet. I'll snug this up before I torque it. Then with a torque wrench, I'm going to torque this to 85 foot-pounds. And same with the lower one.
We want to reinstall this bracket for the ABS wiring harness. Get that lined up. Take this bolt. Get that started. I'll use a 10mm socket and extension just to get this tightened by hand, and then I'll snug it up and just use a ratchet and snug it up—not too tight.
Then I'll take the brake hose; get this lined up. There is some little keyways in the hose, so it only goes on a certain way. It looks like it goes on like that. Just make sure it's not twisted at all—up top or down below. Take the clip. Slide the clip in.
I might have to take a small hammer and just give it a tap. Tap the clip in. Now slide this in position—top. You might have to move this stud down a little bit. Just grab it; slide it down, just like that. You can line that up. Take the 15mm nut. I'm going to use my 15mm ratchet wrench, and it's short Allen—4mm Allen wrench. Now snug that up. Take that off.
Now I'm going to take a 15mm socket on a torque wrench and tighten this nut down to 46 foot-pounds. Now I'm going to take a pry bar. Just get in between these studs, right here. Have that set against the floor. I'll take a 1 1/4 socket and a torque wrench, and I'm going to torque this axle nut to 221 foot-pounds. Be careful when doing this. It's a lot of torque. There we go. At this point, we would put the tire on, put the lug nuts on, lower the vehicle and torque the wheels.
Thanks for watching. Visit 1aauto.com, your place for DIY auto repairs, for great parts, great service, and more content.
Shop Products


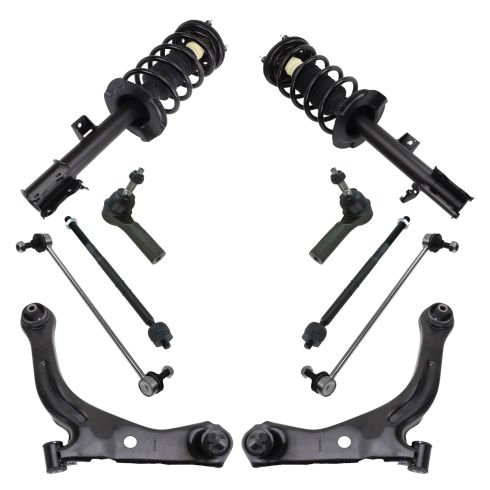
2009 Ford Escape Mercury Mariner Front 10 Piece Steering & Suspension Kit TRQ PSA06175
Part Details:
- (2) Front Sway Bar Links
- 10 Piece
- (2) Front Lower Control Arms with Ball Joints
- (2) Front Strut & Spring Assemblies
- (2) Front Outer Tie Rods
- (2) Front Inner Tie Rods
How to Replace Front Strut Assembly 2007-13 Chevy Suburban
If the front strut assembly is worn or failing and needs to be replaced, check out this how-to video and follow the steps to DIY
