How to Replace Front Strut Assembly 2001-12 Ford Escape
Created on: 2012-06-08
If the front strut in your 01-11 Ford Escape is sagging or clunking you can replace it yourself with the help of this 1A Auto video.
-
step 1 :Remove the top of the shock
- Pop the hood and apply penetrating oil to the top four bolts.
- Use a 14 mm socket and ratchet to remove the nuts.
-
step 2 :Remove the wheel
- Loosen the lug nuts
- Raise and secure the vehicle
- Remove the lug nuts and the tire
-
step 3 :Remove the bottom part of the strut
- Apply penetrating oil to your 10 mm brake line bracket bolt, 14mm Stabilizer link bolt and two 18 mm strut bolts.
- Unbolt the brake line bracket bolt, and then use your 5 mm Allen wrench to stabilize the bolt and work the nut loose with your 14 mm wrench or socket.
- Continue to loosen, apply penetrating oil, tighten, loosen, apply penetrating oil and repeat until you work it loose.
- Use a breaker bar or pipe and ratchet to remove the 18 mm bolts.
-
step 4 :Install the new strut
- Position your strut into place and thread your 6 nuts on.
- Torque the top four 14mm bolts to 35 ft lbs.
- Tighten and torque the bottom two bolts to 85 ft lbs.
- Bolt your stabilizer link back in as well as your brake line bracket.
- Use your 14 mm socket, ratchet and 5 mm Allen wrench to install the stabilizer link.
- The brake line bracket can be reinstalled with a 10 mm socket and ratchet.
-
step 5 :Put the wheel back on
- Replace the wheel and hand tighten the lug nuts.
- Lower the vehicle and torque the lug nuts in a star pattern to 100 ft lbs.
Tools needed
-
Socket Extensions
Jack Stands
10mm Wrench
5mm Hex Wrench
Large Hammer
Ratchet
Floor Jack
11mm Wrench
12mm Wrench
13mm Wrench
11mm Socket
14mm Wrench
12mm Socket
13mm Socket
15mm Wrench
14mm Socket
Torque Wrench
16mm Wrench
17mm Wrench
15mm Socket
Rust Penetrant
18mm Wrench
16mm Socket
17mm Socket
19mm Wrench
18mm Socket
19mm Socket
Flat Blade Screwdriver
10mm Socket
Brought to you by 1AAuto.com, your source for quality replacement parts and the best service on the Internet. Hi, I'm Mike from 1A Auto. I hope this how-to video helps you out and next time you need parts for your vehicle, think of 1AAuto.com. Thanks.
In this video we're going to show you how to replace a front strut on this 2002 Ford Escape. The strut is the same for any 2001-2011 Escape, although getting the wheel off may be a little different for different vehicles. We show you the driver's side. Obviously, you want to replace struts in pairs and the passenger side is the same procedure. Tools you'll need are a jack and jack stands. You'll 10-19 mm sockets and wrenches. You'll need the ratchet, some extensions, a breaker bar or a pipe, because you'll need some extra leverage on some of those nuts and bolts. Flat blade screwdriver, large hammer, a 5 mm Allen wrench, and a torque wrench.
First, with the vehicle on the ground, you're going to remove the four bolts at the top of the strut right here in the engine compartment. Use a little bit of penetrating oil, make it a little easier to get them off. Let that sit for a minute. These bolts should only be tightened to 35 foot pounds, so they should come off pretty easy and they are 14 mm. Now, using a jack, raise the vehicle up off the ground, putting the jack right underneath the front control arm. Then make sure you put a safety jack stand underneath the frame rail there. Next, remove the wheel and tire. If you don't have the benefit of air tools, loosen the lug nuts while the wheel is still on the ground, then raise and support the vehicle and remove the tire the rest of the way.
Now we're going to have to remove this bolt here, which allows these brackets to just kind of move to the side. We'll need an Allen wrench and a wrench to remove this bolt that holds the stabilizer link. Then there's two large bolts here that we need to remove. Again, coat everything with penetrating oil and let them sit for a while. Again here I'll use a little fast motion as I remove that. The bolt that holds the bracket in place is a 10 mm and it can be a little difficult. In fact, you may break it on some vehicles. If you do break it, you'll have to just source a similar bolt from the hardware store. Okay, one thing I didn't go over, there is a clip that holds the brake line in, just use a large screwdriver and pry that clip out. It comes out pretty easily. Then we'll let the brake line down and out of your way.
Okay now, this probably about the most difficult part. I've got a 14 mm wrench on the nut that connects the stabilizer to the strut, then I take another wrench, connect it to it and that gives me some extra leverage and I can start the nut spinning. Then as you get it looser, usually the stud that's part of the stabilizer link will start spinning as well. See here, I take the 5mm Allen wrench and put it into the stud and the stabilizer and work it in there really well. It's usually kind of rusted in there. Maybe take a small screwdriver, clean it out a little bit. Really work that Allen wrench in there well and then hold the stud with the Allen wrench. Okay, this is where it gets difficult. If you have a torch or a Sawzall, I could recommend that you cut the stabilizer link stud and then just put a new one in, but most of the time you want to save that. Basically what you do is you loosen the nut up as much as you can while you're holding the Allen wrench and once you can't loosen it anymore, then you tighten it back up. Spray it with penetrating oil again, loosen it up again, tighten it up. Spray it with penetrating oil, keep loosening it and I probably did this a total probably of about 15-20 times and finally it worked the lock nut all the way off.
Okay, so now we're on to the large bolts that hold the strut at the lower end. You can see I have an 18 mm socket and I'm actually using a pipe and a ratchet. The pipe gives me some extra leverage. What I do is I position the wrench right up against the vehicle and then pull with the pipe. Okay, then we'll fast forward here as I use my impact wrench, put it on there and get that bolt off the rest of the way. Okay, here on the second bolt, you're going to see the bolt actually breaks and that's probably going to happen just about half the time with these. Okay, use a hammer and a punch to start driving the bolts out and then you can let down the jack that releases most of the pressure off the strut and then the bolts will come out and then you remove the strut. Okay, so here is our original strut, and you can see that the spring is actually broken. This vehicle was making a clunking noise whenever you turned the wheel and sometimes when you started out and stopped.
Here's our new strut from 1A Auto. The spring is assembled. It's got all the right brackets and everything on it. Just going to remove the nuts from the top here. Okay, so now we're going to take the new strut and make sure that the bracket that goes around the steering knuckle's pointing out, put it down through between the tie rod and the lower control arm and then bring it up in to place. Kind of get the lower mount set on the steering knuckle, so it kind of is now roughly in place. Now you can go up top and just take your nuts and, if you need to, you can jack up the jack a little bit, but just get those four studs on top in place, put those nuts on, and then just kind of preliminarily tighten them up; you'll torque them later. Okay, from here on out, it's pretty much a reverse of the procedure. You can see I lift the steering knuckle up and kind of work it in the position and get both of the bolts through the strut and into the steering knuckle. Then put on washers and lock nuts and obviously, because one of them broke, I'm using two brand new bolts. Now here I'm jacking the car back up to put the weight back on to the suspension. Tighten and torque these bolts to 85 foot pounds. Torque these upper bolts to 35 foot pounds.
Just speed up as I do those last two. Okay, and now to put the stabilizer link back together. It goes back together a lot easier than it comes apart, needless to say or regardless, I just use a little bit of penetrating oil on there anyways, then use the 5 mm Allen wrench and the 14 mm wrench and tighten that up. It does go a lot faster when you're at about seven times speed too. Now, put the bracket back in place and put that 10 mm bolt, again, if that bolt broke use a, it's probably about a M8 self tapping bolt that just kinds of bolts into the strut. Then put the brake line back in place. Use a small hammer to tap the clip in place. Then just check and make sure nothing's rubbing or chafing on anything. Now, put your wheel and tire back in place. Put the lug nuts on and just kind of tighten them preliminarily. You want to torque them once the vehicle's back on the ground and secured. Set your torque wrench to a hundred foot pounds and then tighten them up using a star pattern as the order and then put your cap back in place.
We hope this helps you out. Brought to you by www.1AAuto.com, your source for quality replacement parts and the best service on the Internet. Please feel free to call us toll free, 888-844-3393. We're the company that's here for you on the Internet and in person.
Shop Products


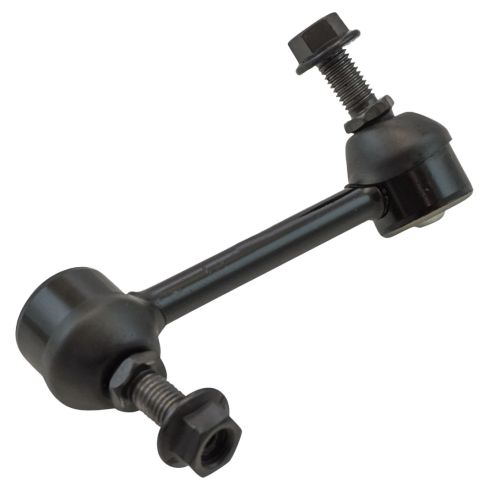
Rear Passenger Side Sway Bar Link TRQ PSA67827
Part Details:
- Yes
- No
- Male Threaded
- Male Threaded
How to Replace Front Strut Assembly 2007-13 Chevy Suburban
If the front strut assembly is worn or failing and needs to be replaced, check out this how-to video and follow the steps to DIY
