How to Replace Front Strut 2013-17 Buick Enclave
Created on: 2020-11-02
This video shows you how to install new shock and spring assemblies on your 2008-17 Buick Enclave.
Tools needed
-
24mm Socket
15mm Wrench
Torque Wrench
Hammer
15mm Socket
18mm Wrench
Jack Stands
18mm Socket
Trim Tool Set
Locking Pliers
Flat Blade Screwdriver
Wheel Chocks
Bungee Cord
Wiper Arm Removal Tool
Ratchet
Floor Jack
1/2 Inch Impact Gun
22mm Socket
Marker / Writing Utensil
I'm going to take a 22-millimeter socket and remove these lug nuts on the wheel. Now I'm going to remove the wheel. I'm going to take this nut off first. I need some locking pliers behind just to hold the stud from spinning. Now what you could do is take an 18 millimeter wrench, and then a socket on the end of this, and loosen it up that way, but this is a lot easier using the 18-millimeter socket. And you might have to tighten this up a little more. And take that nut off. Remove these hold-downs for this ABS wire or wheel speed sensor wire. Just use a trim tool to get underneath here. Pry that off. Then over here just like that. Set that aside.
Now the new strut is probably going to be slightly different. But just to get the alignment somewhat close, just take a marker and just mark the knuckle. Try to put the new strut close to that. You're still going to need an alignment after you're done, but at least this will bring it close. Take a 24-millimeter socket and take these nuts off. And then same with the bottom one.
Now take a hammer and slide these bolts up. They are slotted, so that's what's keeping them in the knuckle. All right. Now we can separate the knuckle from the strut, and then just slide it to the side. And you want to be careful. You don't want the axle to pop out. So try to push on this, and then you can use a bungee cord, or a bungee cable, and just slide it over here. Just find something that you can attach it to underneath. Just go around the back just like that. And that's just going to prevent the axle from popping out and to make sure there's no tension on the brake hose.
You need to remove the wipers. Use a straight blade screwdriver. Just get underneath the cover right there. Use a 15-millimeter socket. Take that nut off. And grab the wiper arm, and just rock it back and forth. Or you can use a wiper arm removal tool, and slide it up just like that. Then do the same for the other side. Take this ground adapter off. Just use a 15-millimeter wrench. And because of the way this trim panel is, we're going to need to remove this panel. Take a trim tool. Just get underneath here. Do that on both sides and then remove all these clips. That's a clip right here and throughout the rest of the panel.
Now just grab this panel and slide it out of the way. Remove these trim pieces on both sides. Use a trim tool. Take these clips out. Now I'm going to remove all these pushpins. Just use a trim tool along the base of the cowl. Just take this fuse box cover off just because it's in the way a little bit. Just push down on these locks and then slide it out of the way. You can slide this up. All right, so lifting this up and then sliding the back side down. There is clips that go underneath the glass holding it in.
Now we don't have to take this off completely. You just need to get it out of the way. You can take this washer hose off. Just slide this out. You can just take a screwdriver or something to brace this up just like that. You just need to access the top of the strut. Now I'm going to take these nuts off at this top of the strut mount. Use a 15-millimeter socket. I'm going to take two off, and then before I take the last one off, I'm actually going to hold the strut, with the strut, and take the last nut off. And slide the strut down, and then tip it, and slide it out.
Now, we're going to take the new strut. I'm going to hold one of the nuts in my hand. Now slide the new strut between the brake hose and the axle, and then tip it up. And try to line those studs up, up top. And I'm going to put the nut on from up top. And now I can let go from below, and just get the other nuts started. I'm not going to tighten these down yet. Just get them all started.
Now you can take that bungee cord off, and just slide the knuckle in position. Take these bolts, line them up. Now leaving it loose up top makes it easier to line this stuff up. If you tighten those up, it's not as easy. You can get that lined up. And then try to...try to line the strut up with those lines that you made. And then we'll tighten these down. Now just make sure that line lines up pretty close, and take your 24-millimeter socket. I'm going to snug these down with the gun. Once you see the struts starting to move towards the knuckle then stop. And then torque those 2 nuts to 144 foot-pounds.
Now I'm going to take this wheel speed sensor wire, and push the retainers back in their place. And take the sway bar, slide that into the bottom of the strut. Pick the nut. Put that on. Take an 18-millimeter wrench on the inside, 18-millimeter socket, tighten this up. Torque this to 59 foot-pounds. All right, now you can put the tire back on. And then put the lug nuts on. Now we're going to tighten the lug nuts down to 140 foot-pounds in a cross pattern to tighten the wheel down evenly.
I'll just go around again. Double-check. Then I'm going to snug these up first. And now I'm going to torque those nuts to 33 foot-pounds. Now I'll just take this screwdriver out of the way. Get the cowl positioned underneath the windshield properly. Now I'll just take this cover, and slide that in position, and put the retainer in. Do the same on the other side.
Now make sure this is all lined up with these clips in. Now take this panel, slide this in position. Make sure that lines up. Put this weatherstrip on both sides. Now take all these push retainers and put those back in. And put the fuse box cover back on. And take this ground adapter, screw that back in. Just snug it up with a wrench. And take the wiper arm, reposition it on the windshield. Sometimes you can see where it was from before, where you could have marked it with a crayon. And put the nut on, and torque this nut to 29 foot-pounds. Do the same for the other one. And close the cap. Now after you're done with this repair, you're going to want to take the vehicle to a local garage and have the vehicle aligned, so you don't have premature tire wear.
Shop Products


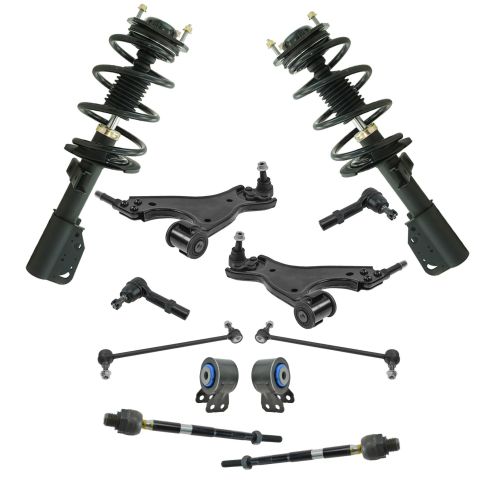
Chevrolet GMC Buick Front 12 Piece Steering & Suspension Kit TRQ PSA64841
Part Details:
- (2) Front Sway Bar Links
- (2) Front Strut & Spring Assemblies
- 12 Piece
- (2) Front Lower Control Arms with Ball Joints
- (2) Front Outer Tie Rods
- (2) Front Lower Forward Control Arm Bushings
- (2) Front Inner Tie Rods
How to Replace Strut Assembly 2000-05 Chevy Cavalier
Watch this video to learn how to replace the front strut assembly on your 00-05 Chevy Cavalier.
