How to Replace Front Strut 2007-12 Nissan Altima
Created on: 2021-09-17
This video shows you how to install new reliable TRQ struts in your 2007-12 Nissan Altima.
Tools needed
-
13mm Socket
Torque Wrench
Pry Bar
Jack Stands
18mm Socket
21mm Socket
21mm wrench
Locking Pliers
Flat Blade Screwdriver
Socket Driver
Ratchet
Floor Jack
3/8 Inch Impact Gun
13mm Wrench
Use a 21-millimeter socket, take the lug nuts off. You can take the hubcap off and the wheel. Take some locking pliers in on the backside of the link. You can attach these to the link so the stud doesn't spin. Use an 18-millimeter socket, take this nut off. And then slide the stud out. If you have to, you can use a pry bar and just slide that out of the strut. Take the wheel speed sensor wire off. Just grab it and slide it off. There's just grommets holding that on. Just set that aside. Take the clip off for the brake hose. Just slide it in there. Pry it out, and take the brake hose off. Slide that out of the way. And take a 21-millimeter wrench and a 21-millimeter socket, take these nuts and bolts out. Be careful, don't rub up against the brake hose. Take the bolts out and separate the strut from the knuckle.
Just slide this out and over a little bit. You don't want to pull on the knuckle too much. You don't wanna pull the CV shaft out or make sure there's no tension on the brake hose. Take these three bolts out. Start with this back one. Use a 13-millimeter wrench because this is in the way a little bit. If you have a socket that fits under there, go for it. But if not, just use a wrench, get it started, and take that bolt out. Now, take a 13-millimeter socket, take these out. Before you take the last one out, you wanna grab the strut assembly. Just grab it under here. Take that bolt out and just slide it down. Now, slide the new strut assembly in place. Make sure you have one of the bolts in your hand. And get one of the bolts started. You can get the other bolts started as well. Now, keep these pretty loose, just only a couple of turns on them. We'll tighten these up later. Now, get the knuckle lined up and slide the bolts in.
Once you get the first bolt, it's a little bit easier. You can always use a screwdriver on the other side. Get that to line up. Put the nuts on, and torque both of these to 103 foot-pounds. And reinstall the brake hose. Make sure it's in there properly. Slide the clip on, just give it a tap. Slide the wheel speed sensor into the bracket, the grommets. Now, line the link up. Slide that in position. Put the nut on. Now, torque this nut to 58 foot-pounds. You can use a 21-millimeter wrench on the back of here to prevent the stud from spinning or whatever size fits for your stud.
Put the wheel up and line the hubcap up. With the valve stem, there's a little notched-out area. And take the lug nuts, get those started. Now, I'm gonna torque the lug nuts down to 83 foot-pounds in a cross pattern to tighten the wheel down evenly. And just go around again, double-check. Now, I'll tighten these down, get them all started, and torque these to 26 foot-pounds. After you're done doing this repair, you wanna make sure you bring the vehicle to an alignment shop and have it aligned. You don't want to have premature tire wear.
Shop Products

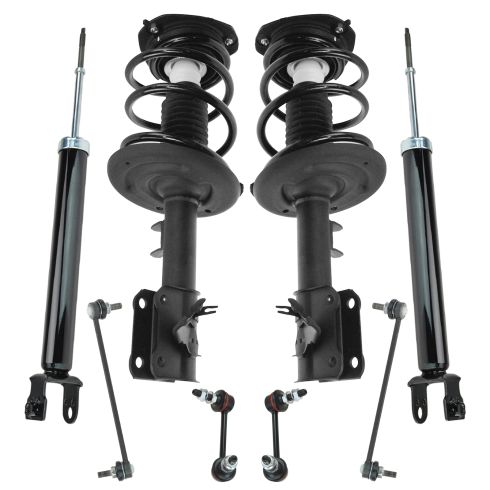
Nissan Altima Front & Rear 8 Piece Suspension Kit TRQ SKA66233
Part Details:
- 8 Piece
- (2) Front Sway Bar Links
- (2) Rear Sway Bar Links
- (2) Front Strut & Spring Assemblies
- (2) Rear Shock Absorbers

How to Replace Shock Absorbers 2007-16 Chevy Silverado
You can learn how to change the rear shocks on your 07-13 Chevy Silverado or GMC Sierra. Watch this video where 1A Auto experts show you step by step!


