How to Replace Front Shock and Spring Assembly 2002-09 GMC Envoy
Created on: 2020-07-07
This video shows you how to install a new shock and spring assembly on your 2002-09 GMC Envoy.
Tools needed
-
24mm Socket
Torque Wrench
Hammer
Rust Penetrant
18mm Wrench
Pry Bar
18mm Socket
19mm Socket
Safety Glasses
Gloves
Wheel Chocks
Center Punch
Floor Jack
Okay, friends. One of the first things we need to do to start this job is to safely raise and support the vehicle. I like to raise it directly on the frame. Once you have the wheel off the ground, we're going to remove our center cover. That exposes our 19-millimeter lug nuts. Remove them all, and then remove the wheel. Now that we have the wheel off of here, we have a clear view of our front strut. Let's start off by spraying everything that's going to need to come apart with some penetrant. Right down here, let's go ahead and get a little bit right in there for the threads.
Up along this area, go ahead and spray that bolt. And then, of course, this area up top, you're going to see right along the top of this strut tower there's two studs that come up. We're going to spray those so the nuts will come off. Right down this side too. Use your 24-millimeter socket to remove this nut. The next thing we need to do is separate this lower portion from the stud right here. To do that, you can use a punch with a hammer and try to come from this side and drive it out towards the front or, of course, if you have an air chisel like I do. So that broke free. That's perfect.
The next thing we need to do is get up top underneath the hood. So now under the hood, as you can tell, we can see the nuts on the top of those struts. We're not going to touch the center one. Do not touch that. Do this one right here and that one over there. These are 18-millimeter. Here's one nut. I'm just going to start it on there just a couple of threads. Remove the other one. All right. There's that one. Get the other one off. Let's go back into the wheel well. Let's go ahead and grab onto that. Pull it aside and then carefully drop it down and remove it from the vehicle.
Now that we have this out of the vehicle, we're going to go ahead and hold onto the bolt side of this with our 18-millimeter and then remove the nut side also with an 18-millimeter. Now I'm going to come from the other side with my air gun here or use whatever you want to remove this, but spin it out. Go ahead and put our nut on there just a little bit so we don't damage the threads and then give it a couple of loving bonks. That's moving right along. Take it right out. Something that we want to pay attention to before we go too much further is the orientation of this piece right here.
If you were to look at it, you're going to see it would run directly along here, and it's going to line up with one of the studs. It doesn't matter which one, just make sure it does line up when you come time to install. Now it's going to be time to go ahead and try to get this off of here. Something to pay attention to is the fact that we're going to have to hit it with a hammer. We're going to be trying to drive it off of the strut itself. As it starts coming off, there's also the possibility that it could come flying off and potentially hurt you.
Obviously, nobody wants you to get hurt. So I just want to mention, be careful for where this goes when it comes off. Grab your hammer or whatever you might have and go ahead and give it a couple of bonks. You might happen to notice that it just doesn't want to come off of there. If that's the case, go ahead and hit it with some more penetrant. Once you have a good amount of penetrant in there, go ahead and use a nice chisel or a punch, whatever you have that's going to be able to spread these ears a little bit.
As we spread these, something to pay attention to is you don't want to keep spreading them until the point where they start to crack or get brittle. You definitely don't want to damage this piece in any way. As I just spreaded those ears, what I saw was this started to let go. I'm going to give it a little wiggle. This is great. Just try to work that penetrant in there. So we got our new strut here. One of the first things we need to do to get this into the vehicle is, of course, get that bottom piece on there. To do that we're going to put a nice piece of wood on the floor, and we're going to turn this upside down.
I'm going to rest it just like this. Pay attention to where those studs are. Okay? Because that was important. I mentioned it before. When we go to install this, we want this arm that's coming out going in a straight line. You can see there's a dot, a dot, a stud. Try to make it a nice straight line. If you put it like this, obviously, it's going to cause an issue when it comes time to install. So we'll get it as close as possible. Now that we've got that nice and covered, let's go ahead and get this lined up straight as possible here. Oh, it looks pretty great.
Give it a couple of loving bonks. Now, as I'm doing this, you can tell the reason why I wanted to use wood on the bottom there. We've got all those studs coming down, and the last thing I want to do is mess anything up. As we bring this down, you're going to want to keep going until it bottoms out on this ridge right here. Looks like it's pretty much there. Double-check it all the way around just to make sure it's completely seated. So now let's take our unit. We're going to slide it right in, get it up into those, and then slide it on this stud down here.
Everything should line up perfectly. If it doesn't, and for some reason, you can't get it in here or you can't line up the top, obviously, the issue is right here. You just didn't line it up properly. I usually like to put a tiny bit of threadlocker on this right here, and then we'll get the nut on. We'll bottom it out. Let's go ahead and torque this to 81 foot-pounds as well. It's going to be time to put in the lower bolt for the strut here. Goes through from the inside or towards the inside of the vehicle here and then going out. Let's go ahead and bottom this out, and then we'll torque it to manufacturer's specifications.
Now we're going to torque this to 81 foot-pounds. There we are. Let's take our two upper mounting nuts. We'll get those on. We'll bottom them out, and then we'll torque them to manufacturer's specifications as well. Torque these to 33 foot-pounds. It's always a great idea to double-check everything that you removed and replaced. Just make sure everything's secure and good to go. Once you've done that, let's go ahead and get the wheel up on here. Bring the vehicle down so the tire's just barely touching the ground so it can't spin. And then torque the wheels in a criss-cross manner to 103 foot-pounds.
Now it's going to be time to get our center cover on here. If you were to turn it around, you might see something that looks a lot like a valve stem. Line it up with your valve stem, and then go ahead and pop it on there.
Shop Products


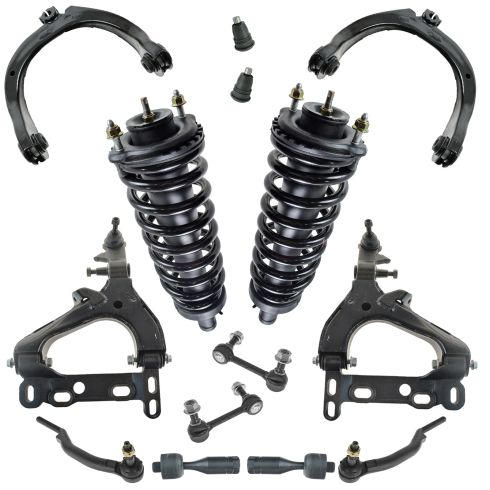
Front 14 Piece Steering & Suspension Kit TRQ PSA34367
Part Details:
- (2) Front Sway Bar Links
- (2) Front Upper Control Arms
- (2) Front Upper Ball Joints
- 14 Piece
- (2) Front Shock & Spring Assemblies
- (2) Front Lower Control Arms with Ball Joints
- (2) Front Outer Tie Rods
- (2) Front Inner Tie Rods
How to Replace Strut Assembly 2000-05 Chevy Cavalier
Watch this video to learn how to replace the front strut assembly on your 00-05 Chevy Cavalier.
