How to Replace Front Rearward Lower Control Arms 2005-10 Chrysler 300
Created on: 2017-02-08
Learn how to replace the front rearward lower control arms on your 05-10 Chrysler 300 with this helpful video from 1A Auto.
-
step 1 :Removing the Wheel
- Loosen the lug nuts with the vehicle on the ground
- Raise the vehicle with a floor jack
- Secure the vehicle on jack stands
- Remove the lug nuts
- Pull off the wheel
-
step 2 :Loosening the Control Arm
- Secure the bottom strut nut with a 19mm wrench and loosen the 18mm bolt
- Remove the bolt
- Loosen the upper control arm nut
- Loosen the 21mm nut on the lower ball joint
- Hold the spindle in place with a bungee cord
- Hammer out the control arm
-
step 3 :Removing the Sway Bar Bushings
- Remove the two 15mm bolts on the sway bar bushing bracket
- Remove the brackets from the bushing
- Remove the bushing
-
step 4 :Removing the Lower Control Arm
- Tap in a 12mm Allen socket to the upper control arm bolt
- Rotate the nut and bolt together
- Remove the nut and bolt
- Pull the spindle and hub out of the way
- Remove the control arm
-
step 5 :Installing the Lower Control Arm
- Install the control arm into the subframe of the vehicle
- Insert the upper bolt with a 12mm allen socket without rounding off the threads
- Hand-tighten the washer and bolt
- Tighten the lower ball joint castle nut
- Torque the lower ball joint nut to 50 foot-pounds and add 90 degrees
- Insert and bend the cotter pin
-
step 6 :Tightening the Control Arm
- Pull up the hub while keeping the lower end of the strut in place
- Start the 19mm nut in the upper control arm
- Hold the nut and tighten the nut
- Torque the nut to 35 foot-pounds and add 90 degrees
- Remove the bungee cord
- Push up on the suspension and align the strut
- Tighten the lower strut bolt
- Jack up underneath the spindle to simulate ride height
- Torque the lower strut bolt to 128 foot-pounds
- Finish tightening the upper control arm bolt on the lower control arm
- Torque the bolt to 130 foot-pounds
-
step 7 :Reinstalling the Sway Bar Bushings
- Insert the bushing onto the way bar
- Tighten the bracket into place
-
step 8 :Reattaching the Wheel
- Slide the wheel into place
- Start the 21mm lug nuts by hand
- Tighten the lug nuts preliminarily
- Lower the vehicle to the ground
- Tighten the lug nuts to 110 foot-pounds in a crossing or star pattern
Tools needed
-
Socket Extensions
Torque Wrench
Hammer
Rust Penetrant
Jack Stands
Complete Metric Wrench Set
Safety Glasses
12mm Allen Wrench
6mm Allen Wrench
Gloves
Rubber Mallet
Bungee Cord
Ratchet
Floor Jack
Needle nose pliers
1/2 Inch Breaker Bar
Complete Metric Socket Set
Hi, I'm Mike from 1AAuto. We've been selling auto parts for over 30 years! We're dedicated to delivering quality auto parts, expert customer service, and fast and free shipping, all backed by our 100% satisfaction guarantee. So visit us at 1AAuto.com, your trusted source for quality auto parts.
In this video, we're going to be working with our 2006 Chrysler 300. We're going to show you how to remove and replace your vehicle's front rearward lower control arm. This is the rearward most one in the front suspension that your strut bolts onto.
If you like this video, please click Subscribe. We have a ton more information on this and many other vehicles. If you need this part for your car, you can follow the link down in the description over to 1AAuto.com.
Here are items you'll need for this repair: Full metric socket set, ratchet, socket extensions, full metric wrench set, breaker bar, torque wrench, 6 to 12mm allen sockets, pliers, side cutters, bungee cord, safety goggles, hammer, rubber mallet, gloves, rust penetrant, jack, jack stands
Using a 21mm socket and a breaker bar, loosen all of your lug nuts about one turn. Raise and support your vehicle. We're using a lift to make it easier to show you what's going on, but this job can easily be done at home with a jack and jack stands. Remove your lug nuts the rest of the way by hand. Remove your wheel and tire.
After removing your wheel and tire, use a 19mm wrench to secure the nut on the back side if you're an aftermarket strut like we are. OE piece have a welded nut, and you'll only need your 18mm socket and ratchet to remove the bolt at the front. You may need to use an 18mm socket and breaker bar if it's on there pretty tight like ours is. Once you get the bolt loose, you should be able to finish removing it with a socket and ratchet.
Here's a helpful trick for removing a bolt that's in a bushing, like ours is here: They don't really want to just pull out like a bolt normally would once you've removed the nut, so you can use any wrench that's smaller than the flange or the head on the end of the bolt but bigger than the shank, in our case a 16 works, and you can push it out with one hand while turning the ratchet with the other. Once it's most of the way out, you should be able to move the suspension a little by hand and pull the bolt out.
Now, we'll loosen the upper control arm nut. You don't have to remove this completely, but we're going to loosen it just about to the end of the threads. Ours is spinning, so we're going to have to use a 19mm wrench, a 6mm Allen bit, and a ratchet. What we're going to do is counter-hold the nut and turn the shaft of the bolt here with that 6mm Allen. We're going to turn that clockwise to loosen. So, we'll remove that all the way. Be careful of your ABS wires and brake lines. Looks like we're going to have to disconnect the ABS sensor.
Now using a 21mm socket, and I'm going to use a breaker bar because this looks pretty rusty, you might be able to just use a ratchet, loosen the nut on the lower ball joint. Once we've got that loose, we can switch to a socket and ratchet. I'm going to use a bungee cord to secure our spindle onto the strut. You could also do the control arm. I'm just really concerned about the tension that's on this brake hose here. You always want to be mindful of that.
Now what you're going to do, if you're replacing your lower control arm, you’re going to want to hit the control arm here to separate it from the ball joint without damaging the ball joint itself. Before using a hammer or any other kind of heavy-duty tool, be sure to wear proper safety equipment, such as dust masks and safety glasses. Remove the two 15mm bolts on the sway bar bushing bracket with a 15mm socket and a breaker bar. Just loosen them up for now and switch over to a ratchet once they're a little easier to move. Remove the brackets and you'll see that there is a cut going down the center of the bushing, which we'll want to spread open and slide off of the sway bar.
Using a 12mm Allen socket, which I'm actually going to tap in because there's a little bit of rust buildup. This is not a bolt you want to strip. Normally, using the handle of a ratchet or breaker bar will tap it in enough without risking damage to either the tool or the piece of hardware like a hammer can. So, once that's in there nice and far, we know we're not going to strip it. I'm actually going to use an extension to get myself a little bit away from that bracket there while I'm putting the torque on it and 21mm wrench on the nut on the back side. Go ahead and break that loose with a breaker bar.
Pay attention because what I'm going to do is remove the wrench, rotate the nut and bolt together, hold the wrench again. We'll make the first couple of turns this way, so I don't have to reset that Allen, then we'll switch over to a ratchet. Now this bolt is pretty stuck in that bushing, so what I'm going to do here is remove our tools and leave the nut. Now in order to do what I want, I'm actually going to have to remove this nut completely. There's a large washer back here that we'll slide off. We'll reinstall the nut so it's just about flush with the end of the threads, and now we can tap that a little bit with a hammer and help slide the bolt out. I don't have a lot of room here, so I'm just using the side of the hammer, but this really doesn't take much force.
Now that we know it's moving nice and easy, we'll spin it off a few threads and tap it, spin it a few threads, tap it. Make sure you're not on the last thread when you do this because you can risk damaging it. We'll remove the nut, grab that bolt, and wiggle our control arm until we're able to remove it from the vehicle. Now you should be able to pull your spindle and hub out of the way. Again, always be careful of these hoses and wires. Work the control arm back and forth until it's out of the vehicle.
Here we have our old lower control arm that we removed from our vehicle and our new part from 1AAuto.com. As you can see, these parts are exactly the same, with the same casting. We have the same end here, where our ball joint is going to seat into. We have the same bushing for our lower strut to mount to, and the same bushing here where it goes into the vehicle's sub-frame. Now, what tends to happen with these, and this one isn't terrible, but you can see some of the cracking that's starting to take place around this sleeve inside of the bushing. Eventually, if that tears through, the suspension will feel very loose, probably make a lot of noise, and throw off your alignment angles, as well as throwing off the stability and handling of the vehicle.
This new part from 1A Auto has a nice new high quality bushing pressed in here. You can see how nice and tight that is around the sleeve, whereas the old one here is starting to tear out and fail. These bushings can go bad as well. There is a little slice in here, but that's actually a part of the production process. That's not any kind of damage. You can see both the new one and the old one have that, but you would be looking for the same cracking and separation here or any kind of looseness to the bushing. These should be very tight; I can't move these by hand. This one, I can move a little bit. Again, it's not terrible but it is damaged slightly. So, if your old control arm has failed bushings or the tapered end isn't holding the ball joint as it should, this new part from 1A Auto is going to go in direct fit just like your original equipment, get your vehicle riding and handling like it should, and fix you up right.
Install your new control arm back into the sub-frame of the vehicle. Now this can be a little tricky to line up, so you might have to wiggle it in a few times and once it's in you might need to use a mallet or a pry bar to get it right where you want it. The bolt hole is pretty close to where we want it, so I'm going to just tap it in. Looks like right about there is where we want it, so let's try to put our bolt through.
Now our bolt has this large washer on it, which if you try to put on and install it's not going to get past the sub-frame. So you need to slide it all the way to the end, sneak it underneath that channel in the sub-frame, and then install it into your control arm. Ours isn't quite lined up, so you'd need to wiggle it a little bit, and then you may actually have to turn it by hand to thread it in some. Now, ours was just misaligned slightly, so I'm using the ratchet with our 12mm Allen socket to thread it in. Now, you want to be careful and watch the threads on this side. You want to be careful and watch the threads on this side.
See, this is going through with very minimal effort, and it's not really dragging against the cross member, so it's okay to do it like this. But, if you really have to force it through there, you're going to end up rounding off all of these threads and making this bolt unsafe to use, especially on something critical like our control arm. Once those threads have gone through, reinstall the large washer on the opposite side as well as your nut. We're just going to get that snug for now, and we'll torque it once the weight's back on our vehicle.
Reinstall the ball joint into the control arm and start your castle nut on as far as you can get it by hand. Torque the lower ball joint nut to 50 foot-pounds with a 21mm socket. This bolt needs to get 90 degrees added to it. You can use a torque angle finder or you can just go about 90 degrees by eye. Our lower ball joint was missing a cotter pin when we pulled it apart, so we're going to be sure to install one now. You should always install a new one whenever you remove a cotter pin just because they're very light and flimsy, and they're very important to making sure these suspension components don't move. You can buy a kit of them at a very low cost and it's a good idea to swap them out any time you remove one. They get rusty and break and having a new one in there is just a little more peace of mind. Lay that through and bend the ends over with a needle-nose plier. I like to just bend one end to keep it from turning. Then, to keep it clean and simple, we just snip the straight end off with a pair of side cutters.
Now, this next part is where it gets just a little bit tricky. You're going to want to watch the fork on the bottom of your strut to make sure that it lines up over this bushing while simultaneously pulling up on the hub here and getting this nut started a couple of threads on your upper ball joint. Now, if you're doing this on the ground you could use a floor jack to bring the suspension up, and that's probably not a bad idea. That doesn't have to line up perfectly just yet, as long as it sits around the control arm so we know we have room to move it. Then we'll start our 19mm nut. We'll now hold the nut with our 19mm wrench and use our 6 mm Allen key socket and ratchet. You want the ratchet to rotate counter-clockwise this time to install. We'll now torque the upper ball joint nut to 35 foot pounds with a 19mm socket. Once again, we're going to add 90 degrees.
Remove your bungee cord, or whatever you used to secure your hub. Reconnect the ABS sensor if you disconnected it. Push up on the suspension and align your strut. Now, your strut does rotate a little bit, so you may have to turn it to get it to line up, and start your bolt. Then, make the fine adjustments to line up the other side. Once again, we'll use our 19 mm socket and ratchet to start running that bolt through. Just make sure that there's not a lot of tension on it and that it's not going to damage your threads.
Reinstall your nut. Once again, we're not going to tighten this down; we're just going to get it close. Ours has a 19 mm nut. Yours may vary. Now, we're going to use a screw jack under the lower ball joint. At home, you would want to do this same thing with your floor jack. Bring the vehicle suspension up to ride height. All that means is that we want to go until the weight of the vehicle is on it here. Using a 19 mm wrench and an 18 mm socket, with the weight of our vehicle on the suspension, we're going to torque this bolt to 128 foot pounds.
Then, with our 12 mm Allen and our 22 mm wrench, we'll torque the cradle bolt to 130. Lower the jack or screw jack supporting the suspension on your vehicle. Slide the back cover of the sway bar bushing bracket onto the sub-frame. Support the bushing and install it back over the bar. Install the top half of the bracket and start your two bolts by hand. Tighten the bolts down with a 15 mm socket and ratchet.
You can now reinstall your wheel and tire. Reinstall your wheel and tire, and get your 21 mm lug nuts as tight as you can by hand. Lower the partial weight of your vehicle back onto the tires. Torque your lug nuts to 110 foot pounds in a cross pattern.
Thanks for watching. Visit us at 1AAuto.com for quality auto parts, fast and free shipping, and the best customer service in the industry.
Shop Products


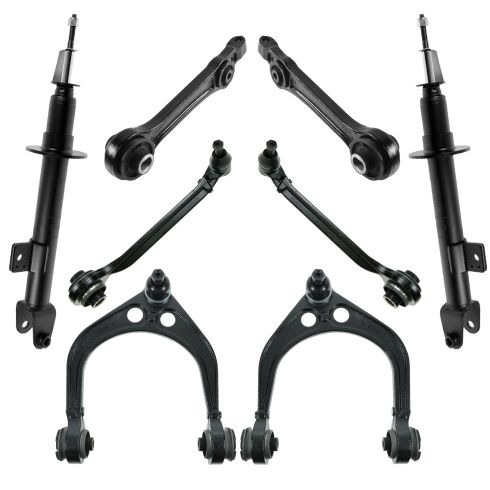
Dodge Chrysler Front 8 Piece Suspension Kit TRQ PSA52861
Part Details:
- (2) Front Shock Absorbers
- 8 Piece
- (2) Front Lower Rearward Control Arms
- (2) Front Lower Forward Control Arms with Ball Joints
- (2) Front Upper Control Arms with Ball Joints
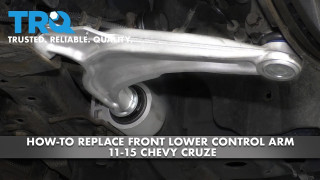
How to Replace Front Lower Control Arm 2011-15 Chevy Cruze
Control arms are a crucial part of the suspension system of your vehicle. They carry the load of the vehicle to the wheel and maintain its alignment. Control arms are large and strong. They contain rubber bushings for smoother rides at the cost of eventual wear. How to install a new quality TRQ lower control arm in your 2011-15 Chevy Cruze.
