How To Replace Front Power Window Regulator 2003-07 Cadillac CTS
Created on: 2011-10-14
If the window regulator is broken, this video will show the steps for replacing it, which includes how to remove the door panel
-
step 1 :Removing the Door Panel
- Pry off the door handle bezel with a putty knife
- Pull up on the tab and disconnect the lock connecter
- Pry out on the corner of the lock button with a putty knife and remove it
- Remove the panel from behind the door pull with a putty knife
- Remove the two Phillips head screws inside the door pull
- Pry off the trim piece at the front top corner of the door panel
- Pry out the door panel by hand
- Lift the door panel up and off
- Remove the pins from the control panel with a pair of pliers
- Remove the 10mm bolt from the door handle
- Slide the panel forward and off the latch rod
- Remove the mirror clip and carefully peel the water shield
-
step 2 :Removing the Window Regulator
- Remove the two 10mm nuts from the regulator
- Raise the window by hand
- Hold the window in place with painter's tape
- Disconnect the window motor lead
- Remove the five 10mm bolts from the regulator and motor assembly
- Pull the window regulator out through the door
-
step 3 :Preparing the New Window Regulator
- Remove the T30 Torx screws from the window motor
- Transfer the window motor to the new regulator
- Replace and tighten the T30 Torx screws
-
step 4 :Installing the New Window Regulator
- Insert two of the bolts into the window regulator
- Push the regulator into the door
- Hang the regulator by its bolt
- Insert the five 10mm bolts into the regulator and motor assembly
- Reconnect the window motor lead
- Remove the painter's tape from the window
- Slowly lower the window onto the regulator
- Insert the two 10mm bolts that hold the window to the regulator
-
step 5 :Replacing the Door Panel
- Put the water shield into place with the door latch rod through the shield
- Place the control panel on and replace the pins
- Reattach the door handle and connect the latch rod
- Replace and tighten the 10mm bolt on the door handle
- Align the door panel
- Push in the door panel clips in
- Replace and tighten the two Phillips head screws inside the door pull
- Attach the panel from behind the door pull
- Re-clip the door handle bezel
- Insert and re-clip the door lock connector
Tools needed
-
Socket Extensions
Phillips Head Screwdriver
Putty Knife
T30 Driver
Painter's Tape
10mm Socket
Ratchet
Needle nose pliers
Brought to you by 1AAuto.com, your source for quality replacement parts and the best service on the Internet.
Hi, I'm Mike from 1A Auto. I hope this how-to video helps you out, and next time you need parts for your vehicle, think of 1AAuto.com. Thanks.
In this video, we're going to show you a power window regulator replacement on this 2006 Cadillac CTS, same as any 2003 to 2007 CTS. In the video, we show you the driver's side, but the passenger's side has the same procedure. Tools you'll need include a putty knife or a similar flat blade tool, Philips screwdriver, 10mm socket with a ratchet and extension, and a T30 Torx Bit with a driver.
I used a household putty knife. Take a paper towel and just wrap it. Then you're going to clip up in underneath, pry it up, and pull out on this handle. Then up in here, pry up, pull out, and it comes out. Behind here is a little tab. Just pull up on that tab and pull the lock connector. Oops, make sure you'll leave it unlocked. Pull that off, and then this bezel comes right off. Here, you see on this very corner, right here on your lock button, just pry it out very lightly. This will pull right up and off.
Then, again, just carefully, there's a little plug right in behind your pull here. Then inside that plug, two Philips screws. Straight up here, we're just removing those two Philips screws. Once those screws are out, start up here at the top and pull. Work your fingers in behind and just pull those thuds. Okay, out and off. I'm going to use a pair of pliers, and you need to just squeeze the tabs on these pins and pull this control panel right off. You could just let it hang like that. We'll get to that door handle, 10mm bolt right here. Remove that. The handle slides forward. It comes off and then it just goes down or off of the rod like that. Take my mirror clip off, and I'm slowly going to pull my water shield off. I know, I said slowly pull, but I'm just going to speed it up here. You want to be careful when you pull it. Try and pull the goop off with the water shield.
Next, the windows held the regulator by two bolts here, which are little clamps. You loosen that one and loosen this one. If your window is all the way in the up position, you can go through this hole as well as you have to pull off this plug and go through that hole too. Most of the times, what happens on these regulators is the cable breaks and you're able to move your window up and down by hand anyways. We'll loosen these two 10mm nuts. Now it's loose, you grab your window and pull your window right up and into place it like that. You can see I just took a little bit of painter's tape and secured the window while we work in the door.
You see our lead is right down here. Push up on that tab and pull the connector out. Then our regulator and motor assembly is held down with five bolts. I'm going to remove this one, loosen and loosen those two. Then there's one right down here next to the speaker, and one right over here. I'm going to speed up as I use my 10mm socket and ratchet extension to do that. I'm removing some of the bolts, and just loosening some. The exception is you'll see me struggle a little bit with that middle top one. I end up just loosening it way up so it allows the motor to slide up and out. Okay, so that's the regulator out. You can see, this is my original regulator. There's really nothing wrong with it so I'll be reinstalling it.
Usually, what happens on these is this cable breaks or something and that transmission breaks. Transfer your old motor on. It will happen a lot on these things. What you'll get is you'll hear a popping sound and then a grinding noise. That's usually the inside is going bad. Then, if you still hear your motor running, your motor is still good so you can just replace the regulator. You want to transfer using a T30 Torx bit with an inch drive ratchet. Remove the motor from here. Then you would bolt the motor right on to the 1A regulator. You can see it's all the same. It's going to go back in there. With a new regulator also, you would want to start the two bolts in so you can hang it up. I'll show you that. Again, my original regulator is fine so I want to reinstall it.
What I want to do here is put this in first, my motor side in. Put that back reel in place first in front of the regulator. Put it in place. You want to make sure that we check in, make sure your regulator is on the correct side of the window. Start these bolts. Fast-forwarding here again, I'm just putting the bolts into the regulator and then tightening them up. When you're tightening them, you want to make sure they're not nice and firm, but you don't need to over tighten them.
Reconnect your motor. Now, you can remove the tape. Slowly bring your window back down. Keep it back in the track. You can see it go down in. You can also make sure you just put it in the same spot in these clamps. Tighten them up. I'll fast-forward putting that water shield on. Make sure you put your door latch rod through. You'll see I actually forgot to do it there. I'm putting that panel back on. Then before I go to put the door handle on, I realized it, peeled the water shield back, popped that rod through, and then put that door handle on and bolt it in place.
As you get your line up pins here and down here, they go into holes. Basically just to keep through, line up one up there, line up one up there. Push the top on and then clip up. Make sure you can look down, you can see the connector going together. I'll put in our two Philips screws. Again, we'll fast forward just to speed through putting those screws in. You like them tight. They're not to be extremely tight but you want them nice and firm so they hold the door panel in place well. This template, just move back in and just put it in place. Then put this panel back on the door handle where you connect your lock switch, and then just put it back into place. Lock it in. Last but not the least, your lock button, put it down until that touches there and push in to lock.
We hope this video helps you out. Brought to you by www.1AAuto.com, your source for quality replacement parts and the best service on the Internet. Please feel free to call us toll-free, 888-844-3393. We're the company that's here for you on the Internet and in person.
Shop Products
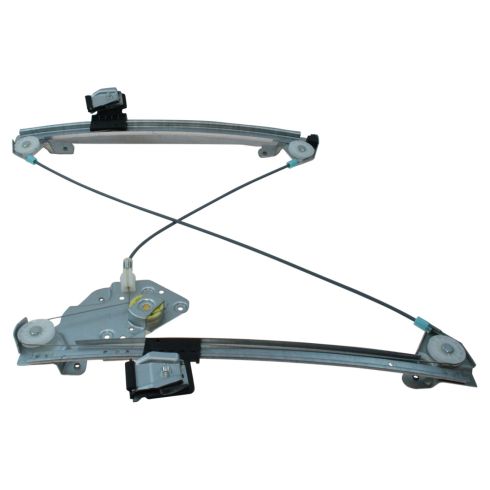
2003-07 Cadillac CTS Front Driver Side Window Regulator TRQ WRA52733
Part Details:
- No
- Galvanized Steel
- Electric
- No
- No

How to Replace Front Window Regulator 1997-2005 Chevy Venture
Check out this video and learn how to replace the front window regulator on your 97-05 Chevy Venture or Pontiac Montana.
