How To Replace Front Power Window Motor 1998-2002 Lincoln Town Car
Created on: 2011-04-28
Learn how to remove the door panel and the power window motor by following the steps in this how-to video
-
step 1 :Remove the door panel
- Remove the lock knob by unscrewing it and set it aside somewhere safe.
- Unscrew the Phillips screws in the door pull.
- Now that you have removed the door pull handle, remove the two T30 Torx screws.
- Remove two more Phillips screws down at the bottom of the door pull.
- Pry up your power window switch panel and disconnect the wiring harness.
- Unclip the door panel from the door.
- Disconnect the remaining wiring harnesses.
- Carefully pull back the water shield.
-
step 2 :Remove the power window motor
- Disconnect the wiring harness.
- Use your T30 Torx driver to remove the Torx bolts securing the motor.
- Remove the power window assembly, unbolting that last Torx bolt securing the motor to the actuator.
-
step 3 :Install the new power window motor
- Bolt the motor to the power window actuator.
- Feed the motor back into the door.
- Bolt the motor to the door with your T30 Torx driver.
- Connect the wiring harness.
-
step 4 :Replace the door panel
- In the interest of time, more detailed instructions for door panel assembly are covered in our other videos.
- Replace the water shield.
- Connect the wiring harness.
- Clip the door panel to the door.
- Plug in the power window switch panel and clip it down into the arm rest.
- Replace the two Phillips screws at the bottom of the door panel.
- Secure the two T30 Torx screws in the door pull.
- Replace the door pull panel with your Phillips screwdriver.
- Screw the door lock knob back onto the door lock mechanism at the top of the door.
Tools needed
-
Flat Blade Screwdriver
Phillips Head Screwdriver
T30 Driver
Brought to you by 1AAuto.com, your source for quality replacement parts, and the best service on the Internet. Hi, I'm Mike Green. I'm one of the owners of 1A Auto. I want to help you save time and money repairing and maintaining your vehicle. I'm going to use my twenty plus years experience restoring and repairing cars and trucks like this to show you the correct way to install parts from 1AAuto.com. The right parts, installed correctly -- that's going to save you time and money. Thank you, and enjoy the video. In this video we're going to show you how to replace the front window motor on this 2000 Lincoln Town Car, same as any 98-02. Only tools you'll need are a Phillips screwdriver, and a T30 Torx bit and driver.
Door panel removal ... it's fairly simple. On this vehicle, this door panel has been taken apart a bunch of times, so some of the fasteners may be different for you. For example, it has a screw here which I believe most cars probably don't. The reason it has a screw here I believe is because so many of the pins in behind that hold it are broken. But where you want to start is remove your door lock knob just by unscrewing it. Then in under here should be two ... on this vehicle they're Phillips screws. And you just kind of put your screwdriver up under there. Now there's another Phillips screw up in here. And this pulls out. And then right in here you'll see there's another Phillips screw that goes into the door panel. As you can tell, I've been fast forwarding when I just get to the monotonous stuff. So you remove that screw, and then there's another screw next to the rear side of the pull. Then at the bottom, there's two more Phillips screws. It's kind of a little indent in the carpet. Just put your screwdriver in there, twist it a little bit, and you'll get the screw. This car has a little Torx screw here. I'm not sure if this is supposed to be there or not. I'll remove it. This may not be on all cars. Then there is another screw here, but this is broken on my car so I know there's no screw in there. And then what there is is there's a series of clips.
So you would want to work your hand underneath here. And there's one clip right here. And get your hands close to those. You can slide your hand underneath and you slide it over and you feel it getting tighter and tighter. And then you give a good pull and get that clip out. And then go up here on top and give a good pull. Another clip there. And then on these vehicles there's more clips. There's clips in the middle and more on the edge. But like I said, this vehicle's been apart a few times. Actually before you pull the door panel off, you want to pull your window switch up in the front and then pull it out. And then there's a series of harnesses that just have little tabs. You press the tab, pull the harness down. Okay this gray one ... tab, pull it down. Tab here on the black one. And then a tab here for the brown one. Now pull the panel away, and then a few more harness connections back here. Couple of small harnesses with a black and white connector. Press the little button here, pull that apart. It's a blue connector here that has a tab on it that you pull the wires of the blue connector, pull the tab out. There's a gray connector here. Okay again, get tab, pull apart. Looks like the screw is not quite all the way out. And your door panel is off. So you can see here I'm holding back the water shield. You may have noticed on the other clip that on this car somebody has just cut the water shield. There should be a shield covering that whole large open area. You'll want to pull your water shield back carefully, because you do want to save it because it does protect your door panel from getting aged too quickly by water and dirt. To remove your car window motor, your lead is right here. Press on this tab, pull the lead up and out.
And then there's three T30 Torx screws right here. You remove the bottom two and your loosen the top one. Once you've loosened that top one, reach in behind, and you slide the whole motor and cable assembly out. You pull all the way out to here, and actually just finish removing this. And then the motor comes off. A new window motor from 1A Auto. You can see the function will be exactly the same as the old one. Everything is the same. It looks a little different, but the most important thing is the connectors are the same and they'll mount the same. To install it, what you'll want to do is reach in and pull your gear back like that. You want to put the motor in. Push it into the transmission, and then we'll start this bolt up here. Now you want to look right through this hole and bring that screw into place. As you can see I've got it in place there, and I've got the holes pretty well lined up there, so I can put the two other screws in. You want to pull your lead through and reconnect. So here I'm just going to speed up putting the door panel back on just to keep the video at somewhat of a manageable length. If you wanted to see this part of the process in regular speed, just check out all the videos for the Lincoln Town Car door panel, remove and replace.
We hope this helps you out. Brought to you by www.1AAuto.com, your source for quality replacement parts and the best service on the Internet. Please feel free to call us toll free 888-844-3393. We're the company that's here for you on the Internet and in person.
Shop Products


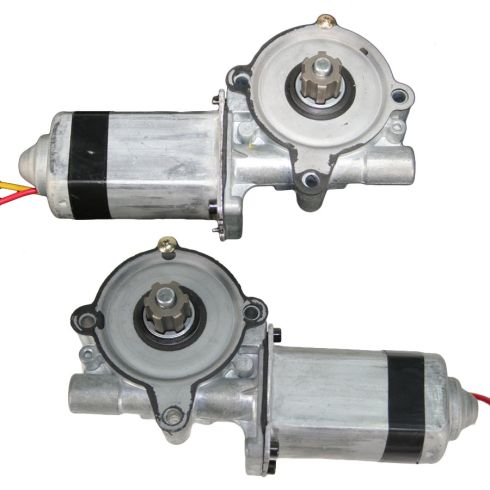
Ford Lincoln Mercury Driver & Passenger Side 2 Piece Power Window Motor Set TRQ WMA03232
Part Details:
- 2 Piece
- (1) Driver Side Power Window Motor
- (1) Passenger Side Power Window Motor
How to Replace Power Window Motor 2000-10 Ford F250 Super Duty Truck
Power windows in your 99-07 Ford Super Duty slow or stuck? Check out this video from 1A Auto to learn how to replace the motor yourself!
