How to Replace Front Lower Control Arms 2002-06 Nissan Altima
Created on: 2017-09-14
How to repair, install, fix, change or replace failing, rusted, rotted, or damaged front lower control arms on 02, 03, 04, 05, 06 Nissan Altima.
-
step 1 :Removing the Wheel
- Loosen the lug nuts with the vehicle on the ground
- Raise and support the vehicle
- Remove the lug nuts
- Pull the wheel off the hub
-
step 2 :Removing the Control Arm
- Apply rust penetrant to the ball joint nut
- Apply rust penetrant to the control arm bolts
- Loosen the control arm bolts with a 19mm socket and breaker bar
- Turn the hub by hand to access the ball joint cotter pin
- Cut the cotter pin with side cutters if necessary
- Remove the cotter pin with pliers
- Loosen the ball joint nut with a 22mm wrench and a dead blow mallet if necessary
- Remove the nut from the ball joint
- Attach a ball joint separator to the ball joint
- Turn the ball joint separator with a socket and ratchet
- Once the ball joint is separated from the steering knuckle, remove the ball joint separator
- Remove the 19mm bolts from the control arm
- Remove the control arm from the vehicle
-
step 3 :Installing the Control Arm
- Remove the plastic cover from the new ball joint
- Slide the control arm into place
- Start the 19mm bolts into the control arm
- Slide the ball joint stud into the wheel knuckle
- Start the castle nut onto the ball joint
- Tighten the castle nut with a 22mm wrench
- Insert the cotter pin into the castle nut
- Bend the cotter pin into place with pliers
- Use a jack to raise the suspension
- Torque the rear control arm bolts to 93 - 112 foot-pounds
- Torque the front control arm bolts to 67 - 88 foot-pounds
-
step 4 :Installing the Wheel
- Lift the wheel onto the hub
- Start the lug nuts by hand
- Lower the vehicle to the ground
- Torque the lug nuts to 73 - 86 foot pounds in a star pattern
Tools needed
-
Socket Extensions
Torque Wrench
Ball Joint Press
Rust Penetrant
Jack Stands
19mm Socket
21mm Socket
Side Cutters
Rubber Mallet
Dead Blow Hammer
22mm Wrench
Ratchet
Floor Jack
Needle nose pliers
1/2 Inch Breaker Bar
Before you lift and support the vehicle, loosen the lug nuts with the wheel on the ground. Use a 21-millimeter socket and breaker bar. Lift and support the vehicle. With the lug nuts loose, you can use the 21-millimeter socket or just your hand. Finish removing the lug nuts. Remove the wheel. Place it aside.
With the vehicle raised and supported, this is your lower control arm in the front. This is the driver's side. It's made out of aluminum. There's two mounting bolts here and this bushing. It's all one piece. There's another mounting bolt here, and of course your ball joint up here.
I'm going to start by spraying some rust penetrant on the ball joint nut and let that sit. These bolts go through and I can see them poking out at the top of the subframe, so I'm going to try to spray some rust penetrant on the top of those to help them come out. This bolt goes into what's probably a captured nut on the inside of the subframe. I can't see it, and there are some access holes in here. I'm going to do my best and just try to blindly spray some rust penetrant in here, and hopefully that will help with getting that bolt out.
Use a breaker bar and a 19-millimeter socket and an extension, and I'm going to break this loose. Remove this bolt here with a 19-millimeter socket and a breaker bar.
With the steering wheel unlocked, I'm going to turn wheel and hub assembly outwards best I can. To remove the cotter pin, I've got some needle nose pliers. I'm going to try to bend it straight. Sometimes you've just got to grab it and wiggle the cotter pin back and forth and you'll start to see the looped end move and it's freed up. Kind of work the needle nose into it. So pry against it. When these cotter pins get rusty it can be a bit of a pain to get them out. The other trick is to use some side-cutting pliers. Sometimes you get a better grip on them on the cotter pin with the side-cutters and just work it out. Or like that. It actually cut the end off of it. Sometimes you can just cut the looped end right off. Then go back to your needle nose pliers and it's easier because you should replace these cotter pins every time you take this off, and try to slide. Grab one part of the cotter pin. This one's just going to break on me. There we go. I've got it out.
With the cotter pin removed, I can take a 22-millimeter wrench and loosen the nut. This one's on here really tight, so I'm going to take my dead blow mallet or you can use a rubber mallet on the end of the wrench. Just going to hit it, break it free. This is almost off. You really can't get a socket and a ratchet in here. If you've got a ratcheting 22-millimeter wrench, you could use that. I just have a regular box wrench, so just turn by turn, get the nut loose and off.
This control arm is made out of aluminum. It's very soft. You can try to hit the knuckle with a heavy hammer to break this out of the taper, but you could hit the control arm and damage the aluminum, so you really should use a ball joint separator tool. With the ball joint separator tool in place, I'm going to use the appropriate size ratchet and socket. Just going to gently push it out. It will snap when it comes free. Now we can pull this down and out of the way. It should come right out of the taper.
Finish removing the lower control arm bolts just using a socket and a ratchet. Just try to pull these out evenly. You can see the arm is coming loose. It won't fall. It's got this brace below it. Take these bolts out. Put them aside. They are the same length so we don't have to keep track of which hole they came out of, but we'll just put them aside so we don't lose them. Now finish taking out this bolt with a 19-millimeter socket and ratchet. You need to move the arm around. Now just be aware the arm is really loose and just keep a hand on it so it doesn't fall. It's pretty light. It's aluminum, but you don't want it to hit you in the face or fall. There it is. Now this is loose. Slide it out. Work it out of the suspension here.
We removed our control arm. Here's our old control arm from our vehicle. If the ball joint has gone bad in your control arm these cannot be pressed out and replaced. You have to replace the whole control arm. Also, if these bushings are bad, the whole control arm has to be replaced. This is the new one from 1AAuto.com. It is marked. This is the left-hand or driver's side. It's got brand new bushings already in. It's got brand new ball joint. It comes with a new castle nut. You're going to want to remove this plastic piece. This is just for shipping to protect the boot. Leave that off. We're going to put the castle nut right here for now so I don't lose it. It has a new cotter pin for the end. As you can see, it's identical in design as the old one, same material. They're both aluminum. This will fit in the vehicle and work great for you.
Take our new control arm. I'm going to start at the back and work it up where it was originally. Might have to flex it a bit. Just like that. I'm going to try to line up the front as best I can. Put it in place. I’ll move the knuckle out of the way so I can play with the alignment of the control arm.
Take our front bolt. It's got a tapered snout to it, so it should help align it. You might have to move the arm around. Let me just start threading it back in with my ratchet. I'm not going to fully tighten this. I just want to get it snug because we'll come back and torque this. Push up on the control arm, line them up.
Put the ball joint back into the knuckle. If you need to you can – there you go. We'll put our nut on here. Tighten our ball joint nut down, 22-millimeter wrench. See, it's pulling these together. It's going to pull the ball joint up into the taper of the hub. That helps to lock it in place. I'll get this nice and tight and then put a cotter pin in. Put our cotter pin in. Take some needle nose pliers. Bend it over. The ball joint is now tight.
To finish installing the control arm, these bolts and this bolt here should be torqued with some vehicle weight on it. You can use a floor jack or you can use a stand-up jack since we're on a two-post lift. Just going to put some weight on the control arm by jacking up on it, just enough so I see the vehicle lift a little bit. The torque for these is 93 to 112 foot-pounds. I'm going to torque them to 100. They go down pretty evenly.
Okay. The torque on this bolt is 67 to 88. I'm going to torque it to 75. Now take the weight off the suspension. We'll reinstall our wheel and we'll torque the lug nuts. Just going to use the socket to get these lug nuts as tight as you can by hand. We'll torque the wheel afterwards once it's on the ground. Torque on the lug nuts is 73 to 86. I'm going to torque these to 80 in a cross pattern. The job is complete.
Thanks for watching. Visit us at 1AAuto.com for quality auto parts, fast and free shipping, and the best customer service in the industry.
Shop Products


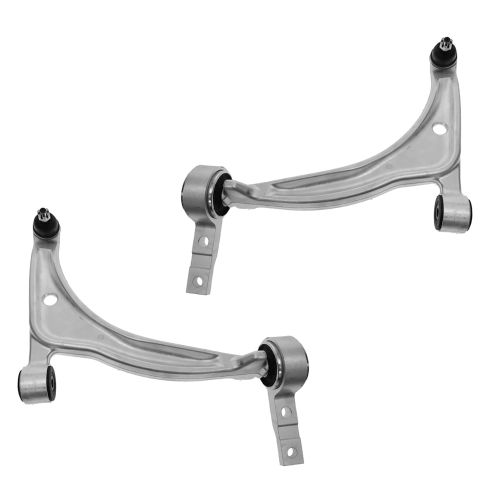
Nissan Altima Maxima Front Driver & Passenger Side 2 Piece Control Arm with Ball Joint Set TRQ PSA62174
Part Details:
- 2 Piece
- (1) Front Driver Side Lower Control Arm with Ball Joint
- (1) Front Passenger Side Lower Control Arm with Ball Joint

How to Replace Upper Control Arm 2009-14 Ford F-150
How to repair, install, fix, change or replace failing, rusted, rotted, or damaged control arms with ball joint on 11 Ford F150
