How to Replace Front Lower Control Arm 2001-05 BMW 325Xi
Created on: 2019-07-18
Learn how to replace the front lower control arm on your 01-05 BMW 325Xi. 1A Auto shows you how in this step by step video guide.
-
step 1 :Removing The Wheel
- Loosen the 17 mm lug bolts
- Raise and support the vehicle
- Remove the lug bolts
- Remove the wheel
-
step 2 :Removing the Front Lower Control Arm
- Loosen the 18 mm lower outer ball joint nut
- Loosen the lower outer ball joint
- Remove the 18 mm nut and remove the lower outer ball joint from the knuckle
- Loosen the 22 mm inner ball joint nut
- Remove the two 18 mm inner ball joint mounting bolts
- Remove the inner ball joint from the frame
- Remove the 22 mm inner ball joint nut
- Separate the inner ball joint from the control arm
- Remove the two 8 mm bolts securing the exhaust heat shield (passenger side only)
- Remove the exhaust heat shield (passenger side only)
- Remove the two 16 mm bolts securing the control arm bushing bracket
- Mark the control arm bushing and the control arm
- Set the control arm in a vise, and remove the bushing from the control arm with a puller tool
-
step 3 :Installing the Front Lower Control Arm
- Transfer the indexing mark to the new lower control arm
- Align the control arm bushing with the new control arm using the index line as a guide
- Spray the control arm with soapy water to assist pressing the bushing on
- Hammer the bushing on using a block of wood to protect the bushing
- The outer edge of the bushing should be 170 mm from the outer edge of the nearest cutout in the control arm
- Install the lower control arm at the bushing bracket end first
- Install the 16 mm bolts securing the bushing bracket
- Torque the 16 mm bolts to 44 ft-lb
- Insert the inner ball joint into the control arm
- Insert the 18 mm inner ball joint mounting bolts through the ball joint into the frame
- Torque the inner ball joint 18 mm mounting bolts to 57 ft-lb
- Install the 22 mm inner ball joint nut and torque it to 57 ft-lb
- Insert the outer ball joint into the wheel knuckle
- Install the outer ball joint 19 mm nut and torque it to 48 ft-lb
- Reposition the exhaust heat shield (passenger side only)
- Reinstall the two 8 mm bolts to secure the exhaust heat shield (passenger side only)
-
step 4 :Installing the Wheel
- Set the wheel on the hub rim
- Install the 17 mm lug bolts by hand
- Lower the vehicle with minimal weight on the wheel
- Torque the 17 mm lug bolts to 95 ft-lb in a star pattern
- Lower the vehicle completely
Tools needed
-
Socket Extensions
Torque Wrench
16mm Wrench
Hammer
Rust Penetrant
Pry Bar
18mm Wrench
16mm Socket
17mm Socket
18mm Socket
Block of Wood
2 Jaw Gear Puller
Pickle Fork
6mm Allen Wrench
22mm Wrench
Ratchet
1/2 Inch Breaker Bar
1/2 Inch Impact Gun
Marker / Writing Utensil
22mm Socket
What's up, guys? I'm Andy from 1A Auto. In this video, I'm going to show you how to replace the front lower control arms on this 2001 BMW 325xi. If you need this part, or other parts for your vehicle, click the link in the description and head over to 1AAuto.com.
I raised the vehicle. We're using a two post lift. If you're doing this at your house, you can use a jack and jack stands. I'm going to remove the tire to gain extra access. It's going to make it a little bit easier.
I'm going to use a 17 millimeter socket and an air gun. You can always use a breaker bar. Take these lug nuts out, or lug studs out. When I get to the last one I'm just going to hold the wheel so it doesn't fall. Take the last one out, and grab the wheel, pull it off.
So, I want to take this nut off, and also the nut right here, but they're pretty rusty, so I'm going to use some rust penetrant, spray it down, soak it for a little bit, right there, and right there. Now I'm going to take a 18 millimeter wrench, go over this nut. I'm going to loosen this nut up. This will get a couple turns on the box side, then I'll switch to the open side and take this nut off, get that nut loosened up.
And sometimes you can't get it off because the axle's in the way, and we're just going to leave it loose like that. So, I'm going to separate the ball joint from the knuckle, right here.
You can do this a couple of ways. Sometimes there's a clamp that you can slide in there and it pushes down on the ball joint. What we're going to use is a fork. We're going to try that method.
You could also take a hammer and just tap on the knuckle itself. Just be careful. You don't want to break anything. I'm just going to use this pickle fork and a hammer. Don't worry about that. Slide that in there, and we'll separate it.
Now, the reason why you might not want to use a pickle fork is generally it rips the boot on the lower control arm, or on the ball joint. So, keep that in mind. If you're going to reuse the ball point, you might not want to use this method.
There we go, separated. Pull that nut out of the way. So, if you're doing this job and you don't have an impact gun, what you're going to want to do is take a 22 millimeter wrench, get on this nut right here, and you're going to want to crack that free first. Otherwise, we're going to loosen up these two bolts right here, just use an 18 millimeter socket, loosen these up, do the same on this one.
Those bolts are loose. I can take that one out. This one I can't get out until I break this free. Just take a pry bar under here, just pry this away and I can get the bolt out. Just got to twist this a little bit, pull that bolt out, and now we can get a gun on here, take that nut off. I'm going to take this nut off and just use a 22 millimeter socket and an impact gun. All right, got that off.
If you're going to reuse this ball joint, you're going to need to use a ball joint separator. What it does is clamps in here and pushes up on the ball joint. If you're not going to reuse it, then you can either use a hammer on here, or a pickle fork. So, I'm just going to use a hammer, try to break it free, if not, I'm going to use a pickle fork.
All right, so just hammering it off I don't have enough stability with the arm, so I'm actually going to use a pickle fork, slide it in here, just be careful not to hit the CV shaft. There we go. Now, I did just put the nut back on, just so it didn't go flying, just put it on a couple threads and slide it out.
So, I need to access these bolts underneath here. This shield is in my way, so I'm going to remove the shield. I'm going to use a eight millimeter socket, extension, and a ratchet, but I'm just going to hammer this on. These are pretty rusted. Tap that on, use the ratchet, loosen it up. Take that one out. There's another one up there.
All right, so I got this out. You may have to bend it a little bit to get this out. There may be another fastener right there. This one doesn't have that, but, so take that out.
So, that heat shield is just on the passenger's side, where the exhaust is. The driver's side does not have that heat shield there. So, if you're doing the driver's side, it's not as hard.
So, what we need is a 16 millimeter socket and a ratchet, and then we're going to take these two bolts out, right here. There we go.
Right, so the inside one, the one closer to the center of the vehicle, was getting pretty tight pretty close to the exhaust, so I had to switch to a ratchet wrench. So, just use a ratchet wrench on that [inaudible 00:06:44] one.
Oh, all right, and that's loose. They're both loose. Make sure you support the lower control arm so that doesn't happen. I'll take the wrench off and slide it out.
So, we need to separate this bushing from the lower control arm. A good idea to do before you take this off is just take a marker and mark this on the control arm so that you at least index roughly where it went before.
Then we're going to put the control arm in a vice like this, and there's different types of pullers you can use. You could try a different two jaw puller, a three jaw puller, or some other. Be creative. They do make a special puller for this. I don't have it, so I'm just using this front end puller, and I'm going to tighten this down. This is just going to separate this from the control arm, and it came right off.
Here's the old control arm. Here's the new control arm from 1AAuto.com. As you can see, the shape is the same, has the same machined components. The end to go into the bushing, this machined hole for the ball joint, and the other ball joint, comes with a ball joint and a nut. Take that off. This is just a cover for shipping. Get yours at 1AAuto.com and you can do it yourself.
So, I have my mark right there, so I want to slide this on like that, in this area, jus transfer the mark over to the new one, so that's good right there, so we know which way it goes. I have seen some people put grease on this. I don't think grease is a great idea, so I am just going to use a little bit of soapy water, because then it will evaporate eventually.
Slide this on. Take a piece of wood, and just use a hammer, and hammer it on.
Now, the measurement we want is from right here to the top of there. We want it to be 170 millimeters. I don't have a millimeters tape measure, so that's a little more than six and a half inches, so, just get it close. I'm just going to hammer it a little bit more. That's about six and a half inches, so we're good.
I just line this up, take the bolts, get them started. You might have to push this out of your way a little bit. All right, so I got those two bolts started, now I'll take my 16 millimeter ratchet wrench, get the inboard bolt snug first, and then the outer one.
I'm going to tighten these bolts down. If you can get a torque wrench in there to 44 foot pounds, it's a little tight on that other one, so I can at least torque the outer one.
I'll take this inner ball joint, take the nut off here, just slide that in position and these two bolts, get these bolts lined up. Actually, it's a good idea to get the inboard one in first. Get that lined up.
So, this inside bolt I'm not going to be able to get a torque wrench on because the arm's in the way, otherwise you want to torque this to 57 foot pounds, and I'll do the same with that one. With an 18 millimeter socket and the torque wrench, I'll torque this bolt to 57 foot pounds.
Now I'll take this ball joint nut, get that lined up. I'm going to take a 22 millimeter wrench and tighten this up, but the ball joint stud is actually spinning, so I'll take a six millimeter hex bit and put it on my ratchet, and that's going to hold the stud from spinning, and I'll tighten this up.
Now I'm going to tighten this down. Now, if you're able to get a torque wrench on there, which it's very difficult, you can torque that down to 57 foot pounds.
I'm going to line up the lower control arm ball joint through here. Take the nut, get this started.
Right, then I'm going to take a 19 millimeter wrench, tighten this nut right here. Now, it's next to impossible to get a torque wrench on here. Maybe if you used a crow's foot you might be able to torque this, but you're going to want to torque this to 48 foot pounds. So, just do the best you can.
Now we'll take this shield, slide it back in position, take the bolts, or the screws, get these started, and if there was any other bolts that you had that were keeping this on, put those back in. Just take an eight millimeter socket, extension, and a ratchet, just snug them up.
Good, now I'm going to put the wheel on. Just line up the holes, take one of the lug studs, get that started, and I can grab the other ones. Now I'll just tighten this down. And then I'm going to lower the vehicle and torque them.
Right, now I'm going to use a 17 millimeter socket and a torque wrench. I'm going to torque these lug bolts to 95 foot pounds. I'm going to torque them in a star pattern so that the wheel gets tightened down evenly, then I'm just going to go around again, just double check.
We're good to go.
Thanks for watching. Visit 1AAuto.com, your place for DIY auto repairs, for great parts, great service, and more content.
Shop Products


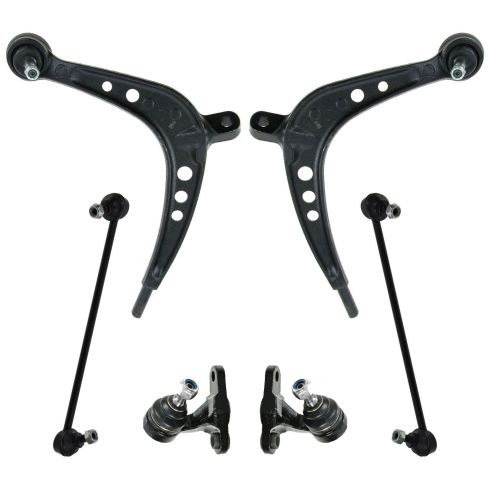
BMW 325Xi 330Xi Front 6 Piece Suspension Kit TRQ PSA65134
Part Details:
- (2) Front Sway Bar Links
- 6 Piece
- (2) Front Lower Control Arms with Ball Joints
- (2) Front Lower Inner Ball Joints
How to Replace Upper Control Arm 2000-06 Chevy Suburban 1500
Watch this video to learn how to replace a loose, rusted, or damaged upper control arm. The experts at 1A Auto will show you how to replace the lower control arm on your 00-06 Chevy Suburban or Silverado, or GMC Yukon or Sierra.
