How to Replace Front Lower Control Arm 2000-04 Ford Focus
Created on: 2018-07-30
How to repair, install, fix, change or replace a broken, busted, bad, loose, or damaged tie rod on 00, 01, 02, 03, 04 Ford Focus
-
step 1 :Removing the Wheel
- Remove the lug nut covers with a 19mm socket
- Loosen the 18mm lug nuts with the vehicle on the ground
- Raise the vehicle with a floor jack
- Secure the vehicle on jack stands
- Remove the 18mm lug nuts
- Pull off the wheel
-
step 2 :Removing the Control Arm
- Use a 21 mm wrench and an 18 mm socket and breaker bar to remove the front bolt from the control arm
- Slightly lift the engine and transmission to allow the bolt to clear the transmission fluid pan
- Use an 18 mm wrench and a 15mm socket to remove the rear outer bolt of the control arm
- Use a deep 21 mm socket and a 18 mm socket to remove the rear inner bolt from the control arm
- Use a T50 Torx bit and a 15 mm socket to remove the ball joint bolt
- Remove the ball joint from the knuckle
- Remove the control arm from the subframe
-
step 3 :Reinstalling the Control Arm
- Line up the control arm and slide it into the subframe brackets
- Align the ball joint and press it in its location
- Insert the ball joint nut and bolt and snug them up using the T50 torx bit and a 15mm socket
- Torque the nut to 37 ft-lbs
- Slightly lift the transmission back up
- Insert the front control arm bolt
- Insert the two rear control arm bolts and snug them up
- Torque them rear inner bolt to 85 ft-lbs
- Torque the rear outer bolt to 85 ft-lbs
- Raise the suspension to ride height to level out the control arm
- Torque the front bolt to 85 ft-lbs
-
step 4 :Reattaching the Wheel
- Slide the wheel into place
- Start the lug nuts by hand
- Tighten the lug nuts preliminarily
- Lower the vehicle to the ground
- Tighten the lug nuts to 98 foot-pounds in a crossing or star pattern
- Tighten the lug nut covers
Tools needed
-
Socket Extensions
Torque Wrench
15mm Socket
Pry Bar
18mm Wrench
Jack Stands
18mm Socket
19mm Socket
T50 Socket
21mm Socket
Ratchet
Floor Jack
1/2 Inch Breaker Bar
Hi, I’m Mike from 1A Auto. We’ve been selling auto parts for over 30 years!
We're going to be working on this 2001 Ford Focus. The first thing we're going to do is we're going to take the tire off. One thing to note, this has these little caps that go over the lug nuts. There's two that are missing on this vehicle, regular ones are 19 millimeter, but because the caps are missing, we're going to have to use an 18 millimeter socket to get those off.
So we'll use a 19 millimeter socket and a breaker bar. Just crack these free before we put the vehicle up. Now I'll switch to the 18. These are really tight, normally they shouldn't be this tight. We're using a two post lift to raise and support the vehicle. You can use a jack and jack stands. Now we'll take these lug nuts off, use a little ratchet and an 18 millimeter socket. Take this last lug nut off, take the tire off. Just hit it a couple times.
This one's kind of tight so we're going to hit it off with a hammer. So I put one lug nut on, that's to prevent the wheel from going falling off when I hammer it off with a dead blow. And I'm going to hit right here really hard on the tire and it will pop right off. Now we'll take this lug nut off and pull the wheel off.
Keep in mind that whenever you're doing any front end repair or replacing any front end components, you're going to want to go to a local shop and have your alignment performed, or at least checked. That way, that'll keep your tires from wearing prematurely.
I'm going to take this bolt out. There is a nut on the backside. We're going to use a 21mm wrench. Go over here and go in between the sway bar right there. You get that on the nut. We're going to take an 18mm socket and a breaker bar. It's a little tight next to the oil pan of the transmission. Hold that with one hand. I'm going to use a pipe for some leverage. Spin it free. Because this is tight right here, I'm going to use a smaller 18mm socket and a ratchet. Take this off. The nuts loose. Take the wrench off. Just use my fingers and take the nut off over here. Put that aside.
Because of the location of the transmission pan, I can't get this bolt out, so I'm just going to use a screw jack and jack it up right here. You could use a floor jack. You might want to put a piece of wood under here. Be careful. Keep in mind your vehicle is supported. You don't want to take it off the support, so just go up as high as you can so that the vehicle doesn't come off your support. I can unscrew the bolt and get it out. At this point, I'm going to let it down, because I feel like it's safer not to be up that long.
Next thing, I'm going to take this bolt out. I'm going to have to use a wrench on the top nut that holds it on. It's an 18mm wrench and a 15mm bolt. I'll use that and a breaker bar. Break this free. I switched to a bigger breaker bark because this bolt is really on there. Now, I switch to a ratchet and I'll take this bolt out. I butt the wrench up against the frame right here and that will help from me having to really put a lot of pressure on the wrench. I just hold it in place and then I can ratchet the bolt off. Pull that off.
Next, I want to take this bolt out. There is a nut on the top. This nut happens to be a 21mm, so I'm going to use a deep 21mm socket and a ratchet. It seems to be the easiest to get to this from over here. Go around in the exhaust and then set that right there and then that's going to be be up against the frame. It can loosen this with a breaker bar. The bottom bolt is an 18mm and I'll use a breaker bar on that. Once sets loose, I can switch to an 18mm socket and a small ratchet. Now, this is loose. Take this down. Here's the nut.
We need to remove this ball joint nut. We're going to use a Torx 50 and a ratchet. Then on the other side there's a nut. It's a 15mm and a ratchet on that side. I'll loosen this up. Take this bolt out. It's not coming out very easily, so I can twist this. It's a little rusty in there, so I'm going to use some rust penetrant and over on this side as well. We're going to put the nut back on and I'm going to hit it with a hammer, see if I can get it to move a little bit. Now that I got that to move, I could take the nut off. I'm going to use punch on this side to push the bolt the rest of the way through.
Now, I'm going to try to remove the ball joint from the knuckle. I'm just going to use a hammer and hit on the control arm to push it down. As you can see, it's actually starting to move, so that's good. It's out. We can take the control arm here. Use a pry bar right here and send out. Pull the control arm out.
Here's our old control arm. Here's our new control arm from 1aauto.com. As you can see, the shape is the same. The mounting bolts are the same. The ball joint is the same. The underside has the same all that. The bushing on the old one is extremely worn. It's all dry rotted and cracked and loose. The nice new part is solid. Get yours at 1aauto.com and you'll be ready to rock and roll.
Now, we're going to install the new lower control arm. We're going to slide it in the back here first. Slide this in over here just like that. We can tap this a little bit. Now, we're going to align this up here. We'll tap it up. That's lined up. You're going to get the ball joint. There's a little groove in there. You want to get the ball joint above the groove so that the bolt can go all the way in. All right.
Now, I'm going to slide the bolt through the knuckle. Then put the nut back on. I'm going to tighten this up. I'll put the T50 socket on this side with a ratchet. Then I'll put the 15mm socket and ratchet on the back side on the nut. We'll snug this up and then I'll torque it. Now, I'm going to use this torque wrench. We sell these torque wrenches at 1aauto.com with a 15mm socket on the back, on the nut side and that same Torx bit. We're going to torque this to 37 foot pounds just like that.
We're going to slip this bolt back in here, but it's not going to go because our transmission pan is in the way. We're going to raise the transmission up on this side. You can do this with a floor jack. Just be careful and make sure you use a piece of wood or something to protect the transmission. Here we go. Once we get that in, take the transmission, drop it back down. Just going to tap this in a little bit with a hammer. Put the nut on the inside. I'm going to install this bolt right here and the nut that goes here and then this bolt right here. The nut that goes on here. All right.
I'm going to start snugging up this back bolt. I'm going to use an 18mm socket from the bottom, from the top where the nut is. I'm going to use a 21mm socket and a ratchet. I'm going to snug this one down with 15mm socket and 18mm wrench for the nut. All right.
Now, we're going to torque this bolt. I'm going to put my 21mm socket up top still. Just like that. I'm going to hold that while I torque this bolt. 85 foot pounds. We also sell these torque wrenches at 1aauto.com. We're going to take our 18mm wrench. Stick that on the nut up there. I'm going to torque this bolt to 85 foot pounds as well. That's good. All right.
I got my 21mm wrench on the nut in the back. I'm going to use an 18mm socket and a ratchet right here. We're going to snug this up. I'm going to raise up under this ball joint. I want to raise the suspension to almost ride height so that the control arm right here is as close to where it would be while it's on the ground. The reason I'll do it right now is it will be easier to torque this bolt or tighten this bolt up. If I was to do it on the ground, it's going to be hard to lie under the car and tighten that bolt. Just get it as close as you can to actual ride height. I'm going to put that wrench back on there and I'm going to use the 18mm socket and this torque wrench. I'm going to tighten this 85 foot pounds. Perfect. Now, lower the suspension back down.
So this wheel and tire when coming off the vehicle actually took a lot of effort to get it off. One of the reasons why is because of the two dissimilar metals corroding. You had the metal from the hub and also the aluminum from the wheel corroding together. So we're going to take a wire brush, just lightly on the wheel go around and clean that up a little bit. You don't want to do too much. You really don't want to sand down the wheel and cause any damage to the wheel but just get a little bit of that off. Just like that and then over on the hub we can go all around the hub, clean all this corrosion off of here, and this will help getting the wheel on and off. One of the things to help prevent this from happening is using a little bit of anti-seize lubricant. I don't like to use a whole lot of this, just a little bit, and only on instances where it's really bad so we'll just put a little bit on there then next time we take the wheel off it will be easier.
Now we're going to throw the wheel up and it went right on. Put our lug nuts on, just tighten these lug nuts. I'm going to torque these lug nuts with a 19 millimeter socket and a torque wrench to 98 foot pounds. We sell these torque wrenches at 1AAuto.com. You're going to do it in a cross pattern so that it tightens the wheel properly. And I'll switch to my 18 millimeter socket for these other lug nuts.
Thanks for watching. Visit us at 1AAuto.com for quality auto parts, fast and free shipping, and the best customer service in the industry.
Shop Products
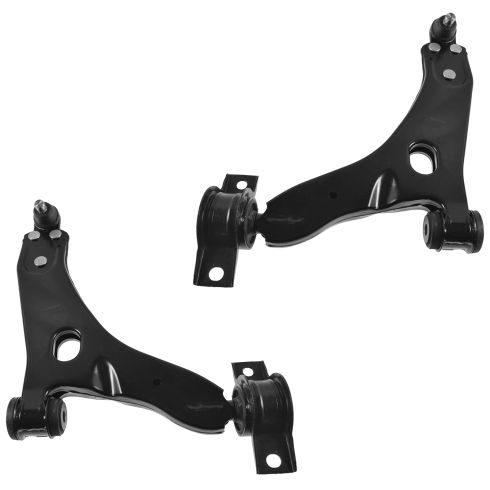
Ford Focus Front Driver & Passenger Side 2 Piece Control Arm with Ball Joint Set TRQ PSA62139
Part Details:
- 2 Piece
- (1) Front Driver Side Lower Control Arm with Ball Joint
- (1) Front Passenger Side Lower Control Arm with Ball Joint
How to Replace Passenger Side Lower Control Arm 2007-14 Ford Edge
Control arms are a crucial part of the suspension system of your vehicle. They carry the load of the vehicle to the wheel and maintain its alignment. Control arms are large and strong. They contain rubber bushings for smoother rides at the cost of eventual wear. How to install a new quality TRQ passenger side lower control arm in your 2007-14 Ford Edge.
