How to Replace Front Lower Ball Joint 1993-95 Toyota Corolla
Created on: 2019-07-19
Check out this video from 1A Auto to learn how to replace the front lower ball joint on your 93-95 Toyota Corolla. Save money and do it yourself!
-
step 1 :Removing the Wheel
- Raise the vehicle with minimal weight on the wheel
- Loosen the 21 mm lug nuts
- Raise and support the vehicle
- Remove the lug nuts
- Remove the wheel
-
step 2 :Removing the Lower Ball Joint
- Remove the ball joint cotter pin
- Loosen the 22 mm ball joint castle nut
- Remove the two 17 mm ball joint mounting nuts
- Remove the 17 mm ball joint mounting bolt
- Loosen the ball joint from the knuckle with a pickle fork
- Remove the 22 mm castle nut
- Pry the control arm down and remove the ball joint from the knuckle and control arm
-
step 3 :Installing the Lower Ball Joint
- Apply thread locker on the ball joint mounting studs and bolt
- Pry the control arm down to insert the ball joint studs into the control arm, and the ball joint into the knuckle
- Install the 18 mm nuts onto the ball joint mounting studs
- Install the 16 mm ball joint mounting bolt
- Install the 22 mm castle nut onto the ball joint
- Install the ball joint cotter pin and peen it over
- Torque the 16 mm ball joint mounting bolt to 105 ft-lb
- Torque the 18 mm ball joint mounting nuts to 105 ft-lb
-
step 4 :Installing the Wheel
- Install the wheel onto the wheel studs
- Install the 21 mm lug nuts by hand
- Lower the vehicle with minimal weight on the wheel
- Torque the lug nuts to 76 ft-lb
- Lower the vehicle completely
Tools needed
-
Pickle Fork
21mm Socket
Torque Wrench
15mm Socket
Rust Penetrant
Pry Bar
16mm Socket
17mm Socket
18mm Socket
22mm Wrench
Ratchet
Hey friends, it's Len here at 1A Auto. Today I'm working on a 1995 Toyota Corolla. I'm going to show you how to do a lower ball joint. It's going to be a very easy job. I want to be the guy that shows you how to do it. If you need this or any other part, you can always check us out at 1AAuto.com. Thanks.
Okay, so one of the first things we're going to do is we're going to raise and support the vehicle a little bit. So the majority of the weight's off of the tire. We do want the tire to just barely be touching the ground so we can't spin. What I'm going to do is I'm going to loosen up the lug nuts. This vehicle has aftermarket wheels and lug nuts. So you know it's going to be different sizes for you, but you should have a 21-millimeter socket, long breaker bar, and all you're going to do is just break them free. Not going to loosen them right up or take them right out. You don't want to mess up your lug studs or anything, or your wheels. Now that we have them all broken free, we'll safely raise the vehicle. We'll make sure that it's safely supported and secure. Now we're going to remove these lug nuts and the wheel.
All right, so I'm just going to go ahead and take off these lug nuts. I'm going to take out the first two. The third one that I'm going to remove, I'm going to leave in a few threads and then I'll fully remove the last one. And I'll show you the reason why when you get to that point. Now I can put down my tool. Hold my wheel, of course, so I'm safe. I'm going to lower it down safely and I'll set this aside.
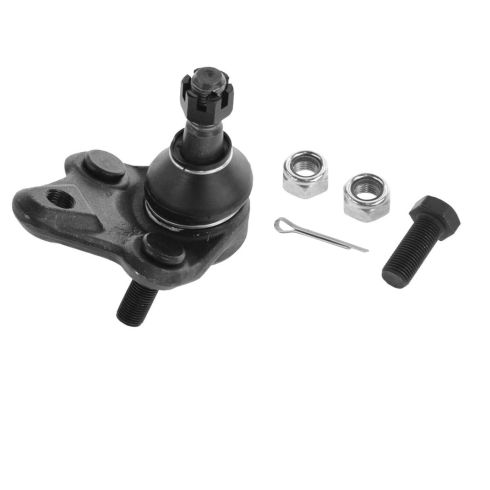
Now we've got a clear view of what we're doing here. So here we are. Here's our ball joint assembly. Okay. There's a stud that comes up right through your knuckle. Right there is a nut with a cotter pin. We're going to remove the cotter pin, remove that nut. The ball joint comes this way and it bolts into your lower control arm. There's a nut, a nut, and one bolt that comes up and through. So here we go.
We're going to go for our cotter pin first. See if I can grab onto it. If you have access to new cotter pins, you don't necessarily have to worry about damaging it. I always recommend replacing them if you have access to them. Because sometimes they come out a little wonky, and if you trust that to hold your nut in, well, good luck. I'm going to recycle this because we have brand new ones. So I'll put it in my pile.
Next we're, I'm going to go ahead and loosen this up with my 22-millimeter wrench. Break it free. Yeah. Nice. Many likes. Cool. Okay.
It's as high up as it's going to go right now. Once we take these out and we break the ball joint free, this will drop out. and we'll be able to get the nut off the rest of the way. So under here you've got a 17, 17, and you should have another 17. One of these nuts looks a little bigger. I'm sure that they're all supposed to be the same size. It's a little bit old. Who knows. Maybe somebody's replaced it before. Did a little something funky under there. Not worried about it. I'm going to find my ratchet and some wrenches or sockets.
Okay. 17. Here we go. Yeah, baby. Love it. Leave that on a little bit. Move along. Grab my bolt. Come on baby. About the same as the first. Different size, but I'm sure they're supposed to be the same. Should be a 17. We'll set these aside.
All right, let's move along. We're going to go with a pickle fork and hammer. Try to put it right in between the knuckle and the ball joint. The purpose of this is to apply pressure in between the two and separate them. Put a little bit of penetrant in there. Hopefully it'll want to do its job. The best of its ability. That's what I'm talking about right there, baby. Love it. Okay, I'll get our nut out of here. We're not reusing it. We'll recycle it, of course. Save Mother Nature.
Okay. Grab pry bar. Let's see. What I need to do now is I need to get my control arm to come down so I can get my ball joint out of here. Okay, so we'll take a peek and I'm going to try coming this way. Let's see if this works. Like a no. Over here. Oh yeah. We've removed our ball joint assembly. Now we can go ahead and replace it.
Okay friends, a quick product comparison for you. Over here we have the ball joint that we just took out of our 1995 Toyota Corolla. It's a lower ball joint. Over here we have our brand new quality 1A Auto part. As you can tell, they're both the same exact shape. They've got their two studs down there on the bottom. They've got the threaded hole for the bolt there. As you can tell, it's a quality part. It's got the same shaft and everything. Got your boot. It even comes with brand new mounting hardware. You don't have to worry about having mismatched hardware anymore. So with all that said, I don't see any reason why this wouldn't be a great part to install on the vehicle. So I'm going to go ahead and recycle this and install this. If you need this or any other part, you can always check us out at 1AAuto.com. Thanks.
Okay. I'm just going to use a little bit of threadlocker. It's your prerogative if you want to or not. There we are. Now we can go ahead and install this. Get our nut off of there. Okay.
I'm just going to go in just like this. Okay. These two studs are going to go right through there. This stud's going to go up through there. let's see what we can do. Safety first, of course, safety glasses just in case I punch myself in the face.
I'm just going to see if I can get it up and in. Okay.
It's looking pretty good so far. We've got our two new nuts. Those right here. We're not going to fully tighten anything down till everything's started. If I can get this started. Okay. Feeling pretty good.
Let's go ahead and get our nuts started up on there. There we are. Okay. Everything's started. We can go ahead and start snugging things down. I'm going to use 18 for these two nuts and then a 16 up here for this one. We'll just bottom it out and then we'll go ahead and torque them down.
Okay. Here we are. So these are all bottomed out. Let's go ahead and bottom this one out. You can use our 22 or 7/8ths, whatever you've got. Okay. Let's get this snugged. Looks like we are pretty close to where we need to be. It's definitely tight. We'll take our cotter pin, stick it through. Grab a screwdriver, it's what I've got on hand. See if I can just get this pulled up. It just needs to be peened over. It doesn't necessarily have to be pretty. Obviously you don't want them touching up against the axle. That's basic. There we are. Perfect. That cotter pin will not come out on its own. The nut will not be able to loosen. Let's go ahead and torque this down. We'll move along.
Here we go. Time to torque this. 105 foot-pounds. That feels good.
Torqued, torqued, torqued. Got the cotter pin in there. Perfect. All right, let's get the wheel on. Good. Time to get the wheel up on here. We're just going to grab it, roll it up our leg, lift with our abs, of course. Try not to use our back for stuff if we don't have to. Get a lug nut started on. I don't have to worry about that wheel falling off. Get all these started and we'll bottom them out. Now we're going to torque them down. There we are.
It's time to go ahead and torque these down. 76 foot-pounds. You're going to go on a crisscross pattern. There we are. I'm just going to hit it one more time.
Okay, perfect.
Thanks for watching. Visit 1AAuto.com, your place for DIY auto repairs, for great parts, great service, and more content.
Shop Products


How to Replace Ball Joint 2011-17 Toyota Camry
Watch this video to learn how to replace the ball joint. The experts at 1A Auto show how to replace the ball joint on your 11-17 Toyota Camry.
