How to Replace Front Lower Ball Joint 2004-08 Ford F-150
Created on: 2020-08-06
This video shows you how to install a new lower ball joint on your 2004-08 Ford F-150.
Tools needed
-
Torque Wrench
Hammer
Socket Extensions
Ball Joint Press
Pry Bar
Jack Stands
Pocket Screwdriver
Snap Ring Pliers
Socket Driver
Paper Towels
Large Locking Pliers
Wheel Chocks
Bungee Cord
Floor Jack
1/2 Inch Impact Gun
22mm Socket
Okay, friends, to get started on this job, the first thing that we need to talk about is safety. You want hand protection and eye protection at all times. With that said, safely raise and support your vehicle so you have your front wheel off the ground. We're going to remove this center cover, and then we're going to remove the lug nuts as well. Get your wheel off of here. Okay, now that the wheel is off, we have a nice, clear view of our inner tie rod end. We need to loosen this jam nut right here, I like to use a nice big pair of pliers. Give that a little turn, grab it. There we are. Make sure it's broken free.
Now, we're going to remove our outer tie rod end nut. To remove your outer tie rod end, it's best to hit right along the knuckle. If for some reason that isn't working and you don't have a threaded area along the top of your tie rod, you could carefully try to bonk along the top as well. Now that we have the tie rod out off, we can move this around. And that's great because we want to be able to get this caliper off. Something, before we do that that I want to mention, is that this rotor right here is going to have a little bit of weight. To do the lower ball joint, we're going to have to take off this whole unit right there. So, of course, that's going to weigh something as well. If you have an issue with something that's heavy, it's probably a great idea to go ahead and remove the rotor as well but, of course, that'll make more work so you'll have to clean up the surfaces in between the wheel bearing and the rotor.
Next, we need to get our ABS wire off of our brake hose. After that, we're going to remove our two caliper bracket mounting bolts. That's going to relieve the caliper and we're going to move it away from the rotor area. Once you do that, you need to have something ready so you can hang the caliper. You don't want to put any pressure on your flex hose. I've got my little bungee cord ready. Just going to put that in a couple of threads. Remove that bolt. All right. Now, we'll just set this up. Next, we need to follow our ABS wire. If you were to give it a tug, you're going to see this area right here moving around. That's because that's where it's attached to on the backside of the plastic. I'm just going to use this little forky tool, you can use pretty much whatever you've got. Give this a little flex, and I'm going to see if I can get behind there and just relieve it from the plastic.
Okay. Pull this through. Now we need to disattach this. If you were to push on this tab and then draw this away, it'll separate the two. We're going to get this off of here as well. And then, of course, we'll bring the ABS wire all the way down to here and we'll wrap it up so it's as safe as possible. At this point, I always like to move down to the lower ball joint. I'm going to get this cotter pin out of here, and I'm going to loosen up this nut. I'll leave it back on a couple of threads and then we're going to move up to the upper ball joint. Let's get this nut off of here. Just leave that on a couple of threads as well.
Next, we're going to take our hammer and we're going to bonk right along here on our knuckle. You want to be careful not to damage your upper ball joint boot. So, now that we have the upper ball joint out of there, you want to make sure that you tie up the knuckle so it's going to be semi-safe, it's not going to be just flopping down because the next thing we need to do is relieve our lower ball joint. When we do that, we're going to do approximately the same thing. We're going to hit right along here on the knuckle, try to cause vibration, and hopefully, this area will separate.
There you are. As you can tell it's separated, our safety nut did its job, and, of course, the upper area that we tied up is also keeping us safe. So, we've got that untied now, I'm going to relieve the nut. You need to lift up on the knuckle and keep in mind that it's going to be a little heavy. Let's get the knuckle right off of there. And we have a nice, clear view of our lower ball joint at this point. We want to remove this grease fitting right here. Once we've done that, we're going to remove the snap ring and we'll move along.
Get this right off of here, I'll show you what it looks like in a sec. So, this is what the snap ring looks like. You need to go ahead and get some of these little pliers, you get into those little circles, as you squeeze, it spreads it, and it'll come off with the lower ball joint. You could use your hammer, give it a whole bunch of bonks and drive it right out of here, but you might, of course, damage your lower control arm, nobody wants that. I'm going to use the ball joint tool and I'll show you how to press it out. Here's the tools we're going to need. The ball joint press itself, you're going to need a cup that fits over the lip of the ball joint, but still fits on the control arm, and then, of course, you're going to need one of these that has the slot for the stud. Put these like this, just like that. Take your press, put it over, and go ahead and bottom it out. Now, as we drive this down, it's going to push the ball joint through. Once it breaks free, the whole going to kind of flop around. So make sure you have a good grip on it.
You can see it starting to go down, and there's our lower ball joint. Now it's going to be time to get ready to install our brand new lower ball joint. Something to pay attention to is to press this in, you're going to need to get on this lip area right here, except not on this portion, on this portion. As you can tell, the boot's in the way. Take a small pocket screwdriver and just see if you can weasel your way in between the lip and the boot and separate the two. Obviously, be very careful, you don't want to damage the boot. We'll get that out of the way and now we can continue. It's always a great idea to clean down the area you're going to be working. Make sure you clean out that hole, you don't want any debris in or around it. To install our new lower ball joint, you're going to need something that looks like this.
It has a little cupped area. The reason for that is because it needs to go over the hole on the lower control arm where the lower ball joint is going to come up, and then through. If you put a flat plate here, obviously, the lower ball joint is going to be able to come up far enough to be able to put your clip on there. So, we'll say that's there, take your lower ball joint, and then, of course, you need another cup. The lower cup needs to have a hole for the stud to go through and it needs to be just thick enough or wide enough that it can fit along the lip of the lower ball joint. Just like this. Go ahead and line this up. Now we're going to get our ball joint press, put it together, and then, of course, as we start tightening it, it's going to pull this up and into the lower control arm. So, now we need to make sure we align this upper cup up because if it's off by a little bit, it's a possibility we could damage our lower ball joint. Now we're going to tighten this. What you want to pay attention to as you tighten it is to make sure the ball joint is going straight up. If it seems like it's going like this, obviously, you're going to have an issue.
So, you can see right here, it looks like it's starting to go at an angle. I'm going to stop there, relieve tension or pressure, I'm going to move this a little bit and see if I can get that side to go up. As you can see, as I'm pressing this up, you want to make sure you don't have any gap between the ball joint and the lower control arm itself, so I need to continue going up. Once it's bottomed out, leave it just as it is. Hit right on the lower control arm with your hammer a couple of times, just to cause vibration and that's going to settle this in just in case it's a little off-kilter. That's great. Let's get this out of here.
Now, let's get this clip on here. Okay. Make sure it's sitting all the way around. You want to make sure it's inside the groove. If it's not in the groove and it's possible that it could fall off, there's also a possibility that the lower ball joint might not be secure. Now it's going to be time to get our boot on here, just line it up on one side and then take some pliers and just help it up all the way around. You want to make sure it's completely secured so it can keep the moisture out. Make sure it's secure. Let's move along. Something that I always try to pay attention to is the area where the cotter pin is going to go through. Obviously, if we're going to have that big old knuckle on here with the rotor, it's going to be very hard to get a cotter pin in between and inside there. So, use a flat-head screwdriver, use a pick, whatever you need to do, give it a spin, so it's facing front to back. Perfect. Now it's going to be time to get our knuckle on here. Make sure you have your lower ball joint nut in your hand because it's going to make your life much easier, slide it up on, start that ball joint nut on.
Now, we're just going to snug up that lower ball joint nut. The reason for that is because I want to make sure there's no way that it can come loose on me while I continue working. Stop right there, we'll move along. Next, we're going to need to get our upper ball joint into the knuckle. That's going to be easiest if you have a nice pry bar like this. What we're going to want to do is go above the control arm right here, and then find an area in the frame that'll make it so we can go into and be able to pull this down. Leave the bar right where it is, line this up. Go ahead and pull this down now and start your upper ball joint nut.
Now it's time to torque these down. Let's torque this upper ball joint nut to 85 foot-pounds. Now, let's torque this lower ball joint nut to 111 foot-pounds. Now it's going to be time to put in your locking cotter pin. If for some reason you notice that the slots on your nut don't line up with the hole on the ball joint, you need to continue tightening that nut until you get to the next slot. You do not want to loosen it, just check it. Well, that one actually lines up perfect. Go ahead and peen it over. I'm going to grab some pliers and cutters.
Make sure it's 100% peened over and there's no way that that locking clip or cotter pin can come out. Next is going to be time to get our caliper back on there. You want to inspect your bolts, make sure they're in good condition. If for some reason the threaded area looks like it's rotted or it has any type of never-seize or anything inside of it, you need to make sure you clean them up and get off any never-seize. Of course, the area on the bracket where the caliper bolts are going to go to, make sure those are clean as well. Once you have your bolts cleaned up, let's go ahead and get this caliper ready for install.
I'm going to slide the pads over the rotor and then line up the holes for the bolts to hold the caliper to the knuckle. It's a great idea to use a little bit of thread locker if you have access to some, but we'll call it your prerogative. Bottom these out, and then we'll torque them down. Torque these to 148 foot-pounds. Now let's get our ABS wire re-secured. Go ahead and reattach it back to the flex hose going up to where it's going to be secured up here, come up this way, get this back on here. If for some reason any of your clips are broken, you need to make sure that you have your ABS wire secure so there's no way it can get damaged by the wheel as it comes around, or, of course, driving the vehicle in any way. Reconnect this in, give it a nice tug to make sure it's 100% in. Put this all behind the nice plastic here, and then re-secure it in the backside.
Now it's time to get our outer tie rod end into the knuckle. Let's see if I can just turn it a little bit, slide it in here. There we are. Take our nut, If it has a lock, make sure the lock is facing up, of course. Now, we're going to snug it down and then we're going to torque it to 111 foot-pounds. Now it's time to get our wheel back up on here. We'll start on all of our lug nuts, bottom them out. And then we're going to torque them to 150 foot-pounds. Next, you need to get your vehicle so the tire's just barely on the ground so it can't spin. We're going to torque the lug nuts like I said to 150 foot-pounds in a star pattern. Once you've torqued it, make sure you put it back on your center cover, of course. Okay, friends, anytime you do any type of front-end work on your vehicle, it's always super important to make sure you get your vehicle down to a reputable alignment shop. They're going to take care of you and make sure you're going straight on down the road. Be safe out there.
Shop Products


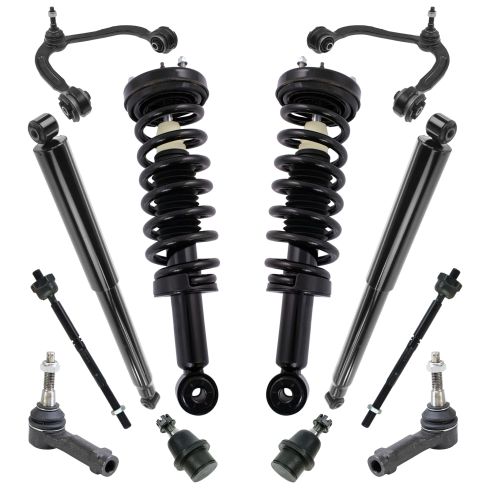
Ford F150 Lincoln Mark LT Front & Rear 12 Piece Steering & Suspension Kit TRQ PSA59215
Part Details:
- (2) Rear Shock Absorbers
- (2) Front Shock & Spring Assemblies
- (2) Front Lower Ball Joints
- (2) Front Upper Control Arms with Ball Joints
- 12 Piece
- (2) Front Outer Tie Rods
- (2) Front Inner Tie Rods
How To Replace Lower Ball Joint 1997-2002 Ford Expedition PART 2
This video continues the installation of the ball joint and CV axle, including some handy ways of completing the repair without special tools
