How to Replace Front Inner Tie Rod 2013-17 Nissan Sentra
Created on: 2020-03-18
Watch this video to learn how to install new inner tie rods from TRQ on your 2013-19 Nissan Sentra.
Tools needed
-
Torque Wrench
Hammer
14mm Socket
17mm Wrench
Rust Penetrant
18mm Wrench
Liquid Thread Locker
Pick
21mm Socket
Side Cutters
Locking Pliers
Inner Tie Rod Removal Tool
Hose Clamp Pliers
Cotter Pin
Needle nose pliers
1/2 Inch Breaker Bar
1/2 Inch Impact Gun
You want to keep in mind when you're doing this job, after you're done, you're gonna want to go to a local garage and have the vehicle aligned so you don't have premature tire wear. Take the wheel off. I'm gonna use a 21-millimeter socket. Remove the wheel. I'm gonna loosen up this jam nut. I'm gonna use a 17-millimeter wrench. And it's loose enough. Just little rust penetrant in here. Suck that down for a little bit. I'll use a 14-millimeter socket, take that nut off. And just take a hammer and just hit it out. Just give it a tap.
Now I'm gonna remove the outer tie rod. Just count the turns when you take it out, one, two, three and so on just so that you know where it was when you go to put it back together. 4, 5, 17, 18, 19. We're gonna take this nut off, take the jam nut off. If you have to, you can use some locking pliers and then a socket. This one's coming off pretty easy though. And now you can use some hose clamp pliers or needle-nose pliers just take this clamp off. I can just use a straight pick and loosen this clamp up right here. And then if I twist it that way it'll be a little easier to loosen it up over here. I'm just gonna use a right-angle pick, just loosen this up a little bit more. I can try to pop it off, make it easier. I might reuse it and I'm pretty sure I can reuse it. I can grab the boot, just slide it off.
All right. Now you can take this clamp off. Now I'm gonna use a tie rod tool with the correct adapter. Slide it over the inner tire rod and lock it in place. And I'm just gonna use some locking pliers as close to the tie rod tool as possible so you don't mess up the steering shaft. I'll get that in place, then I can loosen this up. And it should be loose. I can take the locking pliers off and take the tie rod tool off and just loosen this up. Take it off.
I'm just gonna use a little bit of the grease that comes with the tie rod end, just put it in there. Try to pack it in there a little bit. It's good.
And then I'm just gonna use a little Loctite or a threadlocker. I'll say it again. I'm gonna use a little threadlocker just on these splines right there and get this lined up. And I'm gonna use the same adapter and tool to reinstall it or install the new one. Just the locking pliers just on the steering shaft. Now I'll tighten this up. It's good and tight. Gonna take a little more of this grease and just put it right here where that boot's gonna ride, rub it around. I just put this clamp back on the boot. And line it back up. Specially made clamp tool for this, just gonna squeeze the clamp, tighten it up. Now that's good.
Now I'll just take the clamp. Use some pliers, get that back over the boot. That's good right there. We can install the jam nut and just take the tie rod end and just count the turns. 1, 2, 3, 17, 18, 19. Just move the jam nut a little closer. And I'll just gonna take this castle nut off first and slide it into the knuckle. Put the castle nut back on and torque this nut to 25-foot-pounds. And take the new cotter pin and line it up. Use some side cutters, just bend the tab over. Then you can cut off the excess and just use a 18-millimeter wrench, tighten up the jam nut. If you have the ability to torque this, torque this to 31-foot-pounds. Put the wheel back on, and the lug nuts. Now I'm gonna torque these lug nuts to 83-foot-pounds in a star pattern to tighten the wheel down evenly. Just go around again. Double-check.
Shop Products


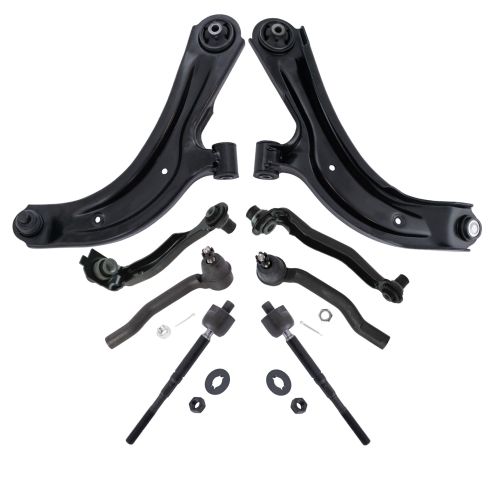
Nissan Sentra Front 8 Piece Steering & Suspension Kit TRQ PSA39460
Part Details:
- (2) Front Lower Control Arms with Ball Joints
- 8 Piece
- (2) Front Upper Control Arm Links
- (2) Front Outer Tie Rods
- (2) Front Inner Tie Rods
How to Replace Tie Rod Assembly 1998-2004 Nissan Frontier
If the tie rod needs to be replaced, this video will show how to remove it and prepare a new on one the 98-04 Nissan Frontier
