How to Replace Front Hub Bearing 2014-17 Chevy Silverado
Created on: 2019-05-16
Watch this 1A Auto video to learn how to replace a worn out front hub and bearing on your 14-17 Chevy Silverado.
-
step 1 :Removing the Front Wheel
- Loosen the lug nut covers with a 22mm socket
- Loosen the lug nuts with the vehicle on the ground
- Raise the vehicle with a floor jack
- Secure the vehicle on jack stands
- Remove the lug nuts
- Pull off the wheel
-
step 2 :Removing the Front Brakes
- Place a screwdriver into a brake disc vent and rest it against the caliper to hold the wheel hub in place
- Loosen the 35 mm axle nut for a later step
- Remove 19mm bolts from the brake caliper
- Pry the brake pads into the caliper with a flat blade screwdriver to push in the pistons
- Set the caliper aside on a caliper hanger
- Pry the brake pads off with a flat blade screwdriver
- Remove 18mm bolts from the brake caliper bracket
- Pull off the brake caliper bracket
- Remove the T30 Torx screw from the rotor
- Pull the rotor off
- If the rotor will not come off, thread the caliper bolts to the rotor and strike the hub area of the rotor with the ball end of a ball peen hammer
-
step 3 :Removing the Front Wheel Hub
- Remove the 35 mm axle nut using the pry bar to prevent the wheel from spinning
- Remove the axle washer using needle nose pliers or a magnet
- Disconnect the wheel speed sensor electrical connector
- Pry away the two wheel speed sensor wire retaining clips
- Remove the three 15 mm wheel hub bolts at the back of the knuckle
- Loosen the wheel hub with a hammer to remove it
-
step 4 :Installing the Front Wheel Hub
- Install the wheel hub into the knuckle
- Replace the three 15 mm wheel hub bolts
- Torque the three 15 mm wheel hub bolts to 133 ft-lb
- Replace the 35 mm axle nut
- Torque the 35 mm axle nut to 177 ft-lb using a pry bar to prevent the wheel from spinning
- Secure the wheel speed sensor wire retention clips into their mounting points
- Reconnect the wheel speed sensor electrical connector
-
step 5 :Replacing the Front Brakes
- Slide the rotor on
- Tighten the T30 screw to the rotor
- Put the bracket back into place
- Start the bolts by hand
- Tighten the bolts to 170 foot-pounds of torque
- Apply grease to the brake pad tabs
- Install the brake pads into the bracket
- Put the caliper on
- Thread bolts by hand
- Tighten bolts to 74 foot-pounds
-
step 6 :Replacing the Front Wheel
- Slide the wheel into place
- Start the lug nuts by hand
- Tighten the lug nuts preliminarily
- Lower the vehicle partially to the ground
- Tighten the lug nuts to 140 foot-pounds in a crossing pattern
- Lower the vehicle completely
Tools needed
-
35mm Socket
A Piece of Pipe (for leverage)
Socket Extensions
Torque Wrench
Hammer
15mm Socket
Rust Penetrant
Pry Bar
Brake Parts Cleaner
Pick
File
Brake Caliper Hanger
Center Punch
Anti-Seize Grease
T30 Socket
Ratchet
Wire Brush
Cloth Rags
Needle nose pliers
1/2 Inch Breaker Bar
1/2 Inch Impact Gun
What's up, guys? I'M Andy from 1A Auto. In this video I'm going to show you how to replace the front hub bearing on this 2015 Chevy Silverado. If you need this part or other parts for your vehicle, click the link in the description and head over to 1Aauto.com.
Take a 22-millimeter socket and a breaker bar. I'm just going to loosen up these lug nuts. Now I'm going to raise and support the vehicle. Then I can take the lug nuts off. Take the tire off.
So I'm going to loosen up this axle nut. There's a couple of different ways you can do this. You can take a screwdriver and slide it in between the break fins right there, and then the brake rotor up against the caliper bracket will stop that from spinning, loosening it up here. And then also you could take a pry bar, slide it in between the lugs and hold that while you loosen it up, or even have the tire on the ground with the center cap off, loosen it that way.
I'm using a 35-millimeter socket and breaker bar, and I'm going to use a pipe to give me a little more leverage. This is on there pretty tight. Loosen it up.
Now I'm going to take these caliper bolts out. I'm going to use a 19-millimeter socket and a ratchet. Loosen that up. Take that out. I'm just going to leave that in a little bit before so I can take the top one out, otherwise the caliper is just going to slide up. There we go.
If when you're taking that bolt out, if the pin starts spinning, you can use a 19-millimeter wrench and hold the pin from spinning. Ours came right out. Now I'll just grab the caliper. I'm just going to rock it back and forth a little bit to compress the piston. You can always take a screwdriver and slide it in between the caliper and the rotor, pry it out a little bit, make it easier to pull it off.
Then I'm going to take this caliper hanger. We sell these at 1Aauto.com. Slide it in the caliper and then hook it onto something. I'm going to hook it onto the spring right here. Keep the caliper from hanging just on the hose. You never want to let the caliber hang from the hose.
Now I'm going to take these pads off. I'm just going to use a little pry bar. You can use a screwdriver. These pads are on there pretty tight. They're rusted on there really good. Slide those out. As you can see, there's no pad life left on these brake pads. That's metal on metal, so these brakes are definitely due to be changed.
Now we want to take this caliper bracket off. I'm going to use a 18-millimeter socket and a breaker bar. Take these two bolts out. These are on there really tight, so I'm actually gonna use a pipe to get a little more leverage. Loosen these up. And I'll take a 18-millimeter socket and a ratchet, take the bracket off. When we have those caliper bolts out, we can grab the bracket and just slide it up.
To take this rotor off, I have to take that screw out. I'm going to use a pry bar to keep the rotor from spinning. I'm going to use a T30 socket and a ratchet, loosen this up.
So this screw isn't coming out very easily, so I'm just going to take a punch and a hammer, give it a couple taps, hopefully to break some rust free. Let's see if I can loosen this up now. All right, so this is giving me a little bit of trouble. What I'm going to do is take that same T30 socket and put it on an impact driver. We actually sell these at 1Aauto.com. We're just going to twist it to the left and hit it with a hammer. And there it goes, it's loose. Got it.
I can grab the rotor. Now if this was stuck on there, rusted worse, you can take a hammer and tap in these locations, and then slide the rotor right off.
Now I gotta take this nut off. I'm just gonna use the socket, a 35-millimeter socket and a ratchet, and I'm gonna use a pry bar to prevent this from spinning. Take that off, take the washer off. You can take some needle nose pliers to grab this washer, or you could take a magnet or even a screwdriver or a pick and just pull this washer off.
Now these bolts that hold the wheel hub on that go through the knuckle, I'm just going to spray some rust penetrant and let them soak for a little bit. It'll make it easier to remove the bolts.
Disconnect this connector. I'll just move this lock tab with a pick. So this lock actually broke a little bit, so what you would do is push this lock back and then push down on that little tab and that will release the connector. I just had to get under there with a pick to release it.
So we're going to get underneath here and just use a straight blade screwdriver or a trim tool. Pry that up. And then over here is a little tab that holds this in. Push down on the tab on one side with a straight blade screwdriver, and then on the other side. Or you can use some needle nose pliers or something. There we go. Pull that out. That wiring harness is disconnected.
Now we want to remove these three bolts that are on the back side of this knuckle. I'm going to use a 15-millimeter socket and a breaker bar to break them free. And then I can use a ratchet. Now they're all loose, now I can switch to a 15-millimeter socket extension and a ratchet. Now I can take these bolts out.
So there's a couple ways that we can pull this hub off. You can try to grab it and see if it comes off. This one's rusted, it's been on there a while. You could use a slide hammer and put an adapter, slide hammer it out. A lot of times it'll break the hub, will separate in the middle, and then you're still stuck with that inner piece attached to the knuckle.
So what we're gonna do is we're going to actually take a hammer and we're just going to hit it from the backside. And that's how we can remove the hub from the knuckle. And luckily this one's not in there too hard. You can see the backing shields starting to separate. A lot of times these will freeze in there and it's really difficult to get out. We'll just go back and forth with the hammer. A couple of hits on this side, couple of hits on this side. Give it a couple of taps on the axle. Not too hard, because we don't want to mess up the threads.
You want to make sure you watch out for your toes too because this hub could just fall all of a sudden. If you're not wearing steel-toed boots, it might get you in the feet. Here we go. Separate it, push the axle, slide this out and slide the dust shield off. Leave that right there, and there's the hub.
Here's the old hub bearing. Here's the new one from 1Aauto.com. It's got the same machine surfaces, same bolt holes, same threads on the inside for the axle. This comes with the wheel speed sensor, same connector. And on the front, it's got the same studs. Get yours at 1Aauto.com and you can do it yourself.
It's a good idea to replace the bolts whenever you're doing the hub bearing on this vehicle. We sell these bolts at 1Aauto.com. As you can see, the bolts look identical to the ones that came out, they're the same threads, same size hex.
Before I put the hub bearing on, I'm just going to take this shield off. Remember the direction that it goes. You could even leave it right there. I'm just going to take a wire brush and clean up some of the rust that's here. If it's really bad, you can take a die grinder and grind some of the rust off. This isn't too bad. All right, that's cleaned up.
If you want, you can put a little bit of grease on there. I'm not going to use any grease. I'm just going to take this shield, slide the ABS harness through there, just like that. Position this back over. Just make sure the wiring harness doesn't get pinched. Let it slide on there, slides on there pretty good.
Now I'm going to take the bolts. You want to get them all started before you start tightening them down. I'm going to use a torque wrench with a 15-millimeter socket, and I'm going to tighten these bolts to 133 ft-lbs.
I'll take the Washer, stick the washer on, then the nut. Then I'll take a pry bar, prevent the hub from spinning. Use a 35-millimeter socket and ratchet, tighten this down, and then I'll torque it. With the torque wrench, I'm gonna torque it to 177 ft-lbs.
Take the wiring harness, re-secure that in the same position that it came out of. Push that clip in there, and this one over here. Just like that. Connect the connector right here, lock it in place and push that down right there.
Now we're going to clean up the caliper bracket. Just take a wire brush. If you're reusing the clips, clean up the clips. Take the clips off. Just use a straight blade screwdriver, a pocket screwdriver, clean the back side of the clips. And then also clean this area right here. If you have a lot of rust, you're going to want to take a file or something a little more abrasive and clean any of the rust out that is raised up. Just be careful. Don't file too much down.
We'll take a little bit of caliper grease, put it on here before we put the clips down. That's going to keep some of the moisture out of there, prevent it from rusting up as bad. And then put the clips on, and we'll do the same with the other side.
Now we want to clean the slide pins. Just pull the slide pin out. Take some brake parts cleaner and a rag, wipe it off. You can also take some brake parts cleaner, spray it in the hole, clean the hole out. Make sure it drains out. We'll take a little bit of brake caliper grease, apply that to the pin. Then re-insert the pin and do the same procedure for the other side.
Before I put the rotor on, I'm just going to use a little bit of this anti-seize. Just go around this area. A lot of times this area gets corroded pretty good, so we'll just do this for future so it's easier to remove.
First I'm gonna slide this rotor on backwards. I'm gonna take some brake parts cleaner, clean it down. There is a coating on the brakes, so you want to take that coating off. Just wipe it down with a rag. Flip it around, take some more brake parts cleaner, clean this side, wipe it down with a rag. Make sure that the bolt hole lines up with that hole right there. Then take the screw, get this one started.
I'll just take the T30 socket extension and ratchet, just snug this down, not tight, that's good enough. Take the brake caliper bracket, line that back up. Take the caliper bolts, you can put some thread locker on there. Same with the top one. Get that lined up.
Now we'll take an 18-millimeter socket and a ratchet and I'll tighten these up. Now I'm going to use a 18-millimeter socket and a torque wrench. I'm going to torque these bolts to 170 ft-lbs. We'll take a little bit of brake grease, put it on the ends of the pads. Take a pad, slide it into the caliper bracket. Do the same on the inside.
Now the inside pad, the bottom of the pad is flat on this one. The outside of the pad has a curve to it. Then I'll take this caliper hanger off, flip the caliper over. Now I'm going to take this break caliper compressor that we sell at 1Aauto.com, slide it in there and it ratchets. I'm just going to go slow, compress the pistons. When that's compressing the pistons, the fluid is going through the caliper, through the hoses, through the lines, back to the master cylinder into the reservoir. It's a good idea to check the reservoir after you're done the job just to make sure the fluid is not too full or not full enough.
Alright, so that's compressed, both of those pistons. Take the caliper, make sure the hose is not twisted, push the pins in a little bit. That lines up. Take the bolt, caliper bolts. Then I'll take a 19-millimeter socket and a ratchet, just snug these up, and then we're going to torque them. Use a 19-millimeter socket and a torque wrench and torque these to 74 ft-lbs.
Take your tire, reinstall the tire. Take the lug nuts, get those started. Before you lower the vehicle all the way down, just let it down enough so the tire is touching. Then I'm going to torque the lug nuts with a 22-millimeter socket and torque wrench, and I'm torquing them to 140 ft-lbs, and I'm going to torque them in a star pattern or a cross pattern so that the wheel gets tightened down evenly. I'll just go around again. We're good to go.
Afterwards, we want to make sure we pump the brake pedal. There's going to be an air gap between the caliper piston and the brake pads. We want to eliminate that air gap by pushing down on the brake pedal. After that, we want to check the fluid level in the reservoir for the master cylinder. Make sure the fluid level is at the proper location and adjust accordingly, and then you'll be good to go.
Thanks for watching. Visit 1Aauto.com for quality auto parts shipped to your door, the place for DIY auto repair. And if you enjoyed this video, please click the subscribe button.
Shop Products


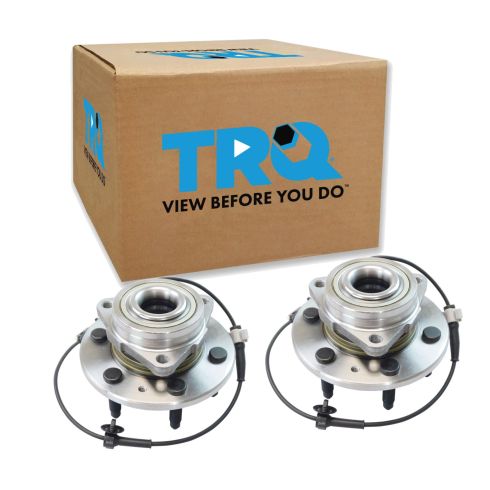
Chevrolet GMC Cadillac Front Driver & Passenger Side 2 Piece Wheel Bearing & Hub Assembly Set TRQ BHA53838
Part Details:
- 2 Piece
- Taper
- (1) Front Driver Side Wheel Bearing & Hub Assembly
- (1) Front Passenger Side Wheel Bearing & Hub Assembly
How to Replace Wheel Bearing Hub Assembly 2005-11 Toyota Camry
Check out this video to learn how to replace the wheel hub on your 05-11 Toyota Camry. You can do it yourself, and 1A Auto shows you how!
