How to Replace Front Hub Assembly 2010-17 GMC Terrain
Created on: 2017-07-19
New Wheel Bearing & Hub Assembly from 1AAuto.com How to repair, install, fix, change or replace a worn out or screeching front hub actuator on 14 GMC Terrain
-
step 1 :Removing the Wheel
- Pry out the center cap with a pick
- Loosen the 35mm hub nut with a breaker bar
- Loosen the 22mm lug nuts with the vehicle on the ground
- Raise the vehicle with a floor jack
- Secure the vehicle on jack stands
- Remove the lug nuts
- Pull off the wheel
-
step 2 :Removing the Hub Nut
- Spray rust penetrant in the hub nut
- Loosen the 35mm nut
- Thread the nut on a few threads
- Tap the nut with a mallet to loosen the axle
-
step 3 :Removing the Brakes
- Loosen the 14mm caliper bolts
- Secure the caliper with a bungee cord
- Remove the 18mm caliper bracket bolts
- Remove the caliper bracket and the pads
- Remove the T30 Torx bolt from the rotor
- Remove the rotor
-
step 4 :Removing the ABS Sensor
- Remove the 10mm bolt from the ABS sensor
- Remove the ABS sensor
-
step 5 :Removing the Hub
- Remove the three 13mm bolts from the hub
- Tap the hub out from the knuckle
- Remove the hub from the axle
-
step 6 :Installing the New Hub
- Clean any corrosion from the axle splines with brake cleaner and a wire brush
- Apply anti-seize grease around the knuckle cavity
- Slide the hub over the axle
- Tighten the three 13mm bolts to the hub
- Torque the bolts to 74 foot-pounds
-
step 7 :Reinstalling the ABS Sensor
- Insert the ABS sensor into place
- Tighten the 10mm bolt to the ABS sensor
-
step 8 :Reinstalling the Axle Nut
- Thread the axle nut on by hand
- Tighten the 35mm axle nut
-
step 9 :Installing the Caliper Bracket and Rotor
- Insert the rotor to the hub
- Tighten the T30 Torx bolt to the rotor
- Put the caliper bracket back into place
- Start the 18mm bolts by hand
- Tighten the bolts to 140 foot-pounds of torque
-
step 10 :Installing the Brake Caliper
- Press the metal clip to the brake pad
- Put an old pad in the caliper
- Apply grease to the brake pad tabs
- Use a large C-clamp and the old pad to push the pistons back if needed
- Install the new brake pads into the bracket
- Put the caliper on
- Thread bolts by hand
- Tighten the 14mm bolts to 20 foot-pounds
- Clean the rotor with brake parts cleaner or mineral spirits
-
step 11 :Reattaching the Wheel
- Slide the wheel into place
- Start the lug nuts by hand
- Tighten the lug nuts preliminarily
- Lower the vehicle to the ground
- Tighten the lug nuts to 125 foot-pounds in a crossing or star pattern
- Torque the hub nut to 151 foot-pounds
- Reattach the center cap
Tools needed
-
35mm Socket
Large C-Clamp
Socket Extensions
Torque Wrench
14mm Socket
Rust Penetrant
Jack Stands
18mm Socket
Brake Parts Cleaner
Rubber Mallet
Flat Blade Screwdriver
T30 Driver
Paper Towels
Bungee Cord
Anti-Seize Grease
10mm Socket
Ratchet
Wire Brush
Floor Jack
Swivel
1/2 Inch Breaker Bar
Hi, I'm Mike from 1A Auto. We've been selling auto parts for over 30 years. We're dedicated to delivering quality auto parts, expert customer service, fast and free shipping, all backed by our 100% satisfaction guarantee. Visit us at 1AAuto.com, your trusted source for quality auto parts.
Before you jack up the vehicle, you want to crack all of these lug nuts loose, because that way the wheel won't spin when you're trying to turn the lug nuts. You can use a 22 millimeter socket to do this, or if you want to use the lug nut wrench that comes with the car in the spare tire kit, you can use that as well.
The first step to do the hub on this is to remove the center cap of the wheel, as strange as it sounds, I'll show you why in just a moment. Once you have the center cap out, you'll notice that there's a very large nut in here, it's a 35 millimeter nut, and we're going to loosen that nut. With the wheel on the ground, it'll make it a little bit easier to loosen the nut on the center of the hub. We'll put our 35 millimeter socket on there and we'll use a nice long breaker bar, and hopefully we can crack it loose, just like that.
You can use a jack and jack stands to lift the vehicle in a driveway situation or a garage, but we have a lift to make the video shooting a little bit easier, so we're going to go ahead and raise it up on the lift. Now we can pull the wheel off of the vehicle. Now we're going to finish taking off the 35 millimeter nut. You can spray a little rust penetrant on here to make the nut come off a little easier, and if you live in a climate where there's no rust, it probably won't be an issue. But now we can just spin this nut off with the socket.
So, normally you can just push these axles right out, in our case it's a little bit stuck just because it's a little rusty, so what I'm going to do is I'm going to put the nut back on just a little bit, just so it's flush with the end of the axle, and then I'm going to take a mallet that has rubber on the end, that way I won't damage any of the end of the axle or the nut, and we're going to tap it. There we go, now the axle's loose and we can slip the nut right back off.
We're going to take off the 14 millimeter caliper bracket bolts, right here, with a 14 millimeter wrench. There's the top one, there's the bottom one, you can pull them out by hand after you crack them loose. If the caliper is stuck on there, if you can kind of hang on it like this a little bit and compress the piston, then it'll come right off just like that. Then what you want to do is you want to hang the caliper with some mechanics wire or a bungee cord, that way you won't damage the brake hose right here, 'cause if you just hang it from the brake hose, it will undoubtedly damage it.
Now we're going to take out the two caliper bracket bolts, these are 18 millimeters, so I'll use an 18 millimeter wrench, or you can use an 18 millimeter socket. You can get them loosened up and taking them out. Once you crack them loose, hopefully you can spin them right out. Now you can pull the caliper bracket off with the pads.
Right here we have a T30 Torx bolt holding the rotor to the hub, and we're going to remove that. This has brand new brakes on it, so I know that this bolt is going to come right out, but a lot of the time it'll be rusted in place, and when you try and turn it, the whole thing will spin like this. If that's the case, you can put a wrench on it just like that, and then hold it with one hand and turn it with the other. That will allow you to pull the bolts out, put a little more force on it and get it out in one piece, hopefully. Now we'll pull the brake rotor off, just like that.
Right on the back side of the knuckle is the ABS sensor, so we’re going to put a 10 millimeter socket on it and crack that loose. Then you can pull the bolt right out, just like that. Then with the bolt out, you should be able to just pull the sensor right out of the knuckle, just like that. Now we're going to pull the three bolts out of the hub that go through the knuckle into the hub. We'll start with this easy one on the bottom, it's a 13 millimeter and I'm using an extension and a swivel to try and get in there a little bit easier, on a ratchet.
Up at the top is another 13 millimeter which will also use the short socket, the swivel and the extension to remove. Now we'll do the rearmost bolt, and it looks like the extension's probably not the right tool for this, so we're just going to skip the extension and use the swivel and the 13 millimeter. There's the third one. The hub should be able to be removed from the knuckle now, so we are going to actually hit the back side of it with a hammer to try and release it from its grip. It is coming loose, so I'll tap it from the other side. Try and wiggle it out. There we go. There we are.
Here we have the old hub and the new hub. You can see they're essentially identical; they have the same holes in the same spots. It has the bolt for the rotor, same splines on the inside, the bolts on the backside are also the same, so it's going to mount up and fit properly. It's basically exactly the same in every way and it is going to look and fit and function just like the original one.
Right here you'll see some corrosion, and before we put the new hub in place, we want to get rid of this corrosion that's in here. So, what we're going to do is spray it down with some brake clean, like so, and then we're going to scrub it with our wire brush. Try and get all the corrosion out of there.
Now that we've cleaned the corrosion, I'm going to put a little grease around here, just because I'm going to try and prevent the corrosion in the future and make sure that the bearing goes in nice and smoothly. It's also not a bad idea to put some grease on these splines, that way the splines will go in easily as well.
Now we can put this in place and slide the hub over the axle. Get it lined up as best we can. Then you can take one bolt and slide it into the hole to try and get everything to sit in place. Now we'll slide the upper bolt in and put it in by hand. Then we'll do this front-lower bolt, and we'll put that in by hand as well. Now we can use our 13 millimeter short socket, swivel and extension, to start tightening the bolts up. We'll start with the top one. You want to make sure that you go around and tighten them evenly so that the hub goes in the knuckle straight.
Now we're going to tighten up the three hub bolts to 74 foot-pounds with the torque wrench. Fitting the ABS sensor is very similar, you can come over here and slide the ABS sensor into the hole in the knuckle. On the ABS sensor itself, there is a 10 millimeter screw that needs to be put back in, so we'll put it in by hand first, that way we don't cross-thread anything. Then you can use your quarter drive ratchet and your 10 millimeter to tighten it down. There we are.We can now take the axle nut and thread it on by hand.
Using a 35 millimeter socket and a half inch drive ratchet, we'll tighten it up as much as we can with it off the ground. Now it's tight and we'll be sure to torque it once we get it back on the ground.
Now we're going to reinstall the rotor, being sure to line up this bolt hole with this hole in the rotor. Now we can put this Torx bolt, this is the T30 Torx, we'll thread it in by hand first, then we'll go back and we'll tighten it down with a ratchet and a T30 Torx bit.
Now we can put the caliper bracket on with the brake pads, and we'll take the two bolts, and slide them right through the knuckle and start threading them in by hand. Alright, these two 18 millimeters need to be torqued to 140 foot-pounds, which is quite a lot, so we're going to tighten them up evenly and then torque them.
Now we're going to remove the caliper and the bungee cord. If the caliper piston needs to be compressed, you can compress that with a C-clamp, most likely it's not going to need to be, because when you pulled it off, it should have been fine. So we'll slide it right over and then we'll reinstall the two 14 millimeter bolts that hold the caliper on. Once they're tightened by hand, you can come in here with a torque wrench and torque them to 20 foot-pounds.
We'll slide the wheel over the lugs and then we can come in here and we'll tighten up the lug nuts by hand. Now we'll put the 22 millimeter socket on here with a half inch drive ratchet, and we'll tighten them up as best we can with the vehicle in the air, and then once we get it on the ground, we will tighten it up and torque it properly.
Now we're going to lower the vehicle right back down to the ground. Now we're going to torque the wheel in a cross pattern to 125 foot-pounds.
We're now going to torque the axle nut to 151 foot-pounds, and it's really important to torque this properly and not just use an air gun or something like that, because this actually does put pressure on the bearing, and if you torque it to the wrong spec, it may damage the bearing prematurely. So we're going to go ahead and torque to 151 foot-
pounds. With that torqued, we can now put the GMC center cap right back in wheel.
Thanks for watching. Visit us at 1AAuto.com for quality auto parts, fast and free shipping, and the best customer service in the industry.
Shop Products


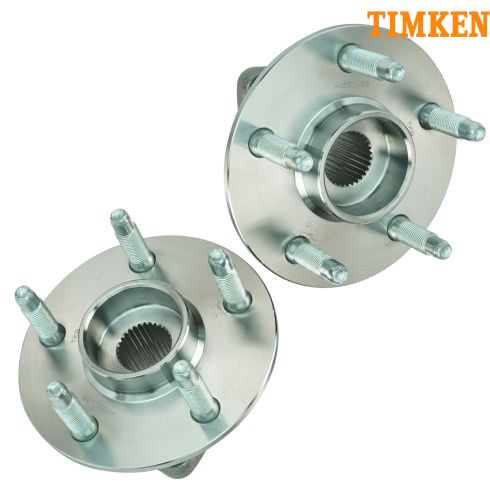
Chevrolet GMC Buick Cadillac Saab 2 Piece Wheel Bearing & Hub Assembly Set Timken TKSHS00526
Part Details:
- 2 Piece
- (2) Wheel Bearing & Hub Assemblies
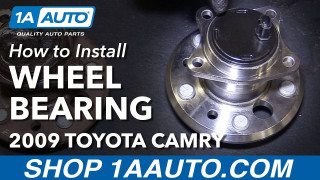
How to Replace Wheel Bearing Hub Assembly 2005-11 Toyota Camry
Check out this video to learn how to replace the wheel hub on your 05-11 Toyota Camry. You can do it yourself, and 1A Auto shows you how!
