How to Replace Front Exterior Door Handle 1994-99 Cadillac Deville
Created on: 2011-08-02
How to repair, install, fix, change or replace a broken or snapped off exterior door handle on Cadillac DeVille, years 94, 95, 96, 97, 98, and 99.
-
step 1 :Removing the Door Panel
- Disconnect the negative battery cable with an 8mm wrench
- Pry up the window switch panel with a flat blade screwdriver
- Disconnect the door lock wiring harness
- Disconnect the window switch wiring harnesses
- Disconnect the mirror switch wiring harness
- Pry out the courtesy light
- Disconnect the courtesy light wiring harness
- Pry off the trim piece around the door handle with a flat blade screwdriver
- Disconnect the wiring harnesses
- Remove the Phillips head screw inside the courtesy light
- Remove the Phillips head screw inside the door pull
- Lift the door panel up and off
- Disconnect the speaker wiring lead
- Remove the orange safety clip from the air bag wiring harness
- Disconnect the air bag wiring harness
- Remove the four 10mm bolts from the side airbag
- Disconnect the air bag sensor wiring harness
- Remove the two 10mm nuts from the sensor
- Carefully peel off the water shield
-
step 2 :Removing the Outside Door Handle
- Remove the two clips from the door lock rods
- Remove the lock rods from the door handle
- Remove the two 10mm bolts from the outside door handle
- Pull the handle down and out
- Remove the 10mm nut from the lock cylinder
- Remove the lock cylinder
-
step 3 :Installing the Outside Door Handle
- Insert the lock cylinder into the new door handle
- Tighten the 10mm nut to the lock cylinder
- Insert the lock first and push the door handle into the door
- Insert the two 10mm bolts to the door handle
- Connect the door latch rod to the outside door handle
-
step 4 :Reinstalling the Door Panel
- Put the water shield into place
- Connect the air bag module
- Insert the 10mm bolts to the air bag
- Insert the two 10mm bolt to the sensor
- Connect the air bag sensor wiring harness
- Connect the air bag wiring harness
- Connect the orange safety pin to the wiring harness
- Connect the speaker wiring lead
- Lift the door panel into place
- Push in the door panel clips
- Insert the Phillips head screw into the door pull
- Insert the Phillips head screw into the courtesy light
- Connect the courtesy light wiring harness
- Push in the courtesy light
- Connect the wiring harnesses to the door handle trim piece
- Push on the door handle trim piece
- Connect the door lock wiring harness
- Connect the window switch wiring harnesses
- Connect the mirror switch wiring harness
- Push in the window switch panel
- Connect the negative battery cable with an 8mm wrench
Tools needed
-
Flat Blade Screwdriver
Phillips Head Screwdriver
8mm Wrench
8mm Socket
10mm Wrench
10mm Socket
Brought to you by 1AAuto.com, your source for quality replacement parts and the best service on the Internet.
Hi, I'm Mike Green. I'm one of the owners of 1A Auto. I want to help you save time and money repairing or maintaining your vehicle. I'm going to use my 20-plus years experience restoring and repairing cars and trucks like this to show you the correct way to install parts from 1AAuto.com. The right parts installed correctly: that's going to save you time and money. Thank you and enjoy the video.
In this video, I'm going to show you how to replace the front door handle on this '97 Cadillac deVille, the same as any '94 - '99. The tools you'll need is a Phillips screwdriver, flat blade screwdriver, and an 8mm and 10mm either wrenches or socket with ratchet will do.
Start by carefully disconnecting the negative battery cable. This should, on most vehicles, will be an 8mm wrench. First take a flat blade screwdriver. Insert in the middle. There is a little tab, you'll push on it. This comes up. Pull forward and out. Then, this back one, there's a little tab here. Just work your screwdriver in there lightly. Pull that out. This one here, push on the tab and pry up and off. Same thing here: push on that tab, pry up, and out. Let's see what's in here: little tab, pry it out and pull the connector out.
Now, here on this courtesy light, carefully pry the front of it out. It comes out, there's a little tab right here. Pull up on it like that. Now you want to remove this panel here, and basically want to go in and find if you can pull it easy. Just make sure that the metal tabs don't get caught in your door panel in the leather and rip the leather. You can see here, this one's caught. Use the screwdriver to pry the leather right up over and out. There's two connectors, push a little tab, disconnect that, and on this the tab and underneath here, push it down and disconnect that.
There are two Phillips screws: one right there and one right in here. When you go for this one, you want to have your screwdriver slightly angled. It's not straight in. It is at some of an angle. I'm just going to fast-forward as I'm just removing those two Phillips screws. Once you remove those screws, lift your panel up and off, and reach in behind and disconnect the speaker. Here's your side impact airbag. Here's your connector right down here. It's got a little orange safety. Pull that out and press on that tab and pull it apart.
I think there's supposed to be four 10mm bolts. It looks like we're missing one down here. I'll speed it up here for moment as we remove those bolts, those nuts that hold the side airbag on. Take that off, and right down here is your bag sensor. There's a little tab. Pull it back. There's also a couple gears that help to lock it. Again, we'll fast-forward as we remove those 10mm nuts. Now, slowly pull your water shield back.
Next, you'll need to remove two clips. One right here, just use your finger to pull it back. Then one up here. Now, these rods come out. You want to remove these two 10mm bolts here. Now, remove the handle by pulling out, down, like that, and have the handle like this. You're going to want to transfer your lock cylinder to your new handle. So this bolt or nut and your lock cylinder comes out. My handle's in fine shape, so I'm just going to put it back together.
To put the handle back in, make sure your rods are out of the way. Put the lock in first, then twist it up. Push it up vertically into your door. It takes a second just to get the right position and it goes right in. I'm going to speed it up here as I just put those two bolts that hold it in and tighten them up. You want to tighten them up nice and firm. Don't over-tighten, though. Reconnect your door latch rod. Just clip it into the green clip or insert it in there. Push it in and then push the clip down onto it. Then the same thing for the lock rod. Push it in and set the clip. We're just going to fast-forward.
Put your water shield back up into place, and then put your airbag module into place. Start the 10mm nuts that hold it. Then, put the airbag sensor back in place. Start the 10mm nuts. Tighten them up nice and firm. Don't over-tighten them. Then, reconnect the air bag and the sensor, and make sure you put the safety clips back on. To reinstall the panel, what you want to do is get your bottom three hooks in first. Just kind of place them close to where they go. Reconnect our tweeter and make sure all our harnesses are coming through here.
Okay, our courtesy light back here. Then, as we rotate it up, these two harnesses. Lift up on the panel and push it in. Make sure it goes in in the front and rear and push down. Make sure all the harnesses are out. I'm going to fast-forward here again as we install those screws. Plug in our courtesy light. Back in place first. Put these connectors in. Then just then hook the bottom in first. Just remember to reconnect your battery and you're all set.
We hope this video helps you out. Brought to you by www.1AAuto.com, your source for quality replacement parts and the best service on the Internet. Please feel free to call us toll-free, 888-844-3393. We're the company that's here for you on the Internet and in person.
Shop Products
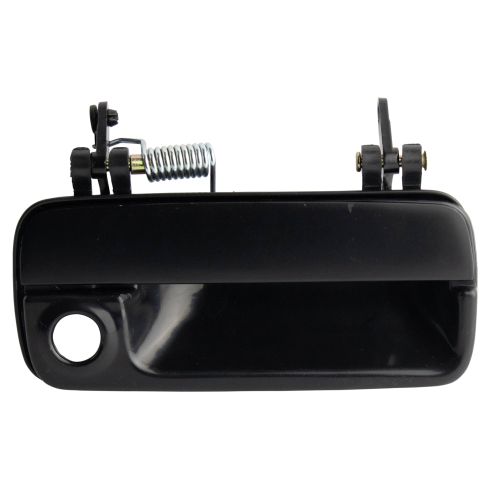
Buick Cadillac Pontiac Olds Front Passenger Side Exterior Door Handle DIY Solutions BHS00590
Part Details:
- Plastic
How To Replace Front Door Handle 2002-07 Jeep Liberty
How to repair, install, fix, change or replace a broken or snapped off interior door handle on Jeep Liberty, years 02, 03, 04, 05, 06, and 07.
