How to Replace Front Door Window Regulator 1997-2000 Ford F-150
Created on: 2017-05-19
How to repair, install, fix, change or replace a slow, stuck, cracked or damaged window regulator on 97, 98, 99, 00 Ford F150
-
step 1 :Removing the Door Panel
- Pry off the sail panel
- Pry off the door pull trim
- Pry off the trim underneath the door pull
- Remove the 7mm screw from the top right
- Remove the two 7mm screws on the bottom of the panel
- Remove the four 7mm screws in the center of the panel
- Pry out the door panel with a door panel clip tool or putty knife
- Lift the door panel up and off
- Disconnect the wiring harnesses
-
step 2 :Removing the Window Regulator
- Disconnect the latch rod
- Run the window halfway up
- Keep a hand on the window
- Remove the 11mm bolts from the window regulator
- Pull the regulator forward
- Move the window up
- Hold the window in place with painter's tape
- Remove the two 11mm nuts on the window regulator track
- Drill out the six rivets securing the window regulator
- Disconnect the window motor connector
- Pop out the window track and motor
- Remove the window regulator
-
step 3 :Installing the Window Regulator
- Insert the window motor into the door
- Clasp in six rivets with a rivet tool
- Connect the window motor
- Tighten the two 11mm nuts to the window regulator track
- Reconnect the latch rod
- Test the regulator and run it up to the right height
- Carefully lower the window down to the regulator
- Tighten the two 11mm bolts to the window and regulator
- If you have an auto feature
- Bring the window up all the way
- Hold the button for three seconds
- Bring the window down all the way
- Hold the button for three seconds
- Test the auto feature
-
step 4 :Installing the Door Panel
- Connect the wiring harnesses to the door panel
- Lift the door panel into place
- Push in the door panel clips
- Tighten the four 7mm screws to the center of the panel
- Tighten the two 7mm screws to the bottom of the panel
- Tighten the 7mm screw to the top right
- Press on the trim underneath the door pull
- Press on the door pull trim
- Press on the sail panel
Tools needed
-
Socket Extensions
Flat Blade Screwdriver
Drill Bit Set
7mm Socket
Drill
Painter's Tape
Ratchet
11mm Socket
Pick
Hi, I'm Mike from 1AAuto. We've been selling auto parts for over 30 years! We're dedicated to delivering quality auto parts, expert customer service, and fast and free shipping, all backed by our 100% satisfaction guarantee. We've created thousands of videos to help you install our parts with confidence. That saves you time and money, so visit us at 1AAuto.com, your trusted source for quality auto parts.
In this video, we're going to be working with our 1998 Ford F-150. We're going to show you how to remove and replace your power window regulator and motor assembly.
If you like this video, please click Subscribe. We have a ton more information on this and many other vehicles. And if you need these parts or the tools that we used for your vehicle, you can follow the link down in the description over to 1aauto.com.
Here are the items you'll need for this repair: 7 to 11mm socket, ratchet, socket extension, drill, drill bits, painter’s tape, flat head screwdriver, pick tool
Pop the cover tab off behind the door handle. You should be able to do this with your fingers. Then inside there is an eight millimeter screw securing the door handle to the latch. We'll get that with an eight millimeter socket, ratchet and extension. The trick here is do not remove this bolt all the way. Get it about halfway out until the handle's free and leave it. It'll stay in there. You don't have to worry about losing the bolt. Grab the sail panel and pop that off with your hand, and the upper trim at the rear as well just pops off by hand. Now, normally there is a seven or eight millimeter screw in both of these locations under those panels. Ours are obviously missing. Lift up and remove the window switch, and unplug all four electrical connectors. Remove the panel from the truck. You can then lift up, lay your door panel back, unplug the marker light, and remove the panel from your truck
Run your window about halfway up, because you'll be able to access the 11 millimeter nut through this opening next to the speaker, behind the door handle. The other one will be in this opening here. We'll remove those with an 11 millimeter socket and ratchet. You shouldn't need to remove them fully. You should just be able to loosen them. No, no, you don't need to. Once you've got those out, you can pull the window regulator forward. Make sure you keep a hand on the window. Lift the window to the full up position and, using painter's tape, tape the window up and out of your way.
This bar here is part of the window regulator track, so you'll need to remove the 11 millimeter nuts on either side. Drill out the six rivets securing the window regulator. Disconnect the window motor connector. You should now be able to pop out the window track and the motor. It may be helpful to pop off the latch and latch rod for the door handle. Pull everything through.
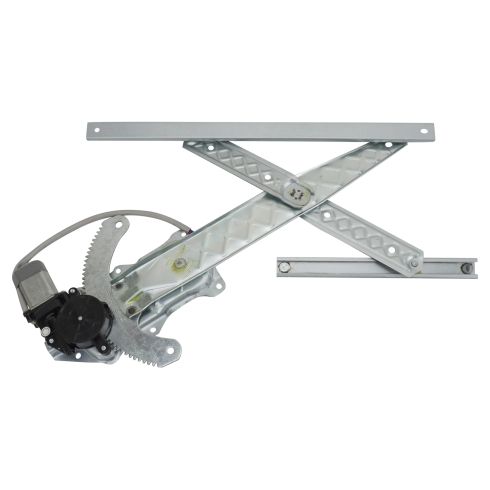
Here we have our old window motor that we removed from our vehicle and our new part from 1AAuto.com. As you can see, these parts are exactly the same with the same window guide, same regulator, two bolt track here, the same motor, and the same geared toothed assembly, as well as the same two pin electrical connector. Now you can replace the regulators and motors individually. However, replacing the entire assembly is much quicker and easier, because there's a little spring inside of here that can be pretty difficult to replace after you've taken everything all apart, so it's actually a lot easier and a lot safer to replace it as one assembly. So if your window regulator or motor has gone bad and you can't get your window up and down or it doesn't track straight, this new part from 1A Auto is going to go in direct fit, just like our original equipment, and fix you up right.
Install your new window motor and regulator. There's actually a little alignment tab on there that you can set through the slot and the door so you know everything is in place, even though you can't really see it that well. You'll need a heavy-duty rivet tool. These are available from 1A Auto, along with the new window regulator rivets. Reconnect the connector for the window motor. Set up the regulator track and reinstall the two 11 millimeter nuts. Reconnect your latch rod. To do this, you'll want to pull all the slack out, but don't actually pull the latch, set it in, click the safety back on. That all works nicely. We'll turn our key on and run our regulator up to the right height. Untape your window. Again, be sure to keep a hand on this. Set the studs at the bottom of the window, back into the track. Reinstall those two 11 millimeter nuts as well. Ensure that your window operates correctly. If you have an auto feature, bring it up all the way, hold the button for three seconds, bring it down all the way, and hold the button for three seconds, and then up. Ours only has automatic down. Now it operates properly.
Normally there's a series of clips that will retain your harness against the door. Ours have been broken or missing so we'll just feed the wiring for the switch up through the panel and reconnect our courtesy light into its socket. Line up the door lock and all the pins in the door, and slide it back into place. There are also your two screws or pins in the corner here that you'll need to reinstall. Ours are missing. Reinstall the top panels by lining them up and snapping them into place. Reconnect all the switches in your panel. Line up the tabs and snap it back into place. Reinstall your door handle and line up the bolt with the hole. Reinstall it with your eight millimeter socket and ratchet. Reinstall the little plastic cover and you're good to go.
Thanks for watching. Visit us at 1AAuto.com for quality auto parts, fast and free shipping, and the best customer service in the industry.
Shop Products


Ford F150 F150 Heritage F250 Front Passenger Side Power Power Window Motor & Regulator Assembly TRQ WRA52167
Part Details:
- Power
- No
- 8
- 2
- No
- No
- 15.75 in
- Galvanized Steel
- Yes
How To Replace Power Window Regulator 2005-09 Chevy Equinox
Learn how to remove the door panel and replace a damaged or bad window regulator motor with the help of the 1A mechanics in this video.
