How To Replace Front CV Axle 1997-2002 Ford Expedition
Created on: 2011-12-16
Check out this video to learn how to replace broken, worn or vibrating front CV axles in a 97-02 Ford Expedition.
-
step 1 :Remove the wheel
- Remove the lug cap
- Loosen the lug nuts.
- Remove the cover and cotter pin from the hub nut and loosen the hub nut.
- Loosen the seven 13 mm 12 point bolts securing the axle to the front drive.
-
step 2 :Disconnect the stabilizer link
- Hit them with penetrating oil
- Use a 14 mm socket and 9/16 socket on the bottom to remove the stabilizer link.
- This might take a bit of elbow grease with hand tools, but it will come loose.
- Use a hammer to drive out the stabilizer link.
-
step 3 :Remove the half shaft of the CV axle.
- Use a large crow bar between the lug bolts to secure the axle while you remove the 13 mm 12 point bolts if you didn't loosen them earlier.
- Remove the hub nut.
- Give the axle a good tap with the hammer to break it loose from the steering knuckle.
- Pull the axle out.
-
step 4 :Install the new half shaft of the CV axle
- Install the grease fitting on the ball joint and fill with grease.
- Put the new axle in and bolt in.
- In a star pattern, torque the 13 mm 12 point bolts to 60 ft lbs.
-
step 5 :Install the new stabilizer link.
- Thread the bushings and washers on the stabilizer bar and tighten the lock nuts down.
- Jack up the suspension a bit and tighten the stabilizer link up to 15-17 ft lbs.
-
step 6 :Put your hub and lug nuts and wheel back on.
- Put the hub nut on and pre-tighten but don't torque it.
- Put the wheel and lug nuts back on
- Lower the vehicle and torque the lug nuts in a star pattern to 100 ft lbs.
- Torque the hub nut to 220 ft lbs.
- Replace the cotter pin and cover on the hub nut.
- Put the lug cover back on.
Tools needed
-
35mm Socket
13mm Socket
Socket Extensions
Torque Wrench
14mm Socket
Hammer
Rust Penetrant
Jack Stands
19mm Socket
Flat Blade Screwdriver
Center Punch
Ratchet
Floor Jack
9/16 Inch Socket
1/2 Inch Breaker Bar
Brought to you by 1A Auto.com, your source for quality replacement parts and the best service on the internet. In this video, we're going to show you how to remove and reinstall the front drive axle, or one side of the front drive axle. Obviously the driver's side is the same. We're doing this on this 97 Expedition. This is the same process for a whole bunch of different Ford and Lincoln trucks and SUVs. Tools we used on this expedition, if you're doing it on a different vehicle some of the sizes may differ a little bit, but Jack and Jack Stands, a large flat blade screw driver, a 13 millimeter 12 point socket, 9/16, 14 millimeter, 19 millimeter, and a 35 millimeter socket, ratchets and extensions. You'll need a breaker bar or a pipe for some extra leverage for some of those bolts, a hammer, punch, torque wrench, and possibly replacement stabilizer links as those often break when you take them apart.
OK, so obviously you are going to start by removing your cap. Now, if you don't have the benefit of air tools, what you'll want to do is start with your wheel on the ground and with your wheel on the ground there's probably three things you're going to want to do: loosen your lug nuts, then there's a thirty five millimeter bolt in the center that holds the axle into the hub, you're going to want to take the cotter pin and the cover off of that and loosen that 35 millimeter bolt and also go underneath and there are seven 13 millimeter 12 point bolts that hold your axle to your front drive, and you'll want to just loosen those seven bolts. Much easier to loosen all these bolts with your tire on the ground held in place if you don't have all the tools that I have access to. Next I'm going to remove the stabilizer link, so I'm going to spray the top of it with some penetrating oil and let it sit for a while. OK, these stabilizer links are sometimes difficult to get apart. You can use hand tools. They will come apart. I just chose to use an impact wrench just to make it easier. I have a 9/16 socket on the bottom and a 14 millimeter socket on the top. OK, use a hammer and pound down on that bolt. Then use a punch, see if you can get it go down through the sleeve.
I end up actually having to use vice grips and a wrench and obviously you also want to remove the other side so you can move your stabilizer bar around easily. OK, what I'm going to do here is put a vice grip onto this shaft. It's a little tighter here. OK, now we're going to remove the half shaft to the CV axle and as I said at the beginning of the video these are the bolts that if you don't have all the tools that I have it might be easier to just loosen them while the vehicle is on the ground. You can see I use a big large crow bar to hold the hub in place while I'm loosening those bolts, and you can see I spin it, loosen one of the bolts, spin it some more, loosen another bolt. So if you were actually doing this with your vehicle on the ground you'd have to probably loosen one or two of the bolts, then roll your car a little bit, put it in park, put the emergency brake on, loosen a couple more, and keep repeating that process. Once it's unbolted, I pull it down and off. I use a pair of pliers and either break off the ends, or just straighten out the cotter pin and pull it out. OK, 35 millimeter. As I said in the beginning if you don't have impact tools this is easier with the tire on and on the ground. Your other option would be to have a helper hold the brakes while you remove it. What I like to do is give it one tap and just watch it, see if it moves, and actually it went pretty freely. If you can pull your stabilizer bar up and out of the way, pull your axle down towards the front, then push it, lift it up, push it out. OK, I'm going to speed through putting the half shaft back in.
One thing I did forget to do, I do a little bit later, is now is the best time to put the grease fitting on top of the ball joint before you put that axle in there. But put the axle in place, get it into the hub and then get it lined up on the axle and start a couple of those 13 millimeter bolts. Then once you get all the bolts in you want to torque them to 60 foot pounds and what I do is I use a black marker. I mark the head of them after I torque them. Then you kind of want to go to the opposite side, torque the next bolt, mark it, and just keep going until they're all torqued. OK, here I'm going to install the sway bar link. I've already put a new link on the other side and just started the nut on it. Bushing, the bushings always go toward the metal. OK, so I've got a bushing on the bottom, going up to the metal control arm and a bushing above that. OK, then my shaft goes on there, and then the washer, then the bushing.
OK, pushing down and in. Make sure that the bushing is kind of centered in the stabilizer bar here. Now bushing, then washer, and then my bolt or nut. OK, now you'll want to use your jack to put some pressure on the suspension and then tighten up the stabilizer to 15 to 17 foot pounds. OK, we'll put on our center nut. Then we're just going to tighten up preliminarily. We're not going to torque it until the wheel's back on. You can put your tire back on and start each lug nut one by one make sure you don't cross thread them. Tighten them down preliminarily. Torque the lug nuts to 100 foot pounds using the star pattern. OK, now using your 35 millimeter socket, torque your hub nut to 220 foot pounds. Put the retainer back on and then the cotter pin and then your wheel cap.
We hope this helps you out. Brought to you by www.1AAuto.com, your source for quality replacement parts and the best service on the internet. Please feel free to call us toll free 888-844-3393. We're the company that's here for you on the internet and in person.
Shop Products


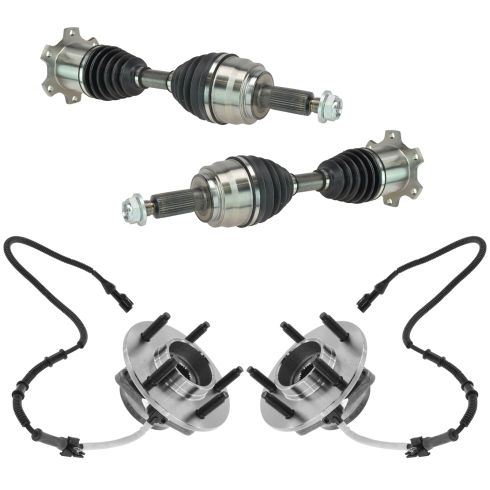
Ford F150 F150 Heritage 4 Piece Drivetrain Kit TRQ BHA52924
Part Details:
- Tapered Roller Bearing
- 4 Piece
- (2) Front CV Axle Assemblies
- (2) Front Wheel Bearing & Hub Assemblies
How to Replace CV Axle Shaft 1995-2005 Chevy Cavalier
Check out this video to learn how to replace the CV axles on your 95-05 Chevy Cavalier.
