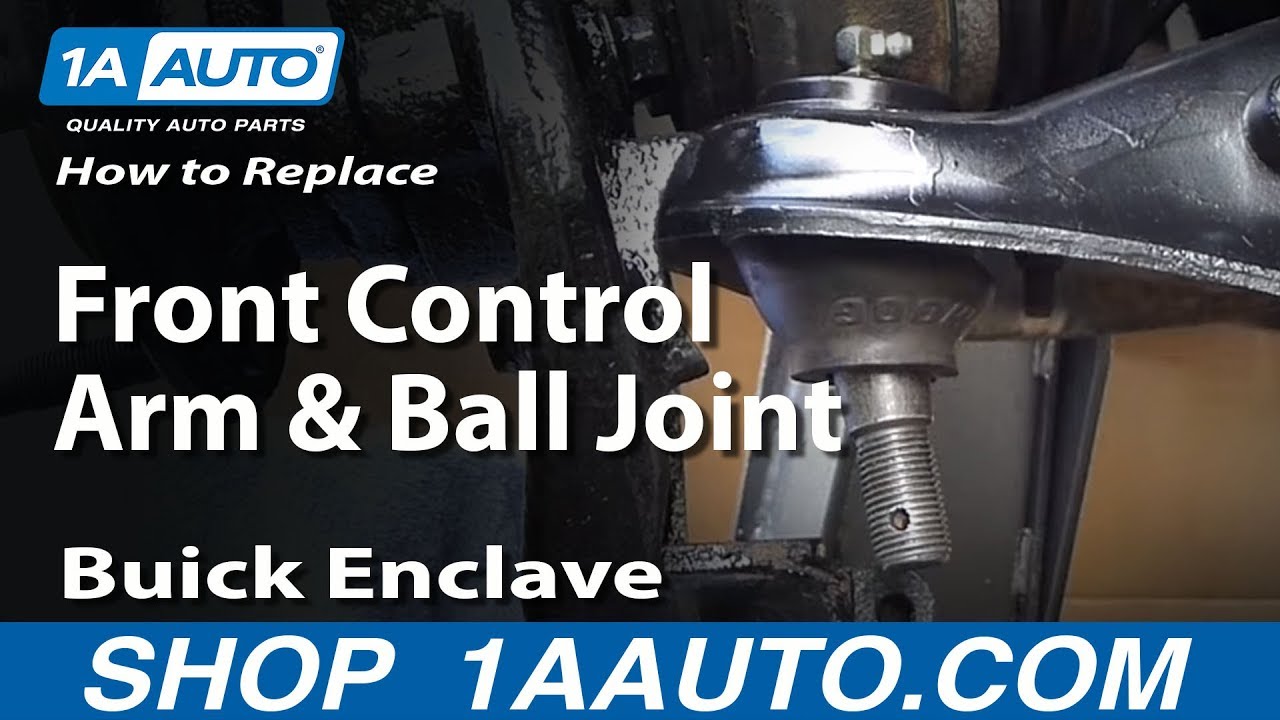
How To Replace Front Control Arm and Ball Joint 2007-16 Buick Enclave
Created on: 2015-10-26
Find out what steps are needed to replace the control arm and ball joint if it's rusted, broken, or damaged
-
We recommend that you replace these in pairs
step 1 :Removing the Wheel
- Remove the hub cap
- Loosen the lug nuts with a 22mm socket
- Pry off the center cap with a flat blade screwdriver
- Loosen the lug nuts with the vehicle on the ground
- Raise the vehicle with a floor jack
- Secure the vehicle on jack stands
- Remove the lug nuts
- Pull off the wheel
-
step 2 :Loosening the Stabilizer Link
- Use rust penetrant where the stabilizer link links to the strut
- Loosen the 18mm nut with an 18mm wrench and turn an 8mm socket and ratchet clockwise OR
- Hook a set of locking pliers on the back side of link and remove the 18mm nut with a wrench
- Move the stabilizer link to the side
-
step 3 :Removing the Control Arm
- Remove the 24mm nut from the control arm with a socket and breaker bar
- Remove the 21mm nut from the other end of the control arm and leave the bolt in place
- Jack up underneath the front of the control arm
- Remove the 21mm nut from the ball joint
- If needed, thread the 21mm ball joint nut on and tap the knuckle with a hammer to loosen the control arm
- Remove one and loosen the second 21mm front mount bolts near the front shaft of the control arm
- Jack up underneath the stabilizer bar
- Tap out the 21mm bolt from the control arm with a pry bar
- Remove the control arm
-
step 4 :Installing the Control Arm
- Remove the shipping protectors from the front shaft and ball joint
- Insert the front shaft of the control arm into place
- Insert the ball joint and rest of control arm into place
- Raise and jack up the stabilizer bar
- Tap the 21mm bolt into the rear of the control arm with a hammer
- Insert the 21mm front mount bolt
- Tighten the front mount bolts to 70 foot-pounds
- Insert the 24mm bolt into the control arm
- Lower the stabilizer bar
- Insert and preliminarily tighten the 21mm nut
- Insert and preliminarily tighten the 24mm nut
- Jack up underneath the front of the control arm
- Tighten the 21mm nut to the ball joint
-
step 5 :Tightening the Stabilizer Link
- Insert the stabilizer link into place
- Insert the 18mm nut until the locking pliers are pinched
- Insert an 18mm wrench onto the nut
- Use an 8mm socket and ratchet to pull the stud through
- Tighten the nut with an 18mm wrench
- Check so that the ABS wire is in place
- Lower the car into a level position with a jack underneath the control arm
- Tighten the 24mm nut to 120-130 foot-pounds
- Tighten the rear 21mm nut to 95-105 foot-pounds
-
We recommend getting an alignment after this repair
step 6 :Reattaching the Wheel
- Slide the wheel into place
- Start the lug nuts by hand
- Tighten the lug nuts preliminarily
- Lower the vehicle to the ground
- Tighten the lug nuts to 110 foot-pounds in a crossing or star pattern
- Reattach the center cap
Tools needed
-
24mm Socket
Socket Extensions
Torque Wrench
Hammer
Rust Penetrant
8mm Wrench
Jack Stands
21mm Socket
21mm wrench
24mm Wrench
8mm Socket
Ratchet
Floor Jack
Brought to you by 1AAuto.com, your source for quality replacement parts and the best service on the Internet.
Hi, I'm Mike from 1A Auto. I hope this how-to video helps you out, and next time you need parts for your vehicle, think of 1AAuto.com. Thanks!
In this video, we're going to show you how to replace the front control arm in this 2010 Buick Enclave, but this is basically the same process for this generation of GM SUVs the Enclave, Acadia, Outlook, and Traverse. We're going to show you on the passenger side, but the driver's side is the same procedure. We do recommend you replace these in pairs, because usually whatever is wrong with one side, whether it's a ball joint or rust, is eventually going to happen to the other side. You're going to need new control arms from 1AAuto.com, jack and jack stands, 8-24 millimeter sockets and/or wrenches, 8 and 21 millimeter wrenches you will need, ratchets and extensions, large hammer, penetrating oil, torque wrench, and after this repair you will need a front end alignment done on your vehicle.
You're going to start by removing the front wheel. You're going to remove the cap if you have one. Then the lug nuts are 22 millimeter. If you don't have the benefit of air tools, loosen up your lug nuts first, then raise and secure the vehicle, and then remove the lug nuts, wheel, and tire.
Use penetrating oil on the stabilizer link where it hooks to the strut, and then an 18 millimeter wrench. You'll first loosen it up, use another wrench, hook it on there, or use a larger socket and ratchet. Loosen up the nut first, and then you'll want to put either an 8 millimeter wrench or an 8 millimeter ratchet, and if you turn the ratchet clockwise, it actually drives the stud out of the nut. The other thing you can do is you can use a set of locking pliers and hook them on the backside once you get it loosened up enough, and then remove the nut with your wrench. That's just another way to do it. Then put that stabilizer link to the side.
The control arm attaches at three different points: a nut on the front, 24 millimeter, a nut on top of the ball joint that's 21 millimeter, and then a bolt and nut, they're 21 millimeter, that hold the rear of the control arm into the frame. Use a socket and breaker-bar, or double wrench method, which is a 24 millimeter wrench, and then you hook another wrench onto it for extra leverage and loosen up that front nut, and once it gets loose you can use your regular ratchet, or just the wrench, and you can remove that nut all the way. On the back fastener you'll need a 21 millimeter wrench and either another 21 millimeter wrench or a 21 millimeter socket with a ratchet. It can help to have a deep socket in this case.
I was able to get by with a regular socket and just put the ratchet into it a little bit. Remove that nut, but leave the bolt in place. Then you're going to want to put some pressure up from underneath on the suspension. This will help hold the ball joint shaft into the steering knuckle. Mine actually broke loose fairly easily. Spray a little bit of penetrating oil on the top of that ball joint stud. 21 millimeter wrench, kind of hook it in under there. You will need a wrench to get under the CV joint, and once you get it loose it actually came loose pretty easily remove the nut most of the way, and then you'll want to break the control arm loose. Mine actually just comes loose as I lower down the control arm. You may have to give the steering knuckle a couple of hits with a hammer. I'll show you just how to hit it.
You can see that my control arm actually just comes loose, which I was actually kind of surprised about. If you should need to hit it with a hammer - see, it came loose right there with just a little tap of my hand. Hit the knuckle right there with the hammer while the control arm is hanging down, and you leave the nut on, just to keep things together. Now, I'm going to remove... there are two bolts that go through and they have nuts on top, I'm just loosening them up first. These are 18 millimeter, they hold the mount in place. I'm going to remove one of the bolts, and I'm going to loosen up the other bolt so that mount will swivel and allow me to get the control arm out. I remove one bolt and loosen up the other one.
In order to get that rear bolt out, you have to take your jack and jack up the stabilizer bar. Jack it up a little bit, make a little tap that bolt out some, raise it up a little bit more, and use a pry bar just to tap on that part. Raise it up a little bit more and take the nut off of the ball joint. I kind of take that nut off the ball joint, drop the control arm down, and then you can move the control arm around and take that bolt right out of there. Then you'll need to let your jack down out of the stabilizer bar to get the control arm out the rest of the way. Here you can see on the right the new control arm from 1AAuto. On the left is the rusted one that has a bad ball joint, and the control arm from 1A Auto's going to go in exactly the same.
When you go to reinstall, just take the shipping protectors off of the front shaft and off of the ball joint. Keep that nut in your hand and throw the protector away. Put the front shaft in first. Put the rear mount just kind of into place, and then get the ball joint up into place. You might have to push the ball joint just to angle it better. Push the ball joint up in the steering knuckle and then just thread the nut on there to hold it in place. Put your jack back under the stabilizer bar and raise it up and out of the way so you can get that bolt in. Then you use two screwdrivers, or you can use something a little bigger. There are slots in the mount, and you just move those. It would help to have another pair of hands. While one person puts the control arm into place, the other one can put the bolt in.
I was able to hold it well enough and get the bolt started it, and then you just kind of manipulate the control arm and tap it in with the hammer. Now, work that front mount bolt you put into place, and push it in there. I'd just kind of use a combination of pushing it up in there and threading it in, and then it goes in, and I put the bolt on the other side, or the nut on the other side. At this point, you can tighten those up, and you want to torque those to 70 foot pounds.
Now, you can put that 24 millimeter nut back in place. You let your stabilizer bar back down, put the 21 millimeter nut back on there, and, at this point, I'm just going to preliminarily tighten both of those. I'm going to torque them up a little bit later. Just get them on there so they're snug. Same thing with the 24 millimeter nut. Now, we're going to put pressure back up underneath the control arm. That holds that stud into place. I tap on the steering knuckle just to allow it to kind of get some pressure and seat itself, and then you want to tighten it to about 100 foot-pounds. I just kind of try and roughly do it with the 21 millimeter wrench and the other wrench for some extra torque.
The stabilizer link is back in place. Just make sure you get the ABS wire on the correct side of it. I put it back in place. I still have the locking pliers on there, so I just left them on there. Put the nut on, then tighten it up until the walking pliers start to get pitched, and you could have skipped this step and just done what I do next, which is just have your wrench, your 18 millimeter wrench on there using 8 millimeter socket and ratchet, and you actually drive the socket and ratchet counterclockwise, which pulls the stud through, and then tighten it up with the wrench. Make sure your harness is clipped back in place.
Next, we're going to torque those other two fasteners, so the vehicle is now on the ground. You can see the lift, and there's nothing holding up the front. What is holding up the front is I have my jack underneath the control arm, and the car's basically in a level position. Now I'm going to torque that front 24 millimeter nut to 120 to 130 foot pounds, and that rear one, 95 to 105 foot pounds, and notice I have the torque wrench on the nut end, and I was holding the other end with the wrench.
Now we can raise the vehicle back up, put the tire on, and then just thread the lug nuts on preliminarily. With the vehicle still in the air, you can just tighten the lug nuts up preliminarily. You're not tightening them up all the way here. Just so they're snug. Lower the vehicle back down. Torque the lug nuts to 110 foot pounds, and I use a crossing pattern. Torque one, go to the opposite one, and then go to the opposite one minus one, and the opposite one, and then I just go right around and check them. Then last, but not least, put the cap back on, and you will want to have a front end wheel alignment done after you've done this repair.
Thanks for tuning in. We hope this video helped you out. Next time you need parts for your car, please visit 1AAuto.com. Also check out our other helpful how-to and diagnosis videos.
Shop Products


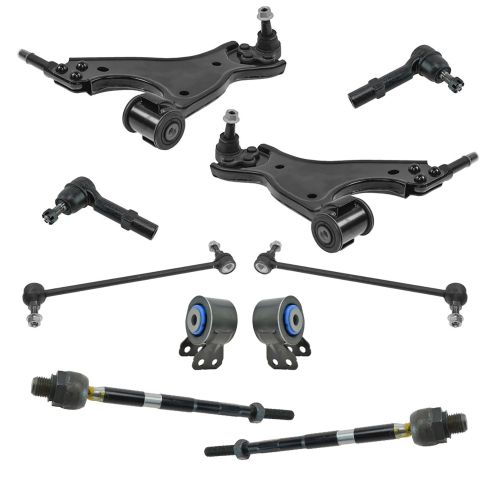
Chevrolet GMC Buick Saturn Front 10 Piece Steering & Suspension Kit TRQ PSA64839
Part Details:
- (2) Front Sway Bar Links
- 10 Piece
- (2) Front Lower Control Arms with Ball Joints
- (2) Front Outer Tie Rods
- (2) Front Lower Forward Control Arm Bushings
- (2) Front Inner Tie Rods

How to Replace Lower Control Arm 2000-06 Chevy Suburban 1500 SUV
Watch this video to learn how to replace a loose, rusted, or damaged control arm. The experts at 1A Auto will show you how to replace the lower control arm on your 00-06 Chevy Suburban or Silverado, or GMC Yukon or Sierra.
