How to Replace Fog Light 2008-14 Cadillac CTS
Created on: 2018-05-30
How to install, repair, fix, change, or replace a broken, damaged, burned out, cracked, faded, cloudy or chipped fog light on 08 Cadillac CTS
-
step 1 :Removing the Fog Light Assembly
- Remove the plastic pins
- Remove the panel out
- Remove the weather strip
- Remove the panel on the other side
- Remove the front panel
- Remove the plastic clip with a trim tool
- Remove the two 10mm bolts
- Remove the clips for the rubber shields
- Remove the plastic push clips on the bottom of the bumper
- Disconnect the electrical connection for the fog lights
- Remove the air duct out of the way
- Remove the hose for the headlight washer fluid
- Plug the hose with a bolt
- Remove the push clips from the fender liner
- Remove the 10mm bolts that hold on the bumper
- Unclip the bumper from the sides
- Remove the whole front bumper
- Remove the 7mm bolt holding the fog light assembly in
- Push the small lock tabs in while pulling on the fog light
- Remove the fog light assembly
-
step 2 :Reinstalling the Fog Light Assembly
- Line up the assembly
- Snug up the 7mm bolt
- Line up the bumper cover
- Pres it in and snap it in place
- Snug up the four 10mm bolts that hold the bumper cover on
- Reconnect the fog light electrical connection
- Reconnect the headlight washer hoses
- Reinstall the push pins for the rubber shield
- Reinstall the brake cooling snorkels
- Reinstall the push pins on the fender liner
- Reinstall the push pins on the underneath of the bumper
- Reinstall the push clips on the top of the bumper
- Reinstall the top bumper shield with the weather stripping
- Reinstall the weather stripping
- Reinstall the push pins that hold the weather stripping shield in place
- Reinstall the left and right strut tower covers
Tools needed
-
Socket Extensions
7mm Socket
10mm Socket
Ratchet
Trim Tool Set
Hi, I’m Mike from 1A Auto. We’ve been selling auto parts for over 30 years!
In this video we will be removing and reinstalling a fog light assembly in a 2008 Cadillac CTS4. If you need this part or other parts for your vehicle, click the link in the description and head over to 1aauto.com.
Take these pins out, you're gonna untwist them and then once they're untwisted you can pull them up. Just like that. Sometimes they don't untwist too well so you've got to like pry up underneath it. You can use your fingernail or like a straight head screwdriver. You're gonna pull this panel up, put it aside, then I can pull this weather strip towards the center of the vehicle to take it off. We'll do the same with this side. Pull up here and pull up there.
There's a fastener right there and a clip on the back side. I can take the weather strip towards the center and this piece will come right off. I'm gonna pull these little clips out with a trim tool. We sell these at 1aauto.com. Get in underneath there and there. There should be another one there but it's missing on this vehicle. Right here. Right there. I'm gonna use a ten millimeter socket and ratchet, just take these two ten millimeter bolts out. Alright, good.
We're gonna pull this push clip off, we're gonna use a clip trim tool and then there's one right here we need to pull off. Pull that off. This is just a rubber shield that's attached to the bumper. We're gonna leave it attached to the car on this side. And then over here, we'll do the same on the other side. This one's actually ripped right here, so we don't have to do that. And then this piece over here is already out, so we're all set on this side. We're gonna take these plastic push clips out, use our trim tool again. Pull it out and we'll pull this one out. These other ones, we can leave in. Those just hold this front skirt on. Pull that out. Pull this one out too.
So we're gonna disconnect the fog light. There's a little clip on the back side and then a clip on the front side. If you do them somewhat together, you can pull it down. Pull the backside clip off first, then you can pull on the front side. See. Two clips, just pull them out. I'm gonna do the same for this side. Disconnect the fog light. There's this air duct thing here, we're gonna pull that off. Looks like it's missing from the other side. This is there to force cool air onto the brakes while you're driving.
This vehicle has headlight washers. So it sprays washer fluid on the headlights. So we're gonna disconnect that. We're gonna use some needle nose pliers and then pry this clip off. Just move it to the side a little bit. Right there. We're gonna take a right angle pick and get in there without stabbing yourself. And you go all the way around to loosen up the hose. Like that. And we can twist it off. Just gonna work the hose back and forth and then it'll eventually come out.
Alright when I pull this off, fluid's gonna come out so I just have this random bolt that's about the same size. So I'm gonna plug the hole with that. Just like that and that'll keep the fluid in there. Most of the fluid in there.
I'm gonna use my clip tool, whoops, pull these push clips off. Alright, use our trim tool. Try to pull this one out, I'll have a little more play with this. There's a ten millimeter bolt right there we're gonna take out. Take that out. And that process would be the same for the other side, and then you can pull this off. Pull this out over here. Just grab and pull it straight forward. Pull the fog light assembly out, we're gonna take this seven millimeter screw out with a seven millimeter socket, extension and a ratchet. Get that out. You can grab it. There's these little locks and here, you can grab a little screwdriver, straight screwdriver, push in on the locks while pulling on the fog light. Pull it right out.
To reinstall, we're gonna take the fog light, line it up with the locks, click it in, make sure those locks are lined up and take our seven millimeter screw and tighten it down. Remember it is in plastic so not too tight. Just snug. The process will be the same for the passenger side. We're gonna reinstall the bumper, make sure that lines up over there. Line this up right here. Line that side up, and that. We can take these two ten millimeter bolts, put these in. We can snug these down. We're gonna install this ten millimeter bolt on the passenger side. When we're doing this, you're gonna wanna make sure the body lines up with the bumper, and then snug that down. Procedure will be the same for the driver's side. Connect the fog light connector, line it up and then push so it locks in place. Same on the passenger's side.
Alright next we're gonna reconnect our headlight washer hoses. Most of our fluid leaked out but if you did this, in a timely manner, you would have fluid coming out of there. Then we're gonna move this clamp with some needle nose pliers, back to it's original location. Right there. And that goes just like that. We're gonna reinstall this shield, push the pushpin through up top, push this one in down here. Like so. Same for the driver's side.
Next we're gonna install this brake cooling snorkel on the passenger side. Our driver's side is missing, so. Put a pushpin right there, right there, right here. Pushpin there, one right here and then one right here. Alright we're gonna reinstall this liner. You're gonna go up under here and then to put the snorkel on, just gonna click through like that. I'm gonna put our push clips through there. Install these push clips right here and here and one right there. We're gonna put our push clips in up top here. Whoops.
Now we're gonna reinstall this shield, we're gonna push this weather stripping on. Just like that. And same with the other side. Just like that.
Now we're gonna use these clips, reinstall these retainers. And then reinstall this cover right here, get that lined up. There is a little tab right there that lines up with, lock that down. And reinstall this right here. Make sure you go under the weather strip over here. And then press down.
Thanks for watching. Visit us at 1AAuto.com for quality auto parts, fast and free shipping, and the best customer service in the industry.
Shop Products


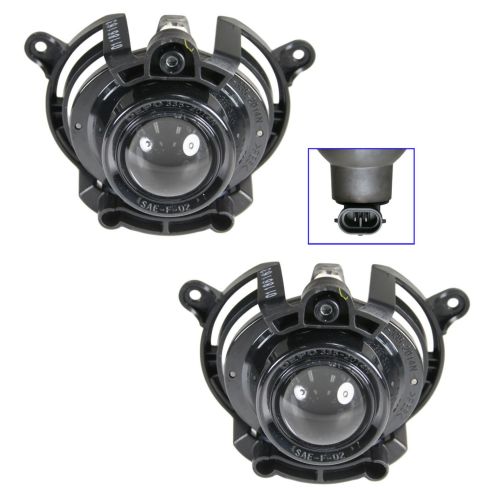
Chevrolet Buick Cadillac Saturn Driver & Passenger Side 2 Piece Fog Light Set DIY Solutions LHT00855
Part Details:
- 2 Piece
- Features and Benefits
- (1) Passenger Side Fog Light
- (1) Driver Side Fog Light
How to Replace Fog Lights 2010-16 Cadillac SRX
Fog Light: How to install, repair, fix, change, or replace a broken, damaged, burned out, cracked, faded, cloudy or chipped fog lighton 13 Cadillac SRX
