How to Replace Fan Clutch 1999-2004 Chevy Silverado
Created on: 2020-07-21
This video shows you how to install a new radiator fan clutch on your 1999-2004 Chevy Silverado.
Tools needed
-
Torque Wrench
Socket Extensions
Rust Penetrant
Socket Driver
Fan Clutch Wrench
8mm Socket
10mm Socket
Ratchet
Trim Tool Set
If you were to look right down here, you're gonna see a clamp. If you were to look at the other end where it connects on to the throttle body, you're gonna see another clamp. You'd go ahead and loosen those up. Also, if you come right up here, you're gonna see an 8-millimeter bolt. Look, if you loosen that up, you can take this right out. Once you have that out of the way and the clamps are loosened, you can wiggle this around. I'm gonna draw it off of the throttle body right here and I'm gonna take them right there. Take it off of right here. Remove it from the vehicle. Next we're gonna remove the bolts right up here that hold this in. Let's use our little forky tool here or you can use a screwdriver or whatever you've got. We're gonna lift up on the center of these push tabs here and then you should be able to take it right out of there. That's what it looks like. There's two on this side and two on the passenger side. Remove them all. Have all those out, let's go ahead and get this off of here. The next thing we need to do is get the fan clutch off of here. You wanna do that before you remove your serpentine belt because that's gonna help keep the water pump from spinning. I'm gonna carefully try to put a little bit of penetrant on there, right along the area between the actual clutch itself and the pump. Let that sit for a second. We're gonna need to use a 36-millimeter wrench of some sort.
I have one that goes on my air chisel but if you have a 36-millimeter wrench and a hammer, you could try to give it a couple light bonks and see if you can get it to break free. Once that breaks free, you can go ahead and spin it right off. Just be careful not to let it spin too freely because if it comes off, falls down, it could potentially damage your radiator. Get that right out of there. All right, so we got our fan. Let's put it right on the bench. On the backside you're gonna see four bolts. Go ahead and remove those. So you might notice that the fan clutch doesn't wanna come out of there, just go ahead and give it a nice bonk. There we are. Double-check your fan. Make sure it's in good condition. If there's any issues with it, of course, you'd wanna replace that as well. This one looks good, aside from a little rust, which I'm really not worried about. Let's get that clutch out of the way, bring our new one over. This looks great. Slide this right on over. Line up those bolt holes. All right. Start in all four of your bolts and then we'll bottom them out. Go ahead and torque these to 17 foot-pounds. Now it's gonna be time to get the fan clutch on to the water pump. Don't use any threadlocker or anything like that. You don't need to use any threadlocker and you don't wanna use any Never-Seez. Just go ahead and go metal-on-metal. Turn this clockwise until it bottoms out. Okay. So that's pretty much it.
Now, at this point, what I like to do is just give it a couple taps to tighten it. You don't wanna continue tightening it to the point that it's gonna be over-tightened because you do, of course, need to get this off again someday. If you were gonna torque it down, you would torque it to 41 foot-pounds. And that's it. Let's go ahead and get our fan shroud back on here. Go ahead and lift up on that upper hose. Slide it down in. There we are. This looks good. We're gonna line up down here. You're gonna see, I have a little piton and a hole. Line that up. It should sit right in. Do the same on the other side. There we are. So now we're gonna take our push clips. Make sure that the center is pulled up. If it's pushed in, that means it's in the locked position. Go ahead and slide it in. Lock it in. Do the same to the other one. And then come right up top up here and start in your bolt. Now we'll do the same to the other side and then we'll snug this up. We'll get our intake back on here. It's gonna go right underneath this hose here. Line it up there. Grab this. Slide it in. Push it all the way in so it's up against the whole throttle body. Make sure your clamps are nice and tight. Your hose over here should have a little clippy-do. Ours is actually broken but it's gonna push in right there and that'll hold it secure. This cover back on here, just slide it all the way back so it's sitting inside the pitons. Put this down and tighten up your bolt.
Shop Products
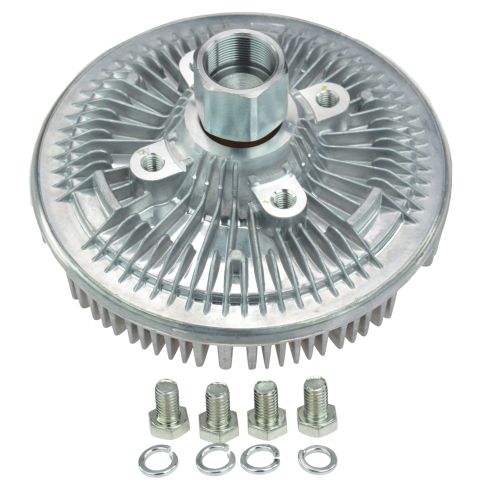
Chevrolet GMC Olds Isuzu Severe Duty Radiator Fan Clutch TRQ RCA91846
Part Details:
- Severe Duty

How to Replace Radiator Fan Clutch 1996-99 GMC K1500
This video shows you how to replace the radiator fan clutch on your 96-99 GMC 1500.
