How to Replace Exterior Door Handle 1998-2004 GMC Sonoma
Created on: 2012-02-20
How to repair, install, fix, change or replace a broken or snapped off exterior door handle on GMC Sonoma model years 98, 99, 00, 01, 02, 03, and 04.
-
step 1 :Removing the Door Panel
- Pry up the window switch panel by hand
- Disconnect the window switch wiring harnesses
- Remove the Phillips head screw inside the inside door handle
- Pry off the trim piece inside the inside door handle by hand
- Remove the two 7mm bolts inside the door pull
- Pry out the door panel with a door panel clip tool or putty knife
- Carefully peel off the water shield
-
step 2 :Removing the Outside Door Handle
- Pry the plug out of the door with a flat blade screwdriver
- Remove the two 10mm bolts from the window track
- Pull the window track down
- Unclip the lock rod from the door handle
- Remove the two 10mm bolts from the door handle
- Twist the door handle off the latch rod from the outside
- Pull the clip off the latch rod
-
step 3 :Preparing the Outside Door Handle
- Disconnect the lock cylinder from the old handle with a flat blade screwdriver
- Pull the lock cylinder out of the old handle
- Pull the felt washer out of the old handle
- Push the felt washer into the new handle
- Push the lock cylinder into the new handle
-
step 4 :Installing the Outside Door Handle
- Clip the door handle onto the latch rod
- Push the door handle into place
- Insert the two 10mm bolts into the door handle
- Put the window track into place
- Insert the two 10mm bolts into the window track
- Put the water shield into place
- Make sure the door is unlocked
- Test the door handle
-
step 5 :Installing the Door Panel
- Lift the door panel into place
- Push in the door panel clips
- Push the plug into the door
- Slide on the trim piece inside the inside door handle
- Insert the Phillips screw into the inside door handle
- Insert the two 7mm bolts into the door pull
- Connect the window switch wiring harnesses
- Push in the window switch panel
Tools needed
-
Socket Extensions
10mm Socket
Phillips Head Screwdriver
Putty Knife
Flashlight
Ratchet
Door Panel Removal Tool
Flat Blade Screwdriver
7mm Socket
Brought to you by 1AAuto.com, your source for quality replacement parts and the best service on the Internet.
Hi, I'm Mike from 1A Auto. I hope this how-to video helps you out, and next time you need parts for your vehicle, think of 1AAuto.com. Thanks.
In this video, we're going to show you how to replace a front outside door handle on this 2003 GMC Sonoma. This is pretty much the same for any '98 to '04 GMC Sonoma or S15 pickup. The tools you'll need are flat blade screwdrivers (both regular and small size), Phillips screwdriver, door panel clip tool or putty knife, 10mm socket with a ratchet and extension, and a flashlight will help as well.
Start by grabbing the front of your switch plate and kind of push back and pull up. It should come out. You want to use a screwdriver. On this one, there's a tab right here that you push, this gray one. Try to put your screwdriver right down in here and pry out. Here there's a tab, and then, here there's a tab. We'll speed it up here as I disconnect those connections. On the middle one, I believe, I did have to use two screwdrivers. I used one to hold the locking tab and the other one to pry up on the connector to pull it off.
Right behind your door handle, there's a Phillips screw. Remove that. Then, this bezel pulls out and unclips. You can bring it off the door handle. Up underneath there, there are two 7mm bolts underneath your door pull, one there and then one right up in there. I'm going to speed up as I remove those two bolts. If you have a door panel clip tool, use that or actually a household putty knife works just as well. Put the tool in the bottom between the door and the door panel. Slide it and find the clip and pull it. If your door panel has been apart before they'll come off pretty easy. There's one right up here as well. The door panel comes right off. You'll want to pull back your watershield to give you access to the inside of the door.
With a flat bladed screwdriver, there's just a little plug here. We have two 10mm bolts here. Now, you want to reach inside and grab hold of this track here and pull it down. It's just important to note how it goes in. You can see, as I pull it down, it comes off right there. I'm just going to lay it down right there for now.
Now, we're going to want to unclip our lock rod, and actually, you can see it. I can't really film it through here, but you can see it pretty well through this hole. Look through at your lock rod. I reach in with my hand. I'm sure you can't see much of that, but I'm going to pull the clip off and then pull the rod out.
There's a 10mm bolt right through there and one through there as well. It's a little harder to see behind that rod. I'll speed it up as I remove those two bolts. I use a 10mm socket with an extension and a ratchet. Undo the bolts and then just try and pull them right out while they're still in the socket.
I'm going to pull it out. Twist it down, and it came out. It shouldn't have come out quite that easy. This little clip comes off. It should be clipped right into there. You'll find when you go to pull your handle out that that rod will still be connected. You just need to remove the clip and disconnect the rod. You'll want to get your lock out of your old handle. Just press on this tab here and push out.
The new handle from 1A Auto is the exact same as the old one. I've got a little felt washer from the old handle. I'm just going to push that right down into place here. Take my lock and push it into place. Put this rod on. Hook this clip down to hold it in place. Kind of push it down in. The window is right back in there. You've got to get it around the window to lock in to place. Generally, you kind of push it into place. I'm going to make sure that I get this first bolt started by hand here. You're going to take this one and put it into your socket. You can usually hit it pretty easily. Tighten these up nice and firm. I'm going to speed it up here as we finish threading those in and tightening them up with our socket, ratchet, and extension. Look back up in there and put the lock on. Put it back in place.
Now, we want to take this window track. What you want to do is look right up in there and make sure your window track is going to pass the door handle and in behind the window. I'm just kind of looking right there at the track. I can see it. I can see it go up into place. Push it right in. Once you push it right in, you should be able to see this hole right here, lined up nicely. Start that bolt. Then, start this bolt. I'm going to speed it up as I get those bolts in, tighten them up, and then put the watershield back in place and ready for a test on the new door handle. Make sure that door is unlocked first.
Reinstall your door panel. Get it into place. Make sure all of your wires are clear. Push the top. You want to push the top against the window and then down onto the door. Push the top on down. Just kind of move it around a little bit to make sure the pins go in. Put the inside handle back on. Force the back in first. It snaps in there. Then, you'll clip this into place. Let's take our 7mm bolts and work them right up in there. Plug everything back in. Again, the back kind of locks in first, and then, the front goes right in.
We hope this video helps you out. Brought to you by www.1AAuto.com, your source for quality replacement parts and the best service on the Internet. Please feel free to call us toll-free, 888-844-3393. We're the company that's here for you on the Internet and in person.
Shop Products


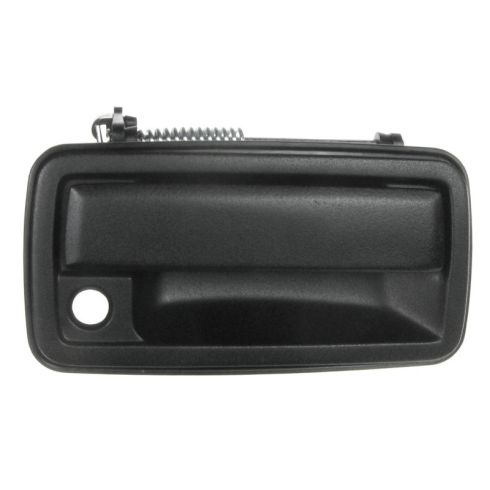
Chevrolet GMC Olds Isuzu Front Passenger Side Exterior Door Handle TRQ DHA45754
Part Details:
- Black
- Plastic
- Textured

How To Replace Front Exterior Door Handle 1998-2011 Lincoln Town Car
How to repair, install, fix, change or replace a broken or snapped off exterior door handleon 98, 99, 00, 01, 02, 03, 04, 05, 06, 07, 08, 09, 10, and 11 Lincoln Town Car models.
