How to Replace Exterior Door Handle 2000-05 Buick LeSabre
Created on: 2012-05-01
How to repair, install, fix, change or replace a broken or snapped off exterior door handle on Buick LeSabre model years 00, 01, 02, 03, 04, and 05.
-
step 1 :Removing the Door Panel
- Pry out the door handle bezel with a flat blade screwdriver
- Pry out the courtesy light with a flat blade screwdriver
- Remove the bulb from the courtesy light
- Remove the Phillips screw inside the courtesy light hole on the door panel
- Pry out the door panel with a door panel clip tool or putty knife
- Lift the door panel up and off
- Disconnect the window wiring harness
- Push up on the retaining clip and remove it with a flat blade screwdriver
- Carefully peel off the water shield
-
step 2 :Removing the Door Handle
- Remove the 10mm screw from the interior door handle
- Slide the interior door handle forward
- Pry the clip from the door handle rod near the actuator
- Remove the three T30 Torx screws from the door lock assembly
- Slide the door lock assembly out of place
- Remove the two 10mm bolts from the door handle
- Push the handle up and out
- Remove the door handle rod
-
step 3 :Installing the Door Handle
- Insert the door handle rod into the door handle
- Insert the door handle into place
- Tighten the two 10mm bolts to the door handle
- Insert the door lock assembly into place
- Push in the clip on the door handle rod
- Tighten the three T30 Torx screws to the assembly
- Slide the interior door handle back
- Tighten the 10mm screw to the interior door handle
-
step 4 :Reinstalling the Door Panel
- Put the water shield into place
- Push the toothed bracket onto the door panel
- Connect the window switch wiring harness
- Lift the door panel into place
- Push in the door panel clips
- Insert the Phillips screw inside the courtesy light area
- Connect the light to the courtesy light
- Push the courtesy light into place
- Insert the door handle bezel into place
Tools needed
-
Socket Extensions
Flat Blade Screwdriver
Phillips Head Screwdriver
T30 Driver
10mm Socket
Door Panel Removal Tool
Ratchet
Brought to you by 1AAuto.com, your source for quality replacement parts and the best service on the Internet.
Hi, I'm Mike from 1A Auto. I hope this how-to video helps you out, and next time you need parts for your vehicle, think of 1AAuto.com. Thanks.
In this video, we're going to show you how to replace a rear outer door handle on this 2000 Buick LaSabre. It's pretty much the same for most LaSabres, Bonnevilles, cars of this era. Tools you'll need include a flat blade screwdriver, Phillips screwdriver, door panel clip tool (which is available on our website), 10mm socket with ratchet and extension, and a T30 Torx driver socket. While the procedure is similar for most LaSabres and Bonnevilles, there may be some differences in how you remove the door panels.
Start with a flat blade screwdriver and just carefully go right in behind here and pull out on this bezel. It comes forward and off. Next, you want to take your screwdriver again and pry out on this courtesy light. That comes straight out, and you can pull the bulb out like that. Phillips screwdriver, you can look right in here, you'll see a black Phillips screw and remove that. Now there's a series of clips around the door panel, you want a door panel clip tool.
What you want to do is pull out on the panel, slide it in, and then usually down until you come to a clip, pull it out, put it right around the clip. Then pull on the door panel and the tool at the same time and then just keep doing that right around the whole panel. I'll speed it up here as I just work my way around the panel with the tool and pulling to release the clips. Then, once you release the clips, you'll want to actually just try to pull the handle out or pull the panel out and pull it up and off of the bracket. Pull all the back clips out, pull the door panel up and then come up to the front here and pull all these clips out. Then you want to lift your door panel up and out. Then there's a little electrical connection here, just press on the tab, disconnect that, door panel comes off.
You can see right here, this is the clip in the middle, it slides down on these clips here. What you want to do is once you have your panel off, take your screwdriver and push up. There are basically two little teeth that hold it on, push up and pull the clip off. Push down and that comes off. You can slide it right back in there. Fast-forward here as we remove the other clip, put it back into the panel, and then the panel's ready to install when you have your project done. Once the door panel is off, use some pliers or a screwdriver, pull the pins at the top of the water shield out, and carefully pull the water shield down to give you access to the part. You want to remove this bolt from your interior door handle. You're going to slide the handle forward, bring it out, and unclip it here and here. You're going to want to reach into your door, it's going to be a little difficult to film here, see that little gray clip right there, reach in with your hand, unclip that gray clip, and pull that rod out.
Now here there's three T30 Torx screws. Use a T30 driver and a socket and remove these. Use a little fast-forward here as we just remove those three screws. As you pull this last one out just let your handle and lock assembly just slide down out of place. Now you can see there's a 10mm bolt right there. Just push this out of the way and you'll see a 10mm bolt right there. We'll use our socket with a ratchet and extension and I'll speed up again here as we remove those bolts. As I'm removing them, I reach up in with my other hand and just make sure that they come out without dropping them down into the door. Now I'm reaching around from inside, you can see you push the handle up and I'm going to detach and pull it out. There's your handle out.
You see my handle is in good shape, a lot of times they break right here. You'll want to take this rod, work it out, and put it onto your new handle from the backside. Reinstalling the handle, put the rod down in. The handle's from 1A Auto, they do come molded in black. Obviously you can put a black one on and it's going to fix your problem if you have a broken handle. If you wanted to paint it to match the car, you can do something as simple as just going to a hardware store and getting a color that matches close. You could also go to your automotive parts store that has a paint department and they can put some paint that matches. You can use your VIN to match your paint, put some into an air charged spray can, and you can then paint the handle that way.
I'm basically putting the handle back in. Put it in, make sure that the gasket is between the handle and the door, snap it into place. Take my first bolt, reach up in and start it by hand, holding the handle on the outside and then my second bolt, reach up in, looking right through here and start it in with my fingers. Grab my socket and ratchet and extension and speed things up here again as we tighten those two bolts, tighten them nice and snug, you don't want to over tighten them though. Put this back in place.
Now I'm going to put that mechanism back up. I'm reaching up with my hand, hold the rod from the door handle, pull it forward some and then slide the lock mechanism up into place. Just hold it there, start one of the bolts, start the other two bolts. I started them in place and then I'll reach in here, take my latch rod, put it in the clip, and lock it. Then, once you're sure that your lock rod's clipped on there correctly, tighten up the three bolts that hold the latch to the door. Again, tighten them up nice and firm but you don't have to over tighten them. Take your handle, pull it forward, put it into place, slide it back, put the bolt in place. Tighten it up. Make sure you clip your water shield and press it back into place.
Before you put your door panel back on, again make sure this bracket is in place. Reconnect your harness. Now two of your lower pins are longer so you can actually put those in place. I'm just looking down and seeing those go in place. Those should pretty much line up and then you can just rotate the panel onto the door. Watch everything go in and peek back here to make sure that these pins are lined up. Stick the back in a little bit and then put that in. Make sure we take our Phillips screw and carefully put it in. Connect our courtesy light.
We hope this video helps you out. Brought to you by www.1AAuto.com, your source for quality replacement parts and the best service on the Internet. Please feel free to call us toll-free, 888-844-3393. We're the company that's here for you on the Internet and in person.
Shop Products


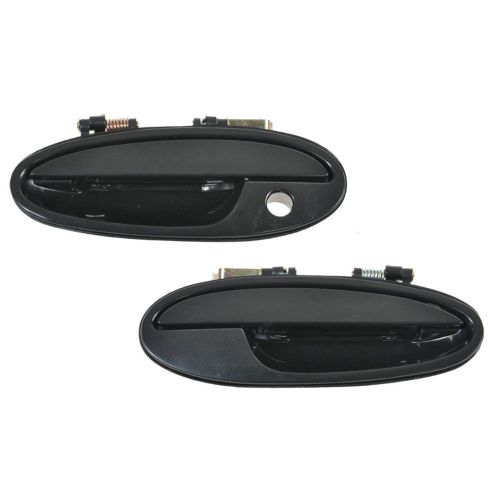
Buick Pontiac Olds Front Driver & Passenger Side 2 Piece Exterior Door Handle Set TRQ DHA35084
Part Details:
- Paint to Match
- 2 Piece
- (1) Front Driver Side Exterior Door Handle
- (1) Front Passenger Side Exterior Door Handle
- Black
How to Replace Rear Exterior Door Handle 2001-05 BMW 325 Xi
Check out this video if you need to replace the door handle on your 01-05 BMW 3 Series. 1A Auto shows you how to do it, step by step!
