How to Replace Exterior Door Handle 2002-10 Ford Explorer
Created on: 2017-05-25
How to repair, install, fix, change or replace a broken or snapped off exterior door handle on 02, 03, 04, 05, 06, 07, 08, 09, 10 Ford Explorer
-
step 1 :Removing the Door Panel
- Pry off the side trim piece next to the window switch panel with a rag and flat blade screwdriver
- Pry up the window switch panel with a flat blade screwdriver
- Disconnect the wiring harnesses
- Pry off the trim piece from the pull handle
- Remove the two 7mm bolts in the switch
- Remove the two 7mm bolts in the door pull
- Remove the two 7mm bolts on the bottom of the door panel
- Pry off the mirror switch with a flat blade screwdriver
- Disconnect the mirror switch wiring harness
- Pull the door panel up and off
- Disconnect the door lock cable with a flat blade screwdriver
-
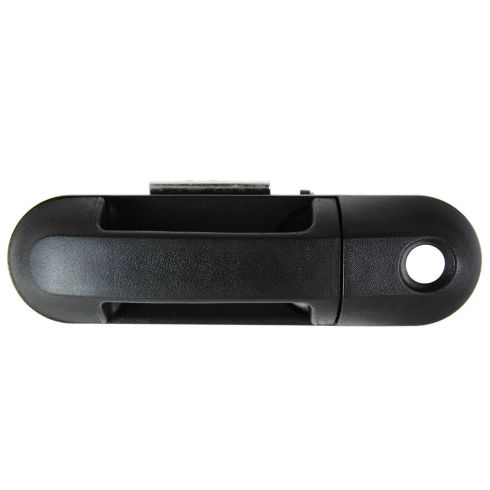
step 2 :Removing the Exterior Door Handle
- Remove the 6mm bolt and slide the guard forward
- Remove the 11mm nut from the door handle
- Remove the 11mm nut from the lock cylinder
- Pull the lock cylinder out and off the door handle
- Remove the door handle
-
step 3 :Installing the Exterior Door Handle
- Insert the door handle into the door
- Tighten the 11mm nut to the door handle
- Press the cylinder into place
- Connect the latch rod to the cylinder and handle
- Tighten the 11mm nut to the cylinder
- Tighten the 6mm bolt to the guard
-
step 4 :Reinstalling the Door Panel
- Connect the door lock cable to the door handle
- Lift the door panel into place
- Push in the door panel clips
- Lightly tighten the two 7mm bolts on the bottom of the door panel
- Tighten the two 7mm bolts in the switch
- Tighten the two 7mm bolts in the door pull
- Connect the mirror switch wiring harness
- Push the mirror switch into place
- Connect the wiring harnesses to the window switch panel
- Push the window switch panel into place
- Push on the trim piece next to the window switch panel
- Push on the door pull trim piece
Tools needed
-
Socket Extensions
Flat Blade Screwdriver
Phillips Head Screwdriver
15mm Socket
5mm Socket
Ratchet
Trim Tool Set
Pick
Hi, I'm Mike from 1AAuto. We've been selling auto parts for over 30 years! We're dedicated to delivering quality auto parts, expert customer service, and fast and free shipping, all backed by our 100% satisfaction guarantee. We've created thousands of videos to help you install our parts with confidence. That saves you time and money, so visit us at 1AAuto.com, your trusted source for quality auto parts.
We're going to remove this trim panel first. Plastic trim tools from 1AAuto.com best way to do it without harming your interior finish. Pull out on this panel. Once you get it out, make sure you're pulling straight, and then it comes off this way. Same thing here with your switch panel. Then disconnect the switches, their tabs, green tab here, and this blue tab here. Looks like this one came right out. Just a little tab on the side. Disconnect it.
Now you want to get this off. Should pull out. There are six 7mm bolts: one, two, there's one missing here, but three, and four, right down to the bottom, five, and six. We'll remove those. Again, using your plastic trim tool, get in underneath of the mirror switch. Clips are on the side. Just get it under there, twist, and it pulls up and out. You do have to rotate it up like that and out. Plastic tab, and disconnect. Make sure you have all your bolts out on the door panel. One of mine just fell out, which is okay. Whole panel comes out and off. Pull your handle to pull the cable out, then grab hold of this little ball here to hold the cable out. Then pull the cable from the door lock. Then use a screwdriver or something to help you release the tabs here.
You'll need to raise your window up, and disconnect your switch again. Pull your shield back far enough to reveal this 6mm bolt, and remove it. That allows you to slide this forward, and hold. Actually, that'll be good enough right there.
Inside the door, use a little pick tool. You could use a screwdriver, too. Release this clip, and pull the rod out. Two 11mm nuts hold the door handle in place. One is right up under here, and a little hard to get to, because the window regulator rail's in the way. Then you can get to the other one very easily right through here. We'll remove those 11mm nuts.
The front one, use a deep 11mm, and go in behind the rail. This back one is really easy to get to, just with an extension on the 11mm deep socket. And remove them. With this back nut off, just pull the lock cylinder right out. Most likely, if your door handle's broken, it's just going to come right out. But if you're looking to upgrade to chrome door handles, pull the bottom out, and the door handle comes out. A lot of times this will happen, that the stud actually comes out from the door handle. A set of locking pliers, and your ratchet and socket, and just take this stuff out.
Original handle from the vehicle, and actually you can see it's in good shape, other than the stud coming out. At 1A Auto, we sell chrome door handles which are a nice upgrade. We also sell handles that are smooth black. You can paint to match your original color, as well as textured black. You can see that the handle from 1A Auto is a quality replacement. It's going to go on there just like the original. We'll take the rod out, put it into the new handle, and we're ready to go.
Good, while you're here, a little cleaner, just clean up the mounting area. Make sure that your lock rod is just over to the side. Put the latch rod down in place, and the top should go in first. Hold the handle out, and look back in where the studs go. Take one of the 11mm nuts, and feed it right back into place, and start it on. Before you put the rear nut in place, put your lock cylinder in place. Then start this nut on. Just take your rod, make sure it's nice and free, and also actuating. The rod right into the clip pole. That's secure, and then this one goes back into the clip. Push up on the rod, then push it into the clip, and lock the clip in place. Put this block back in place.
Make sure that your door lock cable is clipped into the back side, and top on, back of the latch, and the bottom latch. Okay, lock this back in place. Make sure all your harnesses go in there. Put your 6mm bolt back in place. Then you can put your water shield back up. The door panel has a series of hooks that go into slots in the door, so you can put it into place. Make sure your harnesses go through. Put the cable into the door, pull it, and push it through. Make sure your harnesses come up through. Put your door lock button in. Line up all those hooks. Just got to make sure our door lock button goes into the hole. The hooks should all line up and allow the panel to be flush with the door. Make sure your mirror harness comes through, as well, both the front and the back are flush. Push it down into place. Then we can reinstall our six 7mm bolts that hold it in place. For these two that go in at the door handle, we just put some grease on there. That actually is just going to make it so they stay in our socket.
Feed it into place, and start them in. Just clean the grease off the socket, and start the other ones in. On these bottom ones, tighten them. Don't get them too tight, because you'll end up stripping the plastic nuts that they go into. Reconnect your harness leads, green, blue, small black one. Make sure you put it in there correctly. Push it down, and lock it into place. This one hooks on the top first, snaps in place, and then this one snaps right into place. Install the mirror switch, reconnect it down and in. Just make sure we clock it correctly. When it's in the middle position that should be straight up, and push it in.
Thanks for watching. Visit us at 1AAuto.com for quality auto parts, fast and free shipping, and the best customer service in the industry.
Shop Products


Ford Lincoln Mercury Front Driver Side Exterior Door Handle TRQ DHA48871
Part Details:
- Black
- Plastic
- Textured
- Yes

How to Replace Exterior Door Handle 1995-2000 Chevy Tahoe
Watch this video to learn how to replace an exterior door handle. The experts at 1A Auto show how to replace a broken or snapped outside door handle on your 88-98 Chevy Silverado, Suburban, or Tahoe; or GMC Sierra or Yukon.
