How to Replace Engine Water Pump 2009-12 Chevy Traverse
Created on: 2018-02-19
If the water pump is broken or needs to be replaced, follow the steps in this video to replace it yourself the right way
-
step 1 :Removing the Wheel
- Loosen the lug nuts with the vehicle on the ground with a 22mm socket and breaker bar
- Raise the vehicle with a floor jack
- Secure the vehicle on jack stands
- Remove the lug nuts
- Pull off the wheel
-
step 2 :Removing the Serpentine Belt
- Pry off the push clips from the plastic shield in the wheel well with a flat blade screwdriver
- Fold the fender liner up with a bungee cord
- Mark the direction of the serpentine belt's mount with a marker
- Loosen the water pump pulley bolts with a ratcheting wrench
- Familiarize yourself with the route of the serpentine belt
- Insert the 1/2 inch drive ratchet into the tensioner
- Turn the tensioner clockwise to loosen the belt
- Pull the belt off the alternator
- Release the tensioner
- Pull the belt off by hand
-
step 3 :Removing the Water Pump Pulley
- Remove the bolts from the pulley
- Remove the water pump pulley
-
step 4 :Removing the Water Pump
- Have a drain pan ready
- Loosen the lower radiator hose with slip joint pliers
- Remove the 10mm bolts from the water pump
- Slowly pull the water pump off of the engine
- Let the fluid drain
- Remove the water pump
- Remove the metal gasket
-
step 5 :Installing the Water Pump
- Push the engine over a little with a pry bar
- Insert the water pump into place, resting it on top of the crank pulley
- Remove the pry bar
- Insert the gasket into place
- Place the water pump over the gasket
- Thread the bolts by hand
- Torque the bolts in the crossing pattern to 89 inch-pounds, starting with the top bolt, then bottom bolt, top left, bottom right, bottom left, top right
- Clean the pulleys from any coolant or other residue with brake parts cleaner
-
step 6 :Reinstalling the Serpentine Belt
- Loop the belt around the power steering pulley
- Bring it over the water pump
- Bring it down around the alternator
- Bring it loosely around the idler pulley
- Bring it down around the A/C Pulley
- Bring it around the crank pulley
- Bring it around the belt tensioner
- Pull the tensioner clockwise with the 1/2 inch ratchet
- Bring it around the idler
- Release the tensioner
- Press the clips to the fender liner
-
step 7 :Tightening the Water Pump Pulley
- Torque the water pump pulley bolts to 89 inch-pounds
- Insert the fender liner into place
- Press the push clips into the fender liner
-
step 8 :Reattaching the Wheel
- Slide the wheel into place
- Start the lug nuts by hand
- Tighten the lug nuts preliminarily
- Lower the vehicle to the ground
- Tighten the lug nuts to 140 foot-pounds in a crossing or star pattern
-
step 9 :Filling the Coolant
- Push the lower radiator hose onto the engine
- Tighten the hose clamp with slip joint pliers
- Remove the ten plastic clips from the engine compartment shield with a trim tool or flat blade screwdriver
- Lift the shield off the engine compartment
- Twist the radiator cap off the radiator
- Add coolant to the radiator, using a funnel
- Add coolant to the overflow reservoir, using a funnel
- Twist on the radiator cap
-
step 10 :Bleeding the Cooling System
- Start the engine
- Bring the engine to between 2,000 and 2,500 RPM
- Bring the engine to operating temperature
- Check the coolant level
- Add coolant to the overflow reservoir as necessary
- Place the shield to the engine compartment
- Replace the ten plastic clips to the engine compartment shield
Tools needed
-
Funnel
Socket Extensions
Torque Wrench
Channel-Lock Pliers
Pry Bar
Jack Stands
10mm Wrench
Anti-Freeze
Brake Parts Cleaner
Trim Tool Set
Rubber Mallet
Flat Blade Screwdriver
Dead Blow Hammer
Paper Towels
1/2 Inch Ratchet
Bungee Cord
10mm Socket
Drain Pan
Ratchet
Floor Jack
Marker / Writing Utensil
22mm Socket
Hi, I’m Mike from 1A Auto. We’ve been selling auto parts for over 30 years!
Go inside the vehicle, open up the hood. With the vehicle on the ground I'm going to use a breaker bar and a 22 millimeter socket to loosen the lug nuts. Raise and support your vehicle with a jack and jack stands, but we're using our two post lift. Use the socket to finish removing the lug nuts. All right, it's seized to the hub. Take a couple of lug nuts, just thread them on lightly. Use a dead blow or a rubber mallet. Hit on the tire and it will knock it free. Lug nuts will keep the wheel from falling off. Now it's loose so you can finish taking the lug nuts off. Just going to support it so it doesn't fall.
I'm just going to turn this knuckle out of the way. Remove these two push clips holding in this plastic shield. I'm going to use a flat bladed screwdriver to just pop them up to unlock them. They might break, and you'll have to get new ones. It's very common for them to break. I'll try to get this one first. They get old and brittle. I'm going to use a trim clip tool. Try to get underneath them, and I'll just break them off. I'll have to replace these with new ones afterwards. I'm just going to pop them through the holes. They're just plastic—it's not a big deal. I'm going to take a bungee cord and just hold this fender liner up and out of the way. I'll just bungee it over just like that.
Water pump is located up towards the middle of the engine next to the frame rail. Kind of difficult to get to. That's the pulley and there are four bolts holding on the pulley. If you want to reuse the belt you can mark the direction that it's mounted in by just taking a paint marker and just putting an arrow to the outside. This has got a pretty broad tip but I'll know when in reinstall it I want that arrow facing out. The belt is already worn in and I want it to travel in the same direction. If you're going to replace the belt, don't worry about marking the direction.
Before you remove the water pump pulley, you'll need to have four new mounting bolts on hand as they are torqued to yield. There are four 10 millimeter bolts holding on the water pump pulley. I'm going to use a ratcheting wrench to remove them. I'm going to leave, well, I'm going to loosen them first. I'm not going to fully remove them, but I'm going to use the serpentine belt that's on here to hold the pulley still while I remove them. Otherwise, the pulley will spin on you if you take the belt off first. I'm just going to go up and just start loosening them, but not take them out all the way. Just be patient with this. It's tight quarters working on it. Those are all loose.
Now, I'll remove the belt. Belt tensioner is here. It has a 1/2 inch drive opening on it. You could use a 1/2 drive breaker bar. I'm going to use a 1/2 inch drive socket with a swivel head. Whatever you've got that will let you get in there and basically you're just going to line it up. You might have to turn it. That's why a ratchet might be easier than a breaker bar. Get it pushed into the opening.
Now we're going to push it to the back, take the tension off, and I'm going to pop it off of this idler pulley because it's a smooth pulley. Get the belt off just like that. You have to slide it underneath the tensioner pulley. Now I can slowly release the tensioner, and I'll just feed the belt out of the engine compartment. There's the drive belt, serpentine belt. I'm just going to use a little pry bar just to pop this out. I'm going to remove the water pump pulley. I'm going to thread out the bolts that are loose. That's one. Spin the pulley around and just keep removing them.
Hold the pulley so it doesn't fall, so you get the last bolt out. There's the last bolt. Take the pulley off and slide it out. There's the water pump pulley. Get our drain bucket in place to catch of and dispose of the coolant properly. You can either drain the coolant from the lower radiator hose attached to the radiator or you can remove the hose clamp and the hose from the top here, from the engine and then direct the hose down into the bucket which is what I'm going to do. The clamp will be the same on the bottom one.
I'm just using some slip joint pliers. If you squeeze it just the right way, it's got a little lock, it'll lock together. I can slide it down. Reach down and work on getting that hose off. You should always do this when the vehicle is cool. It's going to come gushing out here. This is the new water pump. It'll be sitting the vehicle like this. There are six bolts around the outer edge. There are 10 millimeter heads on them. You're going to remove all those. It's going to be difficult to see. That's why I'm showing you on the new pump. Once all those are removed, I'm going to pull the old pump off the engine and out of the vehicle.
Use a 10 millimeter socket ratchet extension, whatever you need to get in there. You might need to switch to some different stuff but start with this bottom one. They're not in here very tight, which is good. That one's loose. You will want to have new bolts on hand to replace these ones that come out. They are torqued to yield. Just be patient with this. It's very tight to work in there. I'm just going to go around and just get all six bolts. There are some bolts that are near the water pump. They are bigger than 10 millimeter but all the bolts holding the water pump are 10 millimeter. Don't try to remove any bolts that aren't 10 millimeter directly around the water pump. It's already leading, but I've got a rag here so it doesn't. Try not to splash myself in the face with coolant.
I'm going to reach up here and just pull it off the engine block. I'm not going to pull it out completely yet. I'm just going to let it drain some more. All right, I'm going to work that water pump out of the engine compartment here. There's almost enough space but not quite to get the water pump out between the engine and the frame rail. I'm going to use a large pry bar. I'm going to gently pry on the engine and move it over slightly. I'm also going to grab the water pump. I'm going to pry it over, slide it out of position just like that. Put the engine back and there's our old water pump.
Remove the old metal gasket. Reach up here. It might be stuck, but peel it up. Make sure it all comes as one piece. I'm going to discard this, and use a new one. The gasket did have some sealant on it from the factory. Some of that sealant has stuck to the engine block. You're going to make sure you want to clean all that off on the engine block before you install the new gasket, so it seals properly. Just going to use some brake parts cleaner on a rag and go up there and clean the service.
This is our old water pump from our vehicle. And you can see there is the weep hole there and it's actually dry. So what that does is this part of the water pump is sealed against the engine so there's coolant up against here and the shaft that drives the impeller here to pump your water. It goes all the way through, and it's turned by the drive belt that's on this pulley.
So there are seals inside on that shaft, and if they fail they will leak out here at the weep hole. This one appears that it was the seals had gone bad, and it was leaking out of this little pressed in fitting here. You can see it's corroded and it's wet with coolant. That's where our coolant leak was coming from. Typically if a water pump is failing internally you'll have coolant come out of that weep hole.
Here's our original water pump and gasket from our vehicle. This is our brand new one from 1AAuto.com. Comes with a new gasket and the new required hardware to bolt the water pump to the block. This will work great and fit great in our vehicle.
When installing this water pump, it's going to be hard to see because it's up against the frame rail, but after we thread in all the bolts by hand, we're going to torque them to 89 inch pounds. Going to start with this bolt here and go in a cross pattern so it'll be one, two, three, four, five, and six. All right, going to use our pry bar. I'm going to gently push the engine over. Take our new water pump. I don't have the gasket on it yet because I don't want the gasket to be damaged. I'm going to slide it up into position. Get it to slip up to where it needs to go.
There it is, and I'm just going to rest it on top of the crank pulley and pull the pry bar out. I'll take the gasket, and with this wide metal part facing towards the back of the car, grab our water pump and we'll slide the gasket into position behind the water pump. I'm just trying to push the water pump into the opening, but I'm also trying to position the gasket at the same time. Got it sort of lined up.
I'm going to take one of the new bolts, and I'll get the bottom bolt started. Now I'm going to get the top bolt caught, have to do this by feel. Reinstall the rest of the bolts by hand, make sure the gasket remains lined up. I'm going to torque these to 89 inch-pounds in a cross pattern starting with the top bolt. There's one. They're all torqued.
To get the water pump fully reinstalled, get it up into place. Going to start by just finding the threaded hole for one bolt. I've got one started. Turn to the next hole. It should be lined up. Tighten these afterwards with the belt in place.
Before you put the belt back on, you just want to make sure these pulleys are clean and dry from coolant. You can either take some water, spray it down, let it dry, or some brake parts cleaner will do the same. Since we're reusing the belt, I made an arrow to tell me the direction, because I want the belt to go in the same direction. So the arrow is pointing out this way, so I put the belt in the vehicle this way.
I'm going to reach up and get it around the power steering pulley first. Over the water pump pulley, bring it down around the alternator. I'll loosely put it around the idler pulley near the alternator. It's going to have to slide behind the tensioner between the tensioner and the block. So you actually have to flip it sideways and slide it up. Then it will go down around the AC compressor. We'll put it around the crank. I'll put it on the tensioner. Loosen the tensioner and then pop it over the idler and then release the tensioner. Torque for the water pump pulley bolts is 89 inch-pounds or 7.4 foot-pounds. I really can't get a torque wrench in here, but it's very light. I'm just going to do it by feel, and it should be right about when they stop. Just do all four of them the same way. Take the bungee cord out of the way. Put this splash shield back up with some new clips.
Now turn the knuckle straight, and reinstall the wheel and tire. Install the lug nuts by hand, just going to use the socket. Thread these down, we'll retorque them with the vehicle on the ground. Torque the lug nuts in a cross pattern to 140 foot-pounds.
Reinstall the lower radiator hose to the engine. Put that right in place. It'll go on right to that little stop right there. Get the clamp roughly where it was with a flat bladed screwdriver. Pry it down. There it is, snapped into place and it's sealed up. To remove this plastic shield that's in front of the engine compartment, there are 10 clips. Take a small flat bladed screwdriver or trip clip tool, and I'll pop them up. To loosen them, go in like this and pull them out. If the middle comes out, that's okay. Then this rubber seal is clipped in here. Just kind of pop it out. Use a small flat bladed screwdriver. Just pop it up. Use a trip clip tool. These may break when you're taking them out. You might want to have some new ones on hand.
If the middle comes out, it just pushes right back in there. Just repeat that for all the clips. These are a little trickier because they're deep inside here. Try to get this in here, and pry them up. Just go along, and do the same for all of them. This should just lift right off now, and we'll put it aside.
Remove the radiator cap. It just unscrews. We're going to fill this system at the radiator so that we're not you could fill it through the overflow bottle. It would just take a long time to fill so I'm going to fill up the radiator and then I'm going to top off the overflow. You could use a regular funnel. We've got a special funnel we're going to use but it doesn't really matter because it will pressurize and bleed through the overflow and we'll do that after we fill it.
Going to use a 50/50 mix of the appropriate coolant which is Dex-Cool and fresh water. The line is on the back of the reservoir. I've filled the radiator. I'm going to remove the funnel. Might lose a little bit of coolant. It's almost topped off at the cold level. I'm just going to let a little coolant in. There it is. Put this back into our bottle. Going to remove this and replace our radiator cap.
Our radiator is filled to the top which is right where I want it. I'm going to need to run the vehicle, check for leaks, and then bleed the system. I'm going to start the vehicle in a safe place to have it running, so outside. I'm going to bring the RPMs up to between 2,000 and 2,500 RPM till it comes up to operating temperature. I'm going to let it idle for three minutes and shut it off. Let the vehicle cool, and then we'll recheck the coolant level and top off as necessary. After that, the job will be complete.
Install the upper cover of the engine compartment. I'm going to slide it under that ground point. It's going to go over these rubber mounts here, both sides. Let's go under this weather strip. Same thing for both sides. Reinstall all the push clips. It's easier to push the clips in if you pull out the center part. This is the last one and that is complete. Close your hood.
Thanks for watching. Visit us at 1AAuto.com for quality auto parts, fast and free shipping, and the best customer service in the industry.
Shop Products
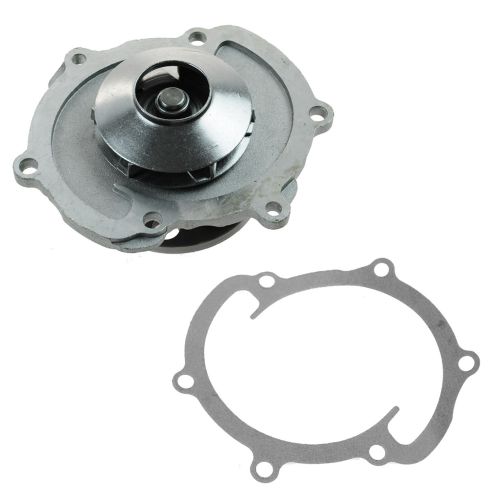
Engine Water Pump TRQ WPA07383
Part Details:
- 6
- 6
- Standard
- No
- 60 mm
- 1.73 in
- 4
- Aluminum
- No
- 2
- No
- No
- No
- Cold Rolled Steel
How to Replace Water Pump 2007-09 Toyota FJ
Check out this video to learn how to replace the water pump in your 07-09 Toyota FJ Cruiser. 1A Auto shows you how to do it yourself and save money!
