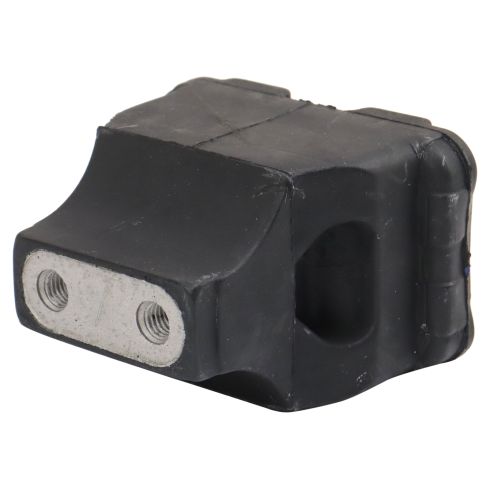
How to Replace Engine Mount 1995-2002 Pontiac Sunfire
Created on: 2010-05-27
Check out this video on how to remove and replace the upper engine mount on your 95-02 Pontiac Sunfire.
-
step 1 :Support your engine
- Find the lift point for the engine underneath the vehicle and set up a jack.
-
step 2 :Remove the radiator coolant bottle
- Use a flat blade screwdriver to pry up the clips.
- Use a 10 mm socket and ratchet to remove the one bolt anchoring it.
- Move the radiator coolant bottle out of the way.
-
step 3 :Remove the engine mount
- Remove the seven 15 mm nuts and bolts using a socket, extension and ratchet to do this.
- Work the mount out of the engine bay, it might take some finesse.
- Twist off the big clip from the motor mount and set aside.
- Remove the 15 mm bolts and drill out the rivets to remove the mount from its bracket.
-
step 4 :Install the new motor mount.
- Assemble your motor mount and bracket.
- Finesse the motor mount assembly into the engine bay and line up the bolt points.
- Bolt all the 15 mm bolts down.
- Torque them to 50 foot lbs.
- Clip the radiator reservoir back into place and bolt in the 10 mm bolt.
Tools needed
-
Socket Extensions
15mm Socket
5/16 Inch Allen Wrench
5/64 Allen Wrench
7mm Allen Wrench
5mm Hex Wrench
3/8 Inch Allen Wrench
1/2 Inch Wrench
8mm Allen Wrench
9/16 Inch Drill Bit
Drill
10mm Socket
Ratchet
Brought to you by 1AAuto.com, your source for quality replacement parts, and the best service on the internet. Hi, I'm Mike Green. I'm one of the owners of 1A Auto. I want to help you save time and money repairing and maintaining your vehicle. I'm going to use my twenty plus years experience restoring and repairing cars and trucks like this to show you the correct way to install parts from 1AAuto.com.The right parts, installed correctly; that's going to save you time and money. Thank you, and enjoy the video.
In this video, we're going to show you replacing the upper engine mount on this 1997 Sunfire; same as any '95 to '05 Cavalier or Sunfire. The tools you'll need are some metric sockets. A 1/2 inch socket and ratchet, a 9/16 drill bit, and an Allen wrench. In this video I go up to a point. Our subject vehicle actually didn't need this mount replaced, and you do have to drill out the original mount, and then mount in your new mount. That's just a note. I go up to a point, and then stop, and then show you how to reinstall the mount in the car. You want to start underneath the front here. You want to support your engine, which is this big bracket right here. Underneath here, you can see I've got the jack right in under there. The first thing you're going to want to do, is remove your radiator coolant bottle. That just entails one 10 millimeter bolt that I'm going to remove right there. We just use a flat blade screwdriver, and pry it out a little bit. You just have to move it out of the way. The next thing you're going to do, is remove one, two, three. Take these off too, four, five, six, seven. There are seven 15 millimeter nuts and bolts. For that, you're going to need a rather big... you need a 15 millimeter socket, and you need an extension to get down in there.
As long as you have the engine supported when you take these bolts out, the engine shouldn't move. Now it's kind of a matter of lifting this whole thing up and off of its studs, which with these lines here, makes it a little difficult. If everything flexes enough, you can get it off. Then you pull these lines off of here. Use a screwdriver to get this clip off of here. Then it's a matter of pulling, and working the thing right out. You can get it to lie on its side here. Now your mount is out. Now we have it out on the bench here. This big clip basically twists off. You lift up this tab and keep twisting, and it eventually comes right off. This is a 15 millimeter bolt. The new mount comes, and you can see these bolts line up here. It comes with two bolts to go in there. These are actually 1/2 inch bolts. That comes off of there. At this point... this is an original mount. You can see this is a northeastern car, so the mounts don't dry out and crack like they might in the south. What you would do at this point is, you'd take a 9/16ths drill bit and drill out these rivets right here. This mount will fall out, and then the new 1A Auto mount will mount right in there. You'll use the flared bolts that come with it to remount it back in, and then we'll put it all back together again. This piece goes on like this. This mounts into the car like this, with this side against the fender. This goes in opposite of that.
It will be quite fun to push in there. You've just got to push it down and in. Then, our two 1/2 inch bolts, here. We'll get those started. This goes on like that with one bolt holding it. It's 15 millimeter. Then this pushes right on like that. The motor mount is going to go in upside down at first. Get it up and underneath all this stuff. You can spin it. You want to be careful that you don't get this line in there incorrectly. I'm underneath that line there. Pull it up and get it onto that stud. Pull it up onto that stud and then down, then I get this line where it wants to be. This, get it turned, so we can get it where it wants to be. The engine, there's a little hole in the mount here; you can actually line it up with a screwdriver, or some type of line-up tool. I just get these in, get them going by hand, because you want to tighten up all these other five nuts first. I'm just going to use the impact wrench to roughly tighten them up. I'm going to use a wrench, and you're going to have them tight. They probably should be torqued to about fifty foot pounds. I just make sure that they're tight. I always tighten things by hand; I never tighten with a torque wrench or the impact wrench, because you could break a bolt. Now we could put this back, clip this down into place. This 10 millimeter bolt, start it. Okay, that's how you replace your motor mount.
We hope this helps you out. Brought to you by www.1AAuto.com, you source for quality replacement parts, and the best service on the internet. Please feel free to call us toll free, 888-844-3393.We're the company that's here for you on the internet, and in person.
Shop Products


How to Replace Engine Mount 1998-2005 Volkswagen Beetle
How to repair, install, fix, change or replace broken, worn, or rattling lower engine torque strut mount on 99, 00, 01, 02, 03, 04, 05 Volkswagen Beetle.
