How To Replace Engine Knock Sensor Wires 2000-06 Chevy Tahoe
Created on: 2020-06-19
Watch this video to learn how to install a new knock sensor wire harness on your 2000-06 Chevy Tahoe.
Tools needed
-
Torque Wrench
Gloves
Hose Pinch-Off Pliers
8mm Wrench
8mm Socket
Bent Nose Pliers
Hose Clamp Pliers
10mm Socket
Ratchet
Trim Tool Set
Safety Glasses
Pocket Screwdriver
All right, we want to disconnect the battery, disconnect the negative cable using 8-millimeter ratchet wrench or a wrench. And slide that out of the way.
Take this engine cover off. There's one screw right there, use an 8-millimeter socket. Just raise the cover up and slide it forward.
Now we're gonna take the snorkel off, use an 8-millimeter socket or a straight-blade screw driver, loosen up this worm clamp. And then over here, near the airbox, attach the mass airflow sensor.
And it's gonna be a bracket right here that's attached, this one is actually broken. Just use a trim tool to loosen that up. And you can grab the snorkel, just rock it back and forth. And take that off.
I'm gonna take this plate off, I'm gonna use a 10-millimeter socket, take these 2 bolts up. And for this back one, I'm just gonna use a ratchet wrench because you can't get underneath here. If you had a shorter socket, you could. I'm gonna take that bolt out and just grab the plate.
Take this nut off, there's a bracket right here that's holding this wiring harness on. Just use that 10-millimeter socket, just slide that up.
Now we're gonna disconnect the electrical connectors. You can disconnect the one right here, on the purge valve, just slide this lever up. And then, on the alternator, just push this little lever down. I'm just trying to get slack so that we can move this out of the way. Disconnect this connector right here, this goes to a sensor down below there. Slide that out of the way. And then there's the injector-sensor connectors. There's a little lock on here. You slide the injector lock up a little bit and you can push down on the lock tab and pull it up. Sometimes you just pull this lock completely off.
So, this is how this works. Normally, this is in here. So, normally, this lock is right here. You could just slide this up a little bit. And then you can push on the tab and that should release. But sometimes, if it's too difficult, just slide this lock completely out and it's a lot easier. So, do that for the other injectors. Three more on this side, and then the other side.
So, disconnect the throttle body, just slide this tab out and push down on the connector, slide it off. And then again with the fuel-rail connectors for the injectors, take these off. And disconnect the map sensor, just slide that connector up, disconnect it. That should be all the connectors. You can just slide this harness out of the way, just go to the side. Now I'm just gonna remove this connector, just slide that off and just set that aside.
Now, there's coolant hoses that go through the throttle body. So, you have to take those coolant hoses off. You don't necessarily have to take the throttle body off but you definitely have to take those hoses off. Make sure that the vehicle's cool when you go to take these hoses off. I'm gonna use a couple clamps on the hoses to prevent losing coolant, so then less coolant you have to top off. just crush the hose and you can take them off. Do the same on this hose right here.
I'm gonna use some hose-clamp pliers, just slide these hose clamps down. And then you can try twisting, twist the hose and slide it off. And do the same for the other one. And I'll just use some hose-removing pliers and just slide those off.
So, this hose goes to the valve cover. Just take this hose off here. Just slide it off. Just like that. Set it aside. And we wanna disconnect the purge valve. Just push down on this lock right here, slide it up.
Then this vacuum hose right here goes to this valve cover. Just slide it off the valve cover over here and back. And you can either leave this connected to the intake or just try to slide it off over here. Like this, if it's out of your way, you can use a pick to loosen that up.
I'm gonna slide the pick around here. Just try to twist this off a little bit. There we go, and slide that down, slide that out of the way.
Now, there is some dirt and debris at the bottom of the intake. Before I disconnect the fuel line and have gasoline in that area, you could use a vacuum to try to vacuum that up. Or just use a blow gun and just blow it away.
Now, there is gonna be pressure in the fuel line, so, you wanna release that pressure before you pop the line off. And there's a little cap with a Schrader valve right there, take the cap off. You're gonna take a rag just so the fuel doesn't spray everywhere. And what you wanna do is push on that Schrader valve and just release the pressure. Once you get in that area, pull this up, push the valve. You should wear safety glasses while you're doing this. There's no pressure in this, so, that's good.
The fuel line connects right here, and there's this clip. You just slide it up and slide it out. You might have to use a screwdriver to bend that up, slide that out, set that aside. And then you're gonna need a special tool to take this off. Go around the fuel line, you're gonna press it into the fuel line. And then slide the line off. There's little fingers in there. There we go. See the little fingers right there? And then you can take this tool off.
Now, this vehicle has a hydraulic booster. It doesn't have a vacuum booster. If you have a vehicle with the vacuum booster, you're gonna need to take that hose off either at the booster on the back of the intake.
Now use an 8-millimeter socket. And there's a bolt right here, right here, right here, and then two in the back. So, five bolts per side. Take those bolts, loosen them up. They should be caged, so, they're not gonna come out of the intake. You just gotta loosen them.
With all those bolts loose, you can grab the intake and slide it up. And this hose, you're gonna have to feed it underneath the fuel line right here. You could take the fuel lines off, if it makes it easier, but you don't have to. To make it easier, I'm just gonna pop the line off right here. It's hard to grab that wall, the intake's still on there, but...just push down on the lock and slide it up. Just grab the intake and slide it out.
All right, I'm gonna use a trim tool and just pry up this little grommet right here. You can slide it up on the wire. And then this one as well. If you're reusing these wires, just be careful. Although, a lot of times the plastic, its connector breaks, so, it's a good idea to just replace these together. And just take the tool and just try to squeeze the connector, just squeeze it like that and it spreads. All right, there you go. And there's the wiring harness.
All right, now you take this wiring harness. Now, the green wire, at least on this harness, is gonna go to the back sensor, just line that up, lock it in. And then the blue one's going to the front harness. Just match the wire up the way it goes. That's good. Now we can push the grommet, place, and do the same for the back one. It looks good. Now I'm just gonna move this connector back here for when I put the intake on.
Now I'm just cleaning up the surface area where the intake goes for the intake gasket meets the head. You can use a small razor blade. Just be careful, you don't want to gouge the metal, just use it lightly. Or a small scraper. Just try not to get any of the dirt into the intake ports.
And you can take a rag and a little brake parts cleaner and just clean up the surface.
You wanna replace these gaskets whenever you take the intake off, there's a little clip right here. Just slide that off, and the clip right here, and right here. And just clean up any of this area, get some of that carbon off. Try not to let it go into the intake itself. And just take a new gasket, line it up, lock it down and do the same at the other side.
And right before we put the intake on, just take a blowgun. Just make sure that nothing got into the ports.
All right, take the intake and just line it up. Just make sure none of the wires get in the way. That looks good. I'm gonna take this evap line, just line it up in the back. It'll lock it down. Yeah, that's good. You can lock it down right here as well.
Just so we don't lose this connector, just grab this and just line it. Click this into position right here, we'll connect it later. That's good.
Now we're gonna torque these down. Now, there's two torque sequences that you do. The first pass, you're gonna torque these to 3.7 foot-pounds. And this is number one right here. Now 23.7 is pretty much just snug, so, that's number one. Number two is right here. And number three, you go to the next one in the back...not all the way to the back, just right there. And four is right here, so, from the middle, the next one forward. Number five is on the passenger side, the next one back. And number six right here, on the driver's side. Number seven, the most forward one on the driver's side. Number eight, this one back on the passenger side. Number nine, this one back on the driver's side. And number 10.
All right, so, on the second pass, we're going to torque these two 7.4 foot-pounds in the same routine, same procedure. So, number one right here. Number two right here. Number three, a little further back. Number four, on the other side. Number five, right here. Number six. Number seven. Number eight, back here. Number nine, right here. And then last, number 10, right here.
And now we'll install the fuel line, just line that up, lock it in place. Take that lock, put that back on, snap it down. Take this line that goes over to the valve cover and line that up. And then put that right there. And then take this hose, get that lined up. And then, if you had the hose for the brake booster, you're gonna wanna hook that up.
Now we can hook up these coolant lines under the throttle body, line those up. And move the clamps over. Same with the other one. Pretty much put those where they were when they came off. And you can take the hose clamps off. use the hose pinchers, take those off. And then from the back of the engine, start hooking up the wires. So, the map sensor, line that wire up connector. And then connect this connector right here. And then all the fuel-injector connectors, line those up. Lock those down and then put the lock on as well. Let's see... And push that down. You can wiggle them a little bit, make sure they're on there properly. And just take this bracket, just line that up. That's good. Connect the alternator...and the purge valve.
And connect the injectors on the passenger's side. Same as the driver's side. Just line them up, lock them in place, push down on the lock. And connect the throttle body, line that connector up. Push down on the wall. Take this nut, put that on that bracket and snug that up. And take this bracket, line this up and put the bolts in. And snug these up.
Yeah, put the snorkel on, just line it up over the throttle body and then over the mass-airflow sensor. And then just tighten the one clamp down, just snug. It's good. Reattach that bracket, just slide that through the pinhole right there. It's good. And take the engine cover and line it up. Get the bolt started. And snug it down.
Now we can hook up the battery. Line it up and get it started. And snug it up. Just make sure it's not loose. Good.
Shop Products


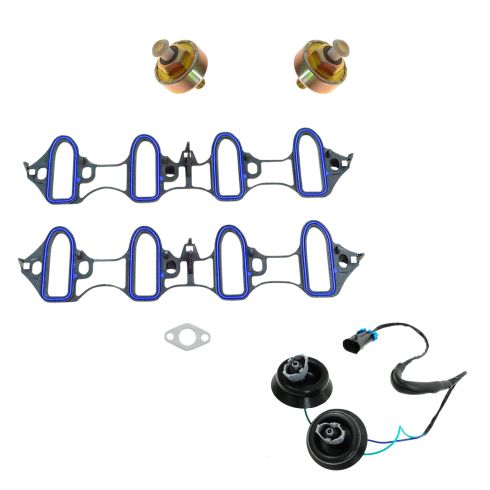
Chevrolet GMC Cadillac Engine Knock Sensor & Harness Kit TRQ ESA12270
Part Details:
- (1) Intake Manifold Gasket Set
- Intake Manifold Gasket Set
- LS Swap
- (1) Engine Knock Sensor Harness
- (2) Engine Knock Sensors
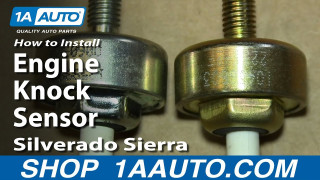
How to Replace Engine Knock Sensor 2000-06 Chevy Suburban SUV
Learn how to stop that pinging noise in your engine. The experts at 1A Auto show how to replace the engine knock sensor in your 00-06 Chevy Silverado, Suburban or Tahoe; or GMC Sierra or Yukon.
