How to Replace Electric Fuel Pump Sending Unit 2005-10 Chrysler 300
Created on: 2017-02-10
This video includes steps like removing the fuel pump fuse relay to remove the fuel pump sending unit assembly yourself. Follow along to DIY
-
step 1 :Removing the Fuel Pump Fuse Relay
- Open the fuse panel
- Remove the fuel pump relay, located at the bottom right in the back passenger corner
- Crank the car while pressing the gas pedal
-
step 2 :Disconnecting the Battery
- Loosen the 10mm nut on the negative battery terminal
-
step 3 :Removing the Rear Seat Cushion
- Feel the bracket underneath the rear seat and pull up firmly
- Remove the lower seat cushion
-
step 4 :Removing the Fuel Pump and Sending Unit
- Lift up the rubber access door
- Pop the harness cover out
- Pop off the main cover
- Disconnect the electrical connector
- Release the lock ring with a screwdriver, chisel, or punch and hammer
- Disconnect the fuel line and hoses
- Lift the pump and O-ring sideways and let it drain
- Disconnect the two-pin connector
- Remove the assembly
- Wipe off any spilled fuel in the compartment and on top of the tank
-
step 5 :Installing the Fuel Pump and Sending Unit
- Insert the lower half of the pump in at an angle
- Once partially installed, connect the lines and fitting
- Place the O-ring into place
- Connect the connectors to the lid
- Line the legs into the pump
- Hold the top over the tank
- Turn the lock ring as far as possible by hand
- Tap the lock ring back into place
- Press on the electrical connector
- Reinstall the fuel pump lid
- Reseal the harness boot
-
step 6 :Installing the Rear Seat Cushion
- Press on the back seat, push down, lock it in
-
step 7 :Reconnecting the Battery and Fuel Pump Relay
- Reconnect the negative battery terminal
- Reinstall the fuel pump relay
-
step 8 :Priming the Fuel System
- Turn the key to the run position three times, allowing the fuel pump to run
Tools needed
-
Hammer
Flat Blade Screwdriver
10mm Socket
Ratchet
Hi, I'm Mike from 1AAuto. We've been selling auto parts for over 30 years! We're dedicated to delivering quality auto parts, expert customer service, and fast and free shipping, all backed by our 100% satisfaction guarantee. So visit us at 1AAuto.com, your trusted source for quality auto parts.
In this video, we're going to be working with our 2006 Chrysler 300. We're going to show you how to remove and replace your vehicle's fuel pump or electronic sending unit located in the vehicle's fuel tank under the rear seat cushion.
If you like this video, please click subscribe. We have a ton more information on this and many other vehicles. If you need this part your car, you can follow the link down in the description over to 1AAuto.com.
Here are the items you'll need for this repair: 10mm wrench, flat blade screwdriver, punch, hammer, gloves, rags, safety glasses
Lift the rear carpet in your trunk. You will find your battery, your fuse, and relay panel here. We'll open that up. The bottom right fuse all the way in the back passenger corner here is the one for your fuel pump. We'll remove that. Now that the fuel pump relay is disconnected, we'll start our vehicle and allow it to run until it shuts down. This means that there will be no more fuel pressure in the vehicle and we can safely work on our fuel system without having to worry about a spill or spray. There you go. Won't even start. There's no fuel pressure.
Loosen the 10mm nut on your negative battery terminal and remove it from the battery. This will prevent any sparks or electricity when we're working on our fuel pump to reduce the risk of having a fire. Right about inline with this seam on the seat on either side in the rear is a small latch. All you have to do is give it a good firm pull up, one on each side. Lift out and remove your rear seat cushion.
Once you've removed your rear seat cushion, you'll find this access door is just rubber, so you can pop the harness cover out and then pop the main cover out and disconnect the electrical connector. We'll lay all that off to the side.
To release the lock ring, I'm going to use a screwdriver and a hammer. I'm using a rubber mallet just so I don't break the handle of the screwdriver. You could also do this with a chisel or a punch with a regular hammer, and tap the lock ring counterclockwise until it releases. Be very careful not to puncture the plastic tank when doing this. Once you've broken it loose, turn it off and remove it. Carefully lift the pump and O-ring out of the vehicle.
There is a quick disconnect fuel line here that's going to make it a little easier to remove this. Push down with a flat blade screwdriver and pull that line off. Disconnect these hoses here. There we go. Now we'll remove the main portion of the sending unit. Be sure to tip it sideways and allow it to drain out any fuel that's still in the base. We also have this two-pin connector on the top that we'll have to disconnect and rotate off of the harness and remove our sending unit assembly.
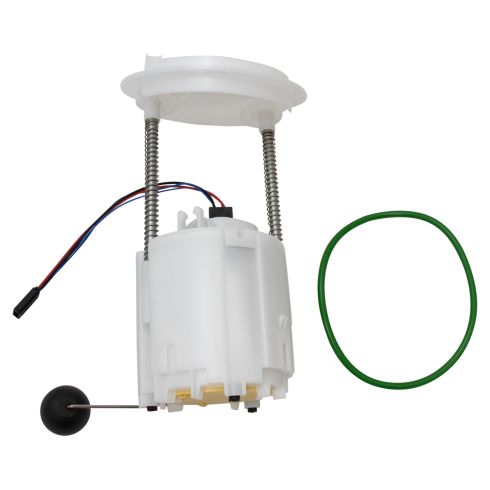
Here we have our old fuel pump and sending unit that we removed from our vehicle, and our new part from 1AAuto.com. As you can see, these parts are exactly the same, with the same lid, same pump. This is the float for your fuel gage. That's on there too. It even comes with a new O-ring to seal into our gas tank. Now this unit is responsible for the delivery of fuel via the fuel pump, which you can see here on both units, and for gaging the level inside of the tank, again, which is this little float ball and armature. Whether you're having an issue with fuel delivery or the gage on your dash is no longer working, this pump from 1A Auto is going to go in direct fit just like your original equipment, get your gages reading correctly, and your fuel flowing right, and fix you up right.
Now one very important step is going to be to wipe up any spilled fuel inside the passenger compartment because that is not only a fire hazard, but it also smells bad. We're going to want to wipe up any fuel that spilled on top of our tank. Again, this is a fire hazard, and it's just going to create a pretty strong odor inside of our vehicle that we don't want. Now be sure to only use a rag when doing this and be sure not to drop any debris into the tank. Any chemicals or solvents you try to use to clean this could potentially damage the plastic tank or have a poor reaction with your fuel, which is going to create more problems than it solves.
To reinstall your fuel pump, pull the lines out of the way and drop the lower half of the pump in. Be sure to place it in on an angle so you don't damage the level sensor. Once it's partially installed, you can snap the lines into place, as well as the quick connect fitting on the top. Place the O-ring into place and snap the connectors into the lid. We'll then line up the legs into the pump and hold it down over the tank.
Reinstall your lock ring, and turn it as far as you can by hand, at which point we'll use our punch and hammer to tap it back into place. Once the lock ring is back in place, we'll send our electrical connector through and reinstall it, snap the access panel back on, and reseal the boot for our harness. Reinstall the rear seat cushion. Be sure to pull your seat belts and buckles through the channels in the seat. Line up the tabs and push down firmly to resecure them.
Reconnect your negative battery terminal. Tighten it back down with your 10mm wrench. Reinstall your fuel pump relay and the cover. Close your trunk cargo area carpet. Now that everything's put back together, we'll need to prime our fuel system. To do this, turn the key to the run position and allow the fuel pump to turn on and shut off three times before cranking your vehicle and starting it. If it runs, your fuel system is primed and you're good to go.
Thanks for watching. Visit us at 1AAuto.com for quality auto parts, fast and free shipping, and the best customer service in the industry.
Shop Products
Dodge Chrysler Driver Side Fuel Pump Module Assembly TRQ FPA62021
Part Details:
- No
- Yes
- Gas
- Strainer
- Yes
- Electric
- 42.27 gph
- In Tank
- Yes
- 85 PSI
- 1
- 130 PSI
- 7.89 mm
- 991 Ohms
- 0
- No
- 51 Ohms
- Quick Connect
- No
- 38 gph
- 34 gph
Fuel Pump Connector Issue Tips 1A Auto
Learn a few tips about connecting a fuel pump adaptor in your GM vehicle in this 1A Auto video.
