How to Replace EGR Valve 1997-2001 Toyota Camry
Created on: 2016-09-08
If the EGR valve is worn out, failing, or defective, learn how to properly replace it with this short how-to video
-
step 1 :Removing the EGR Valve
- Remove the vacuum line from the EGR
- Remove the 12mm nuts from the EGR Valve
- Lift the EGR Valve off of its studs
-
step 2 :Installing the EGR Valve
- Insert the gaskets into place
- Insert the EGR Valve into place
- Tighten the 12mm bolts to the EGR Valve
- Connect the vacuum line
Tools needed
-
12mm Socket
Rust Penetrant
10mm Wrench
10mm Socket
Ratchet
Needle nose pliers
12mm Wrench
Brought to you by 1AAuto.com, your source for quality replacement parts and the best service on the Internet.
Hi, I'm Mike from 1A Auto. I hope this how-to video helps you out, and next time you need parts for your vehicle, think of 1AAuto.com. Thanks!
In this video, we're going to be working with our 1998 Toyota Camry, 2.2-liter automatic. We're going to be changing out the EGR valve here. This regulates the flow of exhaust gases in the intake side of the engine to control knocks emissions by lowering combustion temperatures inside of the motor. If this fails, it can create a rough idle, because the exhaust gases are getting in at a time that they are not designed to do so or they are getting too heavy of a flow of those gases.
If you like this video, please click subscribe. We have a ton more information on this video, as well as many other makes and models. If you want this part for your video, follow the link in the description. It's available from 1AAuto.com.
Here are the items you'll need for this repair: needle nose pliers, 10mm, 12mm socket/wrenches, ratchet, and penetrating oil.
Open the hood and secure the hood prop. The EGR valve is located here on the back side of the intake manifold. Move the vacuum line at the top of the EGR—you may have to twist this a little to get it to free up. We'll unclip that and move it off to the side.
We'll then move this vacuum line next, and we'll use a pair of needle nose pliers to reach down there. Twist that line a little. Remove the twelve millimeter nuts going into the studs on the intake manifold at the top of the EGR valve with a wrench. We use a ten millimeter sock and racket to remove the two bolts going into the EGR tube at the bottom of the valve. We've found that it was easier to remove the passenger side bolt with a ten millimeter stubby wrench and some penetrating oil. We did have the driver side bolt break, however, it broke off in the portion of the valve we'll be replacing. We'll just have to be sure to use a new bolt when it goes back in.
Now, we'll pull back on the EGR valve to release it from the studs and lift up to remove it from our EGR tube.
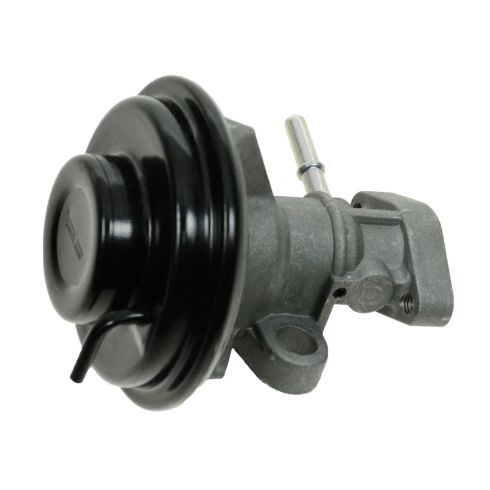
Here we have our old part that we removed from our vehicle and our new part from 1AAuto.com. As you can see, these parts are exactly the same. We have the same mounting locations at the top here as well as on the bottom. We actually had a bolt break off in ours, but fortunately, where this is the piece we're changing, we can just put a new bolt in this valve.
We have the same airline here as well as the ninety degree elbow on the top. Same sized diaphragm, same sized uptake line here.
If your vehicle needs a new EGR valve, this new part from 1A Auto is going to go in direct-fit, just like your original equipment, and fix you up right. Our surfaces are clean and free of debris. We'll install our gaskets into their proper locations.
We'll be lining up these holes with the studs on the intake manifold and threading our two ten millimeter bolts in here up through that exhaust pipe. After starting your ten millimeter bolts by hand, tighten them up with either a small socket and ratchet or a stubby ten millimeter wrench.
Install the two twelve millimeter nuts onto the studs of the intake manifold, bring them down with a twelve millimeter wrench.
Reinstall your vacuum lines, make sure they're on there nice and tight, clip them back into the retainer here, and you're good to go.
Thanks for tuning in. We hope this video helped you out. Next time you need parts for your car, please visit 1AAuto.com. Also check out our other helpful how-to and diagnosis videos.
Shop Products
How to Replace EGR Valve Vacuum Modulator 2001-03 Mercury Mountaineer
How to repair, install, fix, change or replace a failing, worn out, or defective EGR vacuum valve on 02, 03 Ford Explorer or Mercury Mountaineer.
