
How to Replace Door Lock Cylinder 2003-05 Honda Civic
Created on: 2016-03-31
Watch this video to learn how to fix a worn or damaged door lock. The experts at 1A Auto show you how to replace the door lock cylinder on your 03-05 Honda Civic.
-
step 1 :Removing the Door Panel
- Loosen the negative battery terminal with a 10mm wrench
- Pry up the trap door in the door pull with a flat blade screwdriver
- Remove the Phillips screw in the door pull
- Pry off the trap door in the door handle with a flat blade screwdriver
- Remove the two Phillips screws in the door handle
- Pry up the power window switch
- Disconnect the switch wiring harnesses
- Pull the door handle out and remove the door handle rod
- Disconnect the door handle wiring harness
- Remove the two Phillips screws previously behind the door pull
- Remove the sail panel
- Pry out the door panel with a door panel clip tool or putty knife
- Lift the door panel up and off
- Remove the pins from the water shield with needle nose pliers
- Carefully remove the water shield
-
step 2 :Removing the Door Handle
- Remove the two 10mm bolts from the window
- Lift the window up and out
- Remove the 10mm bolt from the bottom of the window track
- Move the window track out of the way
- Unlatch the latch rod clip
- Remove the two 10mm nuts from the door handle
- Push down on the retaining clip with a flat blade screwdriver
- Pull the retaining clip down with a bent tip pick tool to loosen the lock cylinder
- Pry out the door lock cylinder with a flat blade screwdriver
- Remove the plate
- Remove the door handle
-
step 3 :Removing the Door Lock Cylinder
- Disconnect the white clip from the door lock cylinder with a flat blade screwdriver
-
step 4 :Installing the Door Lock Cylinder
- Attach the door lock cylinder to the rod
-
step 5 :Installing the Door Handle
- Insert the door handle into place
- Insert the plate into place
- Hand tighten the 10mm nuts
- Insert the door lock cylinder into the door handle
- Reclip the latch rod
- Tighten the two 10mm nuts
- Insert the window track into place
- Tighten the 10mm bolt to the window track
- Insert the window
- Tighten the two 10mm bolts to the window
-
step 6 :Installing the Door Panel
- Replace the water shield and its clips
- Lift the door panel into place
- Push in the door panel clips
- Insert the sail panel into place
- Insert the two Phillips screws into the door
- Connect the wiring harness to the power window switch
- Press the window switch into place
- Connect the door lock switch to the door handle
- Connect the door rod into the handle
- Press the handle into place
- Tighten the two Phillips screws to the door handle
- Insert the trim panel into the door handle
- Tighten the Phillips screw in the door pull
- Press the trap door into the door pull
Tools needed
-
Socket Extensions
Flat Blade Screwdriver
Phillips Head Screwdriver
10mm Wrench
10mm Socket
Ratchet
Needle nose pliers
Pick
Brought to you by 1AAuto.com, your source for quality replacement parts and the best service on the Internet.
Hi, I'm Mike from 1A Auto. I hope this how-to video helps you out, and next time you need parts for your vehicle, think of 1AAuto.com. Thanks.
In this video, we're going to show you door lock cylinder replacement. This is a 2003 Honda Civic and this is the same for various body styles, 2003 to 2005 Civic. Items you'll need include: a new door lock cylinder or cylinders from 1AAuto.com, flat blade screwdrivers both large and small, Phillips screwdriver, 10 millimeter socket ratchet or wrench, a bent tip pick tool, and needle nose pliers.
10 millimeter wrench, loosen the negative battery cable terminal and disconnect the negative battery cable.
Start out, there's a screw in here and two screws behind here. To get this screw, you pull up on this trap door. Pry the top and pull down to expose two Philips screws here. All right, you pry up on the front of this panel, pull it up and out, and on the harness there's a little tab. Press the tab to disconnect.
Then up on the door handle, pull out, there's a little clip right here. Push the clip off. Pull the lock up and out. Two screws, one here and one here. Remove those. Unplug. Now we're going to remove this top quarter turn. Let it hang to the side, and then there are clips that go into the door that you need to release all the way around. You want to put your fingers in underneath and pull firmly. This door panel's been apart before, so it came apart pretty easily, but you want to release them on the bottom and then up top here. Up top here, and then the panel should pull up off the window ledge and off.
There are two plugs that hold your water shield on here, and there's one here. You can see somebody's already ripped the shield around that. You want to avoid doing that. Needle nosed pliers, just grab hold in the middle and avoid stretching it or tearing it. 10 millimeter socket, ratchet and extension, and we'll fast-forward as I remove those two bolts. With those bolts out, the window lifts right up and out.
Remove the 10 millimeter bolt that holds the bottom of the window track. Then reach in behind, pull the window track down slightly, and you should be able to move it out of the way. We'll move the clip that holds the latch rod. Use a flat blade screwdriver to start it, and then you can probably reach up in there with your thumb. You may need the flat blade screwdriver again to come in here and pry the rod out.
There are two 10 millimeter nuts: one here and one over here. Best way to get to this one is with an extension right through here. We do want to loosen up those two nuts first. We'll just loosen them up, and then we want to push down from the top. You can just see the top of the clip peeking up right there. You're going to use your screwdriver and push down on the clip a little bit. You get the clip to move, and then you're going to come in with your bent tip all in the bottom and pull the clip down. Push down on the clip from the top. Bring in your bent tip from the bottom and if the stars align correctly, pull it down and then reach the screwdriver up in there and pry out. You can push the lock right out. Remove the two 10 millimeter nuts the rest of the way. The plate will come out. The clip's hanging down, so just pull the clip off or out, and then your handle comes right out.
Bring your locks on out with a flat blade screwdriver, there's a little white clip here. The original lock cylinder from the vehicle and the new one. Like I said, it's an OE replacement, so obviously everything's going to be exactly the same, and this is going to install in your vehicle just like the original.
You will have to add a key to your key ring in order to get into your door.
Re-installation is just a reverse of the procedure. You can see we're just installing our original lock, there's nothing wrong with it. Put it on, put the clip over. Set it down, put it inside through the door handle.
To reinstall the handle, put it up in place. Provide some upward pressure and put it right in. Put the plate back up in place and start the nuts on. Take the lock, push it back in place, and make sure it clicks. Reinstall the latch rod, put the clip down. If necessary, always bring in a screwdriver from the top. Tighten up the two 10 millimeter nuts, and we'll fast-forward as I do that. Put this back in place. Put your channel back in place and it should slide right up and in and replace the 10 millimeter bolt tight. Window back in.
Put the front down in and then tilt it backwards. Bring the front up, make sure it goes into the weather strip in the front, and make sure it goes correctly into the back and it slides nice and easy. Put the 2 bolts back in that mount the window to the regulator. I just load them into the socket first and then carefully put them in. If you drop them down, it's pretty easy to reach in there. We can fast-forward as we tighten those up.
Okay, battery connected, key on, just do a quick test with the window in place. Everything's working well. Put your water shield back in place. Pull the harnesses through there and use your two push clips, one in the front here. We use a little extra duct tape to hold it up. I'm not going to take the push clip, I'm just going to pinch the shield in there, push the clip in, and then secure it around the edges. Make sure this is out of the way, bring your panel up. Make sure the small harness goes through your door handle hole, and then the larger harness needs to go through the power windows. Lift it up. Make sure that the harness for the speaker doesn't get caught. Push it towards the window and down onto the ledge starting in the front. Get your lock to come through.
Make sure your lock comes through, push it down on the window ledge and it should be right in place and reinstall the clips. This clip right here has been put in incorrectly too many times, so I have to actually guide it into the hole. There's the hole. Reinstall your upper trim panel here.
Reinstall the two screws for the door pull. We'll fast-forward as I do that. Reconnect your power window switch and then the back goes down in first in place. Then reconnect your door lock switch. Put the latch rod back in place then spin the clip around, push it in. Put that back in place. Just fast-forward as we put those fasteners back in place, then put that trim panel back in place. Put this last screw back in place, then flip the trap door down.
Reconnect your negative battery cable and tighten with a 10 millimeter wrench.
Thanks for tuning in. We hope this video helped you out. Next time you need parts for your car, please visit 1AAuto.com. Also check out our other helpful how-to and diagnosis videos.
Shop Products


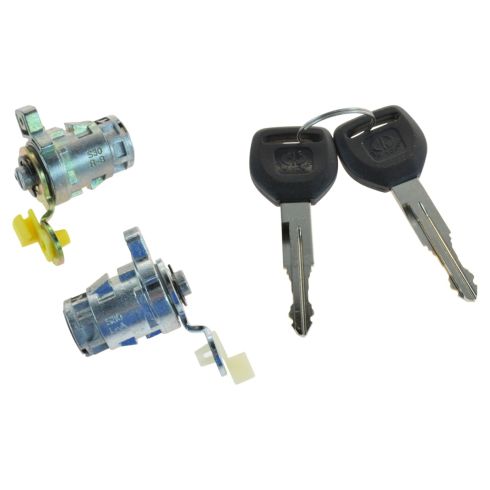
Honda Accord Civic Odyssey S2000 Front Driver & Passenger Side 2 Piece Door Lock Cylinder Set TRQ BDA69221
- (2) Door Lock Cylinders
- (2) Keys
- 2 Piece

How to Replace Door Lock Kit 1993-1997 Ford Ranger
This video shows you how to install a new door lock cylinder on your 1993-1997 Ford Ranger.

