How to Replace Distributor Cap 1998-2003 Dodge Durango
Created on: 2010-12-29
Learn how to replace a broken distributor cap in your 92-03 Dodge Durango. You can do it yourself, and 1A Auto will guide you in this video.
-
step 1 :Removing the Distributor Cap
- Use and adjustable wrench to loosen the air intake.
- Unclip the intake box.
- Lift it up and set it aside.
- Find the firing order on the manifold.
- Follow the wires from the car 1,3,5,7 on the drivers side front is 1. 2,4,6,8 on the passenger side starting with 2. Follow the wires and mark them as they plug into the distributor cap.
- Unplug the wires.
- Remove the two 7mm bolts securing the cap.
- Pull the distributor cap up and out.
-
step 2 :Replacing the Distributor Cap
- Pull the rotor up and out from under the cap.
- Push the new one into place.
- Put the distributor cap into place.
- Replace the two 7mm bolts.
- Reconnect the wires in the order of the firing order. 1 is by the passenger side bolt. From there follow the order. Push until they click.
- Start the vehicle to test it.
- Put the air intake back into place and secure it.
Tools needed
-
Adjustable Wrench
Socket Extensions
Phillips Head Screwdriver
7mm Socket
Ratchet
Brought to you by 1AAuto.com, your source for quality replacement parts and the best service on the internet.
Hi, I'm Mike Green. I'm one of the owners of 1A Auto. I want to help you save time and money repairing and maintaining your vehicle. I'm going to use my 20 plus years of experience restoring and repairing cars and trucks like this to show you the correct way to install parts from 1AAuto.com. The right parts installed correctly, that's going to save you time and money. Thank you and enjoy the video.
In this video, we're going to show you how to replace the distributor cap and rotor on this Dodge Durango with the 5.2L V8, very similar to many Dodge vehicles with the V8 engines.
Tools you'll need are, for this vehicle is an adjustable wrench to get the nut of the top of the throttle body and then a 7mm Socket and Ratchet and a Philips Screwdriver, the short style Philips Screwdriver.
The distributor cap is in behind here and what I'm going to do is remove this air intake, so adjustable wrench. I'm going to unclip my box here and lift this up and off. Just move this right out of the way like that. Here's the distributor cap back in here. Now, before you go pulling the wires off, very important information, and it's right up here in front of your throttle body. Under that tube, hopefully you can see it, it says, firing order and then it says, 1-8-4-3-6-5-7-2. That's a little difficult to see but it's this line right here.
That tells you - that 18436572 - that tells you how the engine fires. The one and eight and four, it refers to the number of the cylinder. On the Dodge is number one is the driver side front cylinder, and that would be the left bank. It would be, one, three, five and seven. Then on the right side, it's two, four, six, and eight. Basically, when this engine is running, number fires then number eight fires, then number four fires and so on. On your distributor, that's the order that the wires are going to be in. What I've done is I just started and grab hold of the number one wire here, and followed it around and found that it came right here, and I labeled it, number. Then, I followed the number eight wire and found the that it came in here right beside number one. You could see, I've written the number eight on that wire. Then, I just followed the progression and labeled all these wires. You can see that I've labeled this one on number four, this one three, and this one is six, five, seven, and then finally two.
Now, I'm going to note the number one. Here's number one right here and it is just in front of where this bolt is. Now, I can remove all my wires and then also, there's this one wire in the middle. That's the coil wire, so I label that coil. Now, I can remove all these wires. What you want to do is just kind of twist them all a little bit and pull up. Twist and pull up, so I'll remove all them.
My new cap is labeled with the number one here, so I know that's where to start the one. Also, you remember, we saw here's the screw and there's a square on here and rounded on this side. The square is the one that's on the passenger side and so we know number one is just in front of that square.
I'm going to use a 7mm Socket and Ratchet with a little extension. I was just going to speed this up so you don't have to just see me turning the wrench. I loosen that one up and then I go over on to the driver side and it's kind of hard to definitely press the wrench down on there to get in on the bolts and then loosen it up. Use a screwdriver to get it the rest, the way out. Once again, I'll speed up as I work at here with the screwdriver. Just working those bolts the rest of the way out.
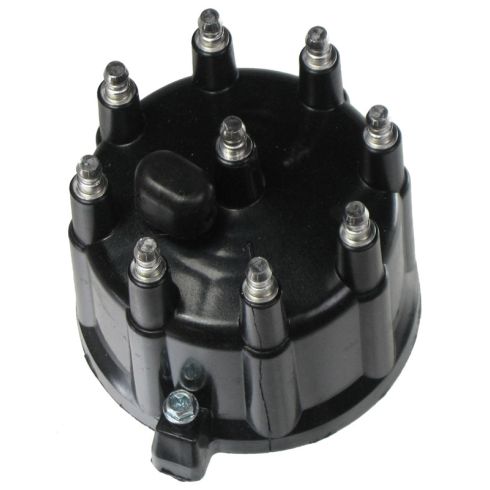
There's our distributor cap and that's what can happen. You can see the contacts and they're all really corroded, causes misfiring. The new cap, slide it in there the same way. Before we put the distributor cap down on there, we're going to replace the rotor and here's my new rotor. The rotor just pulls up, you take it a little bit and off, so the old one and new one. There is a grove inside the rotor that has to line up on the shaft and once you do that, put that down on there.
Now, take our cap. Make sure there's no wires or anything in the way. That on nicely. Start with my short screwdriver to start the fasteners in there a little bit. We'll just fast forward here as I use the screwdriver. I do use the screwdriver to start them in there and tighten them up to get them nice and snug. With that screwdriver, you should be all set. It's nice and tight. I got my number one there, there's my number one wire. One, and then from my firing order here on the manifold, I'll find number eight. There's my coil wires, I know that goes right in the middle. Here's number eight. One, eight then four. That's six and four.
I'll speed it up as I follow that firing order, one, eight, four, three, six, five, seven and two and then make sure the coil wire and those wires you want to push them down until they click so you know that they're on there tight. I'll do a quick startup just to make sure. Okay. Starts up fine. You can put our air cleaner assembly together, and that's set.
We hope this helps you out, brought to you by www.1AAuto.com, your source for quality replacement parts and the best service on the internet. Please feel free to call us toll-free, 888-844-3393. We're the company that's here for you on the internet and in person.
Shop Products
How To Replace Distributor Cap and Rotor Ford 1992-96 F-150 F2-50 F-350
Follow this video in order to see how to replace the distributor cap and rotor on your 92-96 Ford F-150/250/350
