
How to Replace Distributor 1996-2000 Nissan Pathfinder
Created on: 2018-07-13
How to repair, install, fix, change or replace a bad or broken ignition distributor on 00 Nissan Pathfinder
-
step 1 :Disconnecting the Battery
- Disconnect the negative battery terminal with a 10mm wrench
-
step 2 :Removing the Distributor
- Remove the Phillips screws from the distributor cap
- Lift the cap off and set it to the side
- Place a 1-1/16" socket and ratchet on the engine crank
- Turn the crank clockwise and crank the engine to top dead center (pointer will be aligned with second mark on the pulley with one mark to the left and three to the right)
- Mark the location of the rotor with a pen
- Disconnect the electrical connector
- Remove the 12mm bolt from the distributor with a socket, ratchet, and magnet
- Lift the distributor up and out
- Mark the second location of the rotor
-
step 3 :Installing the Distributor
- Remove the Phillips screws from the new distributor
- Remove the cap from the new distributor
- Based on the markings on the old distributor, place markings on the new distributor in the same location, using a ruler and marker
- Line the distributor into place, setting the rotor until it meets the top dead center marking
- Tighten the 12mm bolt snug
- Connect the wiring harness
- Place the distributor cap on
- Tighten the Phillips screws to the cap
- Transfer the wires, wire-for-wire, from the old cap to the new one in their correct locations
-
step 4 :Reconnecting the Battery
- Connect the negative battery terminal with a 10mm wrench
-
step 5 :Checking the Engine Timing
- Let the engine run up to operating temperature
- Attach the timing light connections to the appropriate terminals on the battery
- Attach the lead to the #1 spark plug wire on the distributer cap
- Rev the engine a few times
- Disconnect the throttle position sensor electrical connectors
- Set the timing light to 15 degrees before top dead center
- Aim the timing light down at the crank
- If needed, loosen the 12mm bolt on the distributor a bit
- Aim the timing light down at the crank
- Once ready, tighten the 12mm bolt
- Aim the timing light down at the crank and recheck the timing
- Connect the throttle position sensor connectors
- Disconnect the timing light
Tools needed
-
12mm Socket
Socket Extensions
Phillips Head Screwdriver
Timing Light
10mm Wrench
Ratchet
Swivel
Magnet - Extendable
1-1/16 Inch Socket
Marker / Writing Utensil
Hi, I’m Mike from 1A Auto. We’ve been selling auto parts for over 30 years!
You're going to disconnect the battery and use a 10 mm wrench, and put that out of the way. Before we pull the distributor out, we're going to want to pull the cap off so we can see the orientation of the rotor. So I'm going to loosen up the bolts on the cap with a Phillips head screwdriver. And these bolts should stay with the cap. We'll just set that aside.
So before I pull the distributor out, I want to set the engine to top dead center, so I'm going to use a 1-1/6" socket and a ratchet. You're going to go down to the crank, and then just turn the engine. As I turn the engine, you can see the rotor is turning. You want to turn this clockwise. All right. Okay.
So this is where, right here, this second mark in is top dead center. You want that lined up with this little tang that comes out of the timing cover. So that's your top dead center. This right here is five degrees after top dead center. This is five degrees before top dead center. This is 10 degrees, and then this is 15 degrees before top dead center. So that mark right there is top dead center. This engine is timed at top dead center right now, so before we pull the distributor up, I want to mark the location of where the rotor is. So I'm going to make a line right here, and that lines up that part of the rotor, so when we go to install the new one, we want the new one lined up just like that when it's all the way down.
All right, at this point I can disconnect the electrical connectors. There's a little retainer underneath this connector. You push it in. When it's pushed in, that releases the lock, and I can pull it out. Oops. This is how it pushes in, just like that. That releases it. And there's a connector right here. Disconnect this connector. All right, I'm going to use a straight blade screwdriver. I'm just going to push this retainer in, and that will release the connector once I push that in. Push down on that center piece, and then disconnect the connector.
So if we were going to reuse this distributor, we had to take it out of the way for a certain reason, we could mark the base of the distributor right there and just use the felt tip pen. That's the base of the distributor, and this is a plate that's connected to the engine. That would give you a base line for where you're timing is right now. But we're going to replace the distributor, so it doesn't really matter for us to remark that. All right, so now we're going to take the distributor bolt out.
There's a 12mm bolt right down here, and this is the bolt you would loosen up if you had to adjust the timing as well. So I'm going to use a socket, a universal, and an extension and a ratchet to loosen this up. Once it's loose, be careful not to drop it. It'd be easier to grab the bolt with a magnet if you had a magnet. So we'll pull that bolt out.
What I'm going to do is I'm going to pull this up slowly. Before I pull it out all the way, this is where the rotor was when it came up. So what I want to do is mark it right there, because when I put the new distributor in, I want to set the rotor to that location so that when I drop it down, the rotor will move over to the top dead center location. That is because of the splines down here. When it drops down, the splines are going to twist the rotor to that location.
Here's our old distributor. Here's our new distributor from 1aauto.com. As you can see, the cap is the same. The connectors are the same. This connector is the same. If we remove the cap, here's the rotor. It comes with a cap and rotor. There's the old rotor. It comes with a new coil, a new coil in there as well. You will have to take the cap off when you're installing it to time it properly. Get yours at 1aauto.com, and you'll be ready to rock and roll.
Okay, so when we get our new distributor, we're going to have to take the cap off. Just take a Phillips head screwdriver. Take these two screws out. And this one here, loosen this one up. Pull the cap off. Now this rotor, we're going to have to orient this rotor according to our old one. So the position for the old one was right about there, so we want to take the new one and do pretty much the same.
All right, so we want to line this rotor up with where our rotor came off. So if you look in it, it's right about there, and then I'm going to measure where this line is in relation to this piece right here. It's a little less than an inch, so I'll just mark this. Take our ruler, and just mark it right about there.
So when we install this distributor, we want our rotor facing that mark right there, and that should be at top dead center. Okay, line this up. Okay, so that looks pretty close. I'm just going to try this again. If I move this just a little bit this way. So, if I put this off a spline, it's pretty obvious that I'm not close to where I need to be. So this looks good going down there, and then if I went up again, let's just see if I moved it over one more spline.
Okay, so it's going to be pretty significant that you're not even close to the mark if you are off. So doing that there, I'm confident that that is exactly where it's supposed to be for top dead center. All right, now we're going to reinstall the bolt. I'm going to be careful not to drop this. Slide this in here. Then we'll take our 12mm socket, universal extension and ratchet, and we'll get this started. I'm really not going to tighten it up too much, just a little bit, because we're going to have to adjust this afterwards. Just snug so it won't turn. I can loosen it up while the engine's running.
Next we can plug this electrical connector in, slide this down here, line it up, and push it in and lock it in. All right, I'm just going to grab a screwdriver, straight, and try to pull that lock out so it stays secured, and then this little retainer that holds this electrical connector on over here, and this goes this way. Just slide that on here, just like that, and then we'll take this electrical connector, connect this one right there and lock that in.
All right, now we'll take our distributor cap. Now, the distributor cap goes on this way. You can see this is where the coil feeds. Right there is the coil, so line that up like that. Then we can tighten these two Phillips head screws down. And then this Phillips head screw. Make sure this wire's out of your way. You don't want to pinch that wire. Just snug on the cap. Then we're going to transfer the wires over. The caps are marked, so cylinders one, two, three, four, five, and six, and the new cap is marked as well, so we can just take these wires off and move them over to here. One, two, three, four, five, and six.
We're going to reconnect the negative post on the battery. Take a 10 mm wrench and tighten up the bolt. That's snug.
At this point, we're going to start the vehicle, and then we're going to let it run so that the engine warms up, and then we can adjust the timing with a timing light. All right, we're going to adjust the timing now. We're going to take our timing light, we're going to attach the black terminal to the negative on the battery and the red on the positive on the battery, and then this lead goes over the number on spark plug wire, so you just slide that on like that.
Every time, the light might be a little bit different. You want to make sure the engine is warmed up to full operating temperature. Before we actually check this, we're going to rev the engine a couple times, let it balance out. Then we're going to disconnect these connectors on the throttle position sensor, push down on that, disconnect that wire, and then disconnect this one as well. You're going to hear the idle change a little bit, and that's going to take the computer out of timing mode. I'm going to take the timing light and set it to 15 degrees before top dead center. As you can see right here, it says 15 degrees before top dead center, so that's where we want to set our timing.
So now we can aim it down at the crank. As you can see, it's just about where it needs to be. So to adjust that, what we're going to do is we're going to take a 12 mm socket, a swivel, and an extension and a ratchet. We're going to loosen up this bolt on the distributor right here just a little bit, and we're going to check this, and as we're checking it, we can rotate the distributor. Okay, so as you can see, we're looking at the second line from the left. That is top dead center. And because we have our timing light sent to 15 degrees before top dead center, that's exactly where we want to be. So now I can tighten down the distributor, just snug that down. Recheck it just to make sure, and it looks like it's perfectly timed. Now I can remove my socket. I can reconnect the throttle position sensor. Get that in. Okay, now I can remove my timing light.
Thanks for watching. Visit us at 1AAuto.com for quality auto parts, fast and free shipping, and the best customer service in the industry.
Shop Products


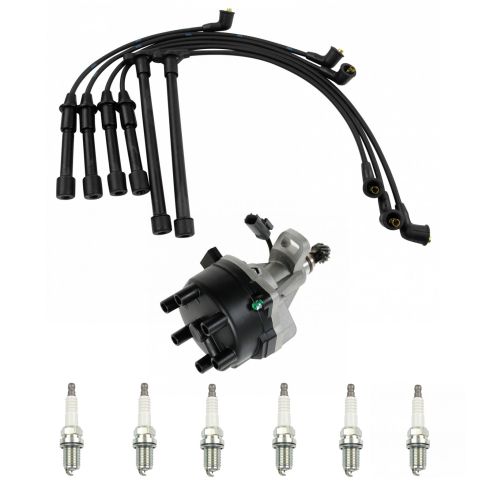
Nissan Infiniti 8 Piece Ignition Kit DIY Solutions IGN01265
Part Details:
- Expert-Designed with Premium Materials
- (1) Distributor
- Premium Performance and Fit to Save on Fuel
- Designed to Replace Your Original Wires
- 8 Piece
- (1) Spark Plug Wire Set
- (6) Spark Plugs

How to Replace Distributor 1988-2002 GMC Sierra 1500
This video shows you how to install a new distributor in your 1988-02 GMC Sierra.
