How to Replace CV Axle Shaft 2002-05 Mercury Mountaineer
Created on: 2014-10-20
Check out this video to learn how to replace the CV axles on your 02-05 Mercury Mountaineer or Ford Explorer.
-
step 1 :Removing the Wheel
- Pry off the center cap with a flat blade screwdriver
- Remove the 30mm hub nut
- Loosen the 19mm lug nuts with the vehicle on the ground
- Raise the vehicle with a floor jack
- Secure the vehicle on jack stands
- Remove the lug nuts
- Pull off the wheel
-
step 2 :Loosening the Axle
- Remove the 18mm control arm nut
- Twist the 18mm on by hand a few threads
- Hammer the wheel knuckle until it slides down
- Hammer the axle out with a pry bar
- Remove the 18mm nut
- Pull the wheel knuckle forward
-
step 3 :Removing the Stabilizer Link
- Insert a 15mm socket and ratchet on the top
- Insert a 16mm socket and ratchet on the bottom
- Remove the bolt and remove the stabilizer link
- If the link is broken, fill the top with rust penetrant
- Insert locking pliers onto the bar
- Remove the lower bolt with a 16mm socket and ratcher
- Remove the plastic tube, remove the rest of the plastic with a hammer and chisel
- Use locking pliers on the upper bushing and remove the lower nut
- Hammer out the stabilizer link
-
step 4 :Removing the Axle
- Turn the wheel knuckle
- Slide the axle back and remove it from the hub
-
step 5 :Installing the Axle
- Insert the axle into the hub
- Preliminarily tighten the hub nut
- Insert the axle into the differential case
- Push the ball joint into the wheel knuckle
- Hand tighten the 18mm nut
- Check to make sure the axle is in place
- Tighten the 18mm nut
- Tighten the 18mm nut to 90 foot-pounds
-
step 6 :Reinstalling the Stabilizer Link
- Slightly jack up the other side of the vehicle
- Insert a washer onto the link
- Insert a bushing onto the link
- Insert the stabilizer link into place
- Insert a bushing onto the link
- Insert a washer onto the link
- Insert the tube onto the link
- Insert a washer onto the link
- Insert a bushing onto the link
- Insert the link through the sway bar
- Insert a bushing onto the link
- Insert a washer onto the link
- Tighten the 15mm nut to the top of the link
- Lower the jack
- Tighten the 16mm nut on the bottom of the link
-
step 7 :Reattaching the Wheel
- Slide the wheel into place
- Start the lug nuts by hand
- Tighten the lug nuts preliminarily
- Lower the vehicle to the ground
- Tighten the hub nut to 180 foot-pounds
- Tighten the lug nuts to between 100 foot-pounds in a crossing or star pattern
- Reattach the center cap
Tools needed
-
A Piece of Pipe (for leverage)
Torque Wrench
Pry Bar
16mm Socket
Jack Stands
18mm Socket
19mm Socket
30mm Socket
Ratchet
Floor Jack
Brought to you by 1AAuto.com, your source for quality replacement parts and the best service on the Internet.
Hi, I'm Mike from 1A Auto. I hope this how-to video helps you out, and next time you need parts for your vehicle, think of 1AAuto.com. Thanks!
In this video, we're going to show you how to replace a front CV axle shaft on this 2003 Mercury Mountaineer. We'll show you on the passenger side, but the driver side is the same procedure. The items you'll need include a new front CV axle shaft from 1AAuto.com, 16mm, 18mm, 19mm, and 30mm socket and ratchet, a piece of pipe for extra leverage, jack and jack stands, torque wrench, and a pry bar.
Remove the center cap using a screwdriver. Then the hub nut is a 30mm nut, and you can use a ratchet with a pipe. If you have a breaker bar, something with more leverage, you can do that. You basically want to remove the nut the whole way at this point. We'll just fast-forward as Mike removes those 19mm lug nuts. If you don't have air-powered tools, you want to loosen them while the vehicle's on the ground, raise the vehicle, and remove them the rest of the way. Now you can pull the wheel free.
Now remove this 18mm nut. We'll fast-forward as Mike does that, and you can see he's using a piece of pipe for some extra leverage. Once you remove that nut, just put it back on a few threads. Then take a hammer and hammer your wheel knuckle. You want to do this until it breaks free and slides down by itself.
On the back of your axle here, just place a pry bar. Just hammer the axle out. Now remove that 18mm nut and pull your wheel knuckle forward. You want to make sure that the axles free, so that it won't get damaged. Remove the stabilizer link. We're just showing you the driver's side. You use 15mm socket and ratchet on top and the 16mm socket and ratchet on the bottom. Remove that top nut. Take the link bolt out, and remove the link. That's if everything works out. On the side we're working on its broken, so we use some penetrating oil.
One thing you do is - this is pretty typical - it breaks off up top here, you saw where you just filled it up with penetrating oil, and then we're just kind of messing around with it. We lock some locking pliers onto it. Now we've got that penetrating oil really helped the bolt start up. We've basically broken the plastic here. Now this plastic tube will slide off. We're just going to use a hammer and chisel to remove the rest of the plastic, this of course is worst case scenario. You just want to remove the plastic then use some locking pliers. Then just remove the nut on the bottom, or at least loosen it up as much as you can. Then just hammer this down and put. Turn your wheel. Then come back here and just pull your axle out. Then slide it back, and pull it out of the hub. Then push it down and out of the control arm.
To reinstall the axle, feed it kind of off to the side of the differential case, and then in. Once you've got it into the hub, just replace that hub nut. Just kind of tighten it up preliminarily. Then take the back end of the axle, and feed it back into place. You just want to keep pushing and moving it up and down, and pushing back until it goes all the way back into place.
Push the stud back into the wheel knuckle. Then replace that 19mm nut. Make sure your axle's pushed all the way back in. It should just feed right back into place. Then tighten up that 19mm nut. Then just torque that nut to 90 ft lbs.
Next, I'm going to reinstall the sway bar link, and you want to jack up the other side just slightly. Now replace your sway bar link. The other it should go in is washer, bushing, control arm. Then bushing, washer, the tube. Then another washer, then the bushing, then your sway bar. Then another bushing, another washer, then the nut. You want to just tighten that nut preliminarily, then release the jack.
To tighten these up, you want to have the car, I've got the jack stands supporting the control arm, and the car pretty much level, so it's at its ride position. Then you just want to tighten this up until all of these bushings are just squeezed down, and they're contacting the washer as well.
Replace your wheel. Then replace all the lug nuts and tighten them preliminarily. Then you'd want to lower the vehicle and tighten them the rest of the way. Then torque each of these in a crossing pattern, to 100 foot-pounds. Now torque that hub nut to 180 foot-pounds. Now replace your hub cap. Just line it up and hit it back into place.
We hope this video helps you out. Brought to you by www.1AAuto.com, your source for quality replacement parts and the best service on the Internet. Please feel free to call us toll-free, 888-844-3393. We're the company that's here for you on the Internet and in person.
Shop Products


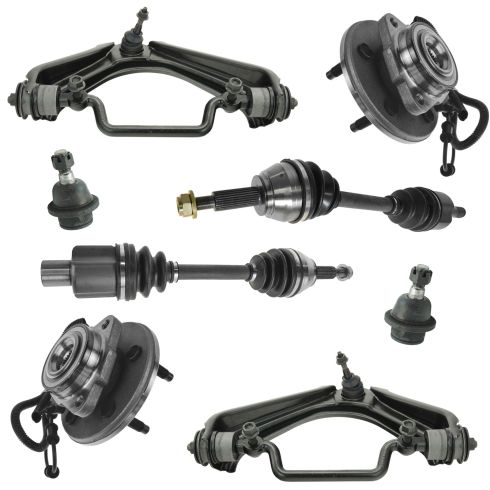
Ford Lincoln Mercury Front 8 Piece Suspension & Drivetrain Kit TRQ PSA56075
Part Details:
- (2) Front Lower Ball Joints
- (2) Front Upper Control Arms with Ball Joints
- (2) Front Wheel Bearing & Hub Assemblies
- Tapered Roller Bearing
- 8 Piece
- (2) Front CV Axle Assemblies

How to Replace Passenger Side CV Axle 2006-11 Honda Civic
How to repair, install, fix, change or replace broken, worn, or vibrating CV axles on 2008 Honda Civic.
