How to Replace Cooling Fan 2007-10 Hyundai Elantra
Created on: 2019-07-02
The radiator fan is critical to the cooling system when driving slow or idling. Learn how to replace the fan in your 07-13 Hyundai Elantra with this video!
-
step 1 :Removing the Cooling Fan
- Remove the two 10 mm screws to remove the air collector
- Disconnect the radiator overflow hose from the radiator, and set it aside
- Disconnect the radiator fan electrical connector
- Remove the 10 mm screw to remove the hose retaining clip at the top of the radiator fan
- Pry the retaining clip on each side of the radiator to disconnect the radiator fan mounting brackets
- Lift and remove the radiator fan
-
step 2 :Installing the Cooling Fan
- Reposition the radiator fan on the radiator
- Reconnect the electrical retaining bracket to the radiator fan
- Reconnect the radiator fan electrical connection
- Reposition the upper radiator hose retaining bracket on the radiator fan and secure it with the 10 mm bolt
- Replace the radiator overflow hose in the retaining clips on the radiator fan
- Reconnect the radiator overflow hose to the reservoir
- Reinstall the air collector and secure it with the two 10 mm bolts
Tools needed
-
Socket Extensions
10mm Socket
Ratchet
Pocket Screwdriver
Hey, friends. It's Len here at 1A Auto. Today, I'm working on a 2007 Hyundai Elantra. I'm going to show you something fairly simple. We're going to remove the fan shroud. For any parts or instructional videos, you can always check us out at 1AAuto.com. Bags. So now it's time to get this out of the way. That's just an air inlet, okay. It goes down to your air filter box. We've got a 10 millimeter here and there should be a 10 millimeter there, so if you have two, remove two, you have one, remove one. Either way, remove the anchoring bolts with a 10 millimeter. Once you have that out, we'll go ahead and remove the air duct. That's what this one looks like. Just going to pull it right off. Let's get this out of the way. I'm just going to pull it off of here.
There we are. Try to work that out of there. That out of there. Cool. We'll set this right aside and move along here. We've got electrical connectors. We take off the bottom side. Just going to put this in here. Give this a little wiggle. We'll take a peek. As you can tell, there's no funny colors. You always want to check your electrical connectors. We'll put this aside, this wire right here, it goes right to the motor so we don't have to worry about taking any of this apart.
Awesome. Get this off of here. We can take that off. See if I can get my socket on. Here we are. Put that right there and set it aside where we can find it again, pf course. Perfect. So we're looking pretty good here. On the radiator itself, it has a little piton. You just kind of pull it away and then you can lift up on the fan shroud. Just like that. I'm going to do the same thing on the side. It's just a little piton, pull it away, lift up. And I'm going to take this, going to see if I can work it up. Okay. So, we'll just keep on trying. There's a couple of things to think about here.
Over on this side, it's kind of hitting on the upper hose area of the radiator. So if you find it to be too much of an issue and you don't want to deal with it, what you could do is grab a coolant receptacle, put it underneath the bottom there. You can drain some coolant out with your petcock at the bottom there on the passenger side of the radiator. Once you drain the coolant down low enough, you don't have to drain it all completely out, but you want it to be at least low enough so it's not all up here. You can just go ahead and squeeze this clamp, pull it away, and then get your hose off. You might have plenty of room at that point. I'm going to keep trying a little bit here without actually taking it off just because I don't want to have to drain the coolant out to do this job. There we are. We've removed our fan shroud.
Let's go ahead and get this fan shroud back in, shall we? You want to put it in this way. No, we're going to put it in this way, right? We've got our electrical connector over here. I'm going to try to keep it fairly straight. I'm going to be careful for my O2 sensor, and of course my radiator fins. Just going to see if I can get it past all this. No, okay. Let's see what's holding us up. There it is. Just keep wiggling it. There we go. Okay, on the backside of the radiator, the engine side, there's little hooks like this along the bottom and then there's hooks along the top as well. The top ones lock in, so we want to make sure we have it settled in to the bottom ones. Of course, those are the harder ones to see, and then make sure they're lined up with the top ones as well, which it looks like it is.
I'm going to give it a little bonk. Bonk, bonk, bonk. Here we go, that's my thing. We got our little clippy-do that we took off. Push that in there. We've got our electrical connector with our lock facing towards the engine. Give it a little squeeze. Listen for a click, double click, bonk. There we are. Just want to make sure that this is fully locked in. Okay. Right here. We've got this. It's going to go right like this into there. We're going to tighten this down with a 10 millimeter. Here we go, feels good. Nice.
Purpose of this is to keep the upper hose from going near the fan, and/ or the heat of the exhaust. So it looks like we're cruising right along. Get this right here. Just get it kind of set where we know it's going to need to go. Just clip it in. It's fairly easy. It's going to go right on here. This is the overflow hose. As your engine coolant gets warm, fluid expands, so when this is full, it's going to expand. It has to go somewhere. The radiator cap is going to do its job. The little plunger is going to go up. It's going to let coolant come through here and then fill up your overflow.
We've got our air intake. I'm going to start it into the air filter housing first. I'm going to set it down onto this right here and I'm going to bring it down right to there. I'm going to put this bolt back in. Get it lined up. Should be two, there's only one broken bolts. Feels pretty great. All right, let's get to filling her up.
Thanks for watching. Visit 1AAuto.com for quality auto parts shipped to your door, the place for DIY auto repair. And if you enjoyed this video, please click the subscribe button.
Shop Products
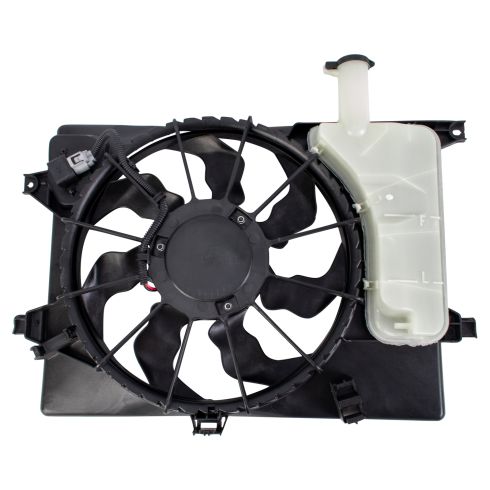
2007-10 Hyundai Elantra Engine Cooling Fan Assembly TRQ RFA80420
Part Details:
- 1
- 7
- No
- Black
- Male
- 3
- No
- Yes
- Plastic
- Black
- Plastic
- Brushed
- Male
- Yes
- Yes
- 435 mm
- 435 mm
- 17.13 in
- 17.13 in

How to Replace Radiator Cooling Fan Assembly 2005-06 Chevy Silverado V6 4-3L
How to repair, install, fix, change or replace a broken radiator dual fan assembly. If your car overheats or runs hot and the radiator cooling fan will not turn on then this may be your solution. This video shows the process for the 05, 06 Chevy Silverado
