How to Replace Coolant Temperature Sensor 2002-06 Jeep Liberty
Created on: 2014-01-28
Watch this video and learn how to replace the coolant temperature sensor in your 02-07 Jeep Liberty. It's an important part of your cooling system!
-
step 1 :Draining the Coolant
- Twist off the coolant tank cap
- Have a drain pan ready
- Remove the radiator drain plug with a 16mm wrench
- Allow the fluid to drain
-
step 2 :Removing the Coolant Temperature Sensor
- Disconnect the wiring harnesses to access the coolant temperature sensor
- Re move the coolant sensor with a 3/4 inch socket and ratchet
-
step 3 :Installing the New Coolant Temperature Sensor
- Insert the coolant sensor with a 3/4 inch socket and ratchet
- Connect the wiring harnesses
-
step 4 :Refilling the Coolant
- Tighten the radiator drain plug with the 16mm wrench
- Refill the coolant tank
- Twist on the coolant tank cap
- Loosen the coolant bleeder plug with an 8mm Allen bit
- Run the engine
- Check the coolant level
- Add coolant as necessary
- Tighten the bleeder plug with an 8mm Allen bit
Tools needed
-
3/4 Inch Socket
Funnel
Socket Extensions
Flat Blade Screwdriver
16mm Wrench
8mm Allen Wrench
Drain Pan
Ratchet
Brought to you by 1AAuto.com, your source for quality replacement parts and the best service on the Internet.
Hi, I'm Don from 1A Auto. I hope this how-to video helps you out, and next time you need parts for your vehicle, think of 1AAuto.com. Thanks.
In this video, we're going to show you how to replace the coolant temperature sensor on this 2006 Jeep Liberty with the 3.7 liter V6 engine. The items you'll need for this are a new coolant temperature sensor from 1AAuto.com, a 16 millimeter wrench, a drip pan, a flat blade screwdriver, a funnel with a screen, a 3/4 inch socket and ratchet with an extension, and an 8 millimeter Allen bit.
Remove the cap to your coolant reservoir. Your drain plug's located right here under the bumper. You're using a 16 millimeter wrench. Just loosen that up. Make sure you have a drip pan underneath to collect the coolant.
To access the coolant temperature sensor, you're going to have to disconnect a couple harnesses. Pry up the red clip on this harness, and then push in the tab and pull the harness free. Now, right here, push on the tab on this harness and pull this harness free, and this is actually your coolant temperature sensor. Use a 3/4 inch socket and just remove the sensor.
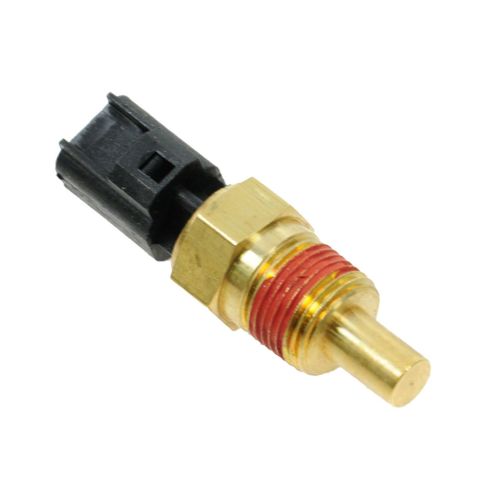
On the left, is the old coolant temperature sensor. On the right, is the new one from 1A Auto. You can see they're identical and they'll mount exactly the same. Put the sensor into the socket and lower it down into place. Just twist it in. Then use the ratchet to tighten it up. Now, reconnect the two harnesses, and on that white harness, make sure you push down that red clip.
Use your 16 millimeter wrench to tighten up the coolant drain plug. Refill your coolant reservoir using the proper type of coolant. Some of this may go down into the engine, as well, so it might take a little while to fill. Replace your cap. You're going to want to bleed the air out of the coolant system, so there's a little bleeder plug here. Loosen that up. You'll want to check the fluids. Make sure you keep the fluid tank at the appropriate level. Then, as you can see here, loosen that up, and you'll see air come out. You don't want to take it all the way out, just have it loose. It lets the air come out. Then, once you fill your coolant bottle to the right level, tighten that plug up. You should hear that your engine's getting the coolant through here. The temperature gauge will settle in, right where it should be.
We hope this video helps you out. Brought to you by www.1AAuto.com, your source for quality replacement parts and the best service on the Internet. Please feel free to call us toll-free, 888-844-3393. We're the company that's here for you on the Internet and in person.
Shop Products

How to Replace Coolant Temperature Sensor 1995-2000 Chevy Tahoe
Watch this video to learn how to fix your coolant temperature sensor. The experts at 1A Auto show you how to replace the sensor on your 95-99 Chevy C1500 or K1500 pickup truck, Tahoe, or Suburban.
