How to Replace Combination Switch 1999-2002 GMC Sierra 2500
Created on: 2011-06-23
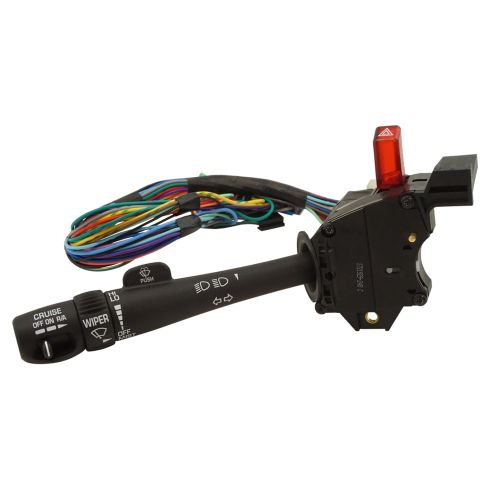
Watch this video to learn how to replace the turn signal lever on your 99-02 Chevy Silverado or GMC Sierra. The experts at 1A Auto will show you how to replace the stalk for your turn signals, wipers cruise control, and high beams.
-
step 1 :Removing the Trim Panels
- Turn the key on and put the car in drive
- Tilt the wheel down
- Pull the dash trim panel up and out
- Put the wheel back up and turn the car off
- Remove the two 7mm screws on the bottom trim panel
- Pull the panel forward to remove
- Pull the tilt lever straight out
- Remove the screws under the steering column
- Push in on the sides of the steering column and pull the two panels off (Push the tilt lever partially in to angle the wheel to make this easier)
- Remove the four 10mm nuts that hold pan under the steering column in place.
-
step 2 :Removing the Wiper Switch
- Remove the 7mm bolt holding the wiring harness in place
- Disconnect the assembly
- Carefully cut all of the wire ties
- Pry the tabs on the bolted panel to free the wiring harness
- Separate the green clip on the cruise control wire by push the tab up and back
- Tilt the wheel back down
- Remove the two T27 screws from the steering column that secure the wiper switch
- Pull the switch free
- Remove the last lead on the back of the steering column
-
step 3 :Installing the New Wiper Switch
- Remove the tape to free the cruise control lead
- Replace the tape
- Reconnect the lead on the back of the steering column
- Feed the harnesses over and down
- Replace the T27 screws
- Rout the dark green lead over the steering column, down and into place
- Reattach the harnesses and bolt them back into place
- Turn the key on and test the switch
-
step 4 :Replacing the Panels
- Put the pan back into place and secure it with the four 10mm nuts
- Replace the steering column trim and bolts. Make sure it is lined up correctly
- Put the shift boot up into place
- Replace the tilt lever
- Replace the lower panel
- Replace the upper panel
- Replace the two 7mm bolts in the bottom panel
Tools needed
-
Socket Extensions
Flat Blade Screwdriver
T27 Torx Driver
T20 Driver
7mm Socket
10mm Socket
Ratchet
Wire Cutters
Brought to you by 1AAuto.com.Your source for quality replacement parts and the best service on the internet.
Hi I'm Mike Green. I'm one of the owners of 1A Auto. I want to help you save time and money repairing and maintaining your vehicle. I'm going to use my 20 plus years experience restoring and repairing cars and trucks like this to show you the correct way to install parts from 1aauto.com. The right parts installed correctly that's going to save you time and money. Thank you and enjoy the video.
In this video we're going to replace the turn signal switch on this 2002 GMC Sierra, same as any Chevy Silverado, Suburban, Tahoe, GMC Yukon, and this vehicle does have cruise control which most do. This is not an overly hard thing to do, but you have to take a few things apart in order to get to the pieces and parts.
Tools you'll need are 7mm & 10mm sockets with a ratchet and extension. You'll need T20 and T27 Torx bit with driver, quarter inch (1/4) or appropriate wrench to use on the Torx bit as you'll see how I use that in the video. Flat blade screwdrivers both small and regular sizes, a tool to cut the wire ties which should be a wire cutter or utility knife. Just one note, my truck did not have the screws that hold the bottom plastic trim on the steering column, so I don't know those are I believe those are T20, but they could be Phillip screws, so you might need a Phillip screwdriver as well.
Start by removing your upper tune panel, so you turn the key on. Put the vehicle down in drive or 1. Bring your tilt wheel down. Then you just pull sometimes start in the corner and then pull the dash trim panel out and then up, put it aside. Turn the key off and put the wheel back up.
Underneath this panel are two 7 mm screws, one right there next to the brake release and then one over here closer to where the gas pedal is. As you can see I have a brake control around mine which I've already taken down. We're going to fast forward here as we remove those two 7mm bolts from the bottom of that trim panel. Once you got those screws out just pull this panel straight forward. You may have heard one of the clips just came off, just push it back on in that.
Now your tilt lever just pulls out and then up underneath this vehicle has been apart before somebody didn't put them back, but there's two- they're either T20 or they're Phillip screws- the one would be there and one would be there. We would want to remove those two screws. Provided you removed those screws and just kind of just push in on your panel, bring it down like that. Now, you want to take your, you don't have to put this all the way back in just put in some, tilt your wheel all the way down. Squeeze the back of your panel here and pull it up and then pull it off on the side and gently work it up and off and just take our tilt lever and wheel back up.
Now, you want to remove this pan and that's just four 10mm nuts: two on that side and then one and two on that side. Hit a little fast forward here as we just use our 10mm socket with ratchet and extension to loosen up and remove those 4 nuts that hold that bottom plate. Now we can remove that and now you can see that your harnesses connect in right here. There's a 7mm bolt right in here, fast forward a little bit as we loosen that bolt. You disconnect this whole assembly and I'm going to cut this wire ties. You be very careful not to damage any wires that you're going to still use. Then we're going to take this and just pry up a little bit, there's a little tab holding them right here. Just pry, push forward, do the same thing over here, pry out, push forward out of the lock.
The cruise control wire goes back and around, see there's little safety, a green safety clip here, push that out and then just disconnect by pushing this tab up, back. Now there's your cruise control lead. Tilt our tilt lever, put our wheel back down. Now there's two screws to remove T27 one here and one right here. Top one is pretty easy, the bottom one if you turn your wheel correctly you should be able to make it. Screwdriver in there, you saw me struggle with the driver and so what I did is I took the bit out of the driver and I'm using a quarter inch wrench so I can now get it the bit straight into the screw. Just use a quarter inch wrench to loosen it up. I'll loosen it up a few turns and then I'll use the driver again. Just speed it up here for the rest of taking that torque screw out. This comes out, bring it up. One last lead plugged in right here. You need to pry up on a little tab here and pull the lead out. You can see here I forced the wires down and I can grab on to them with my hands so I have hold of them down there. I'm pulling the wires from down there and then pry up on that tab on top. So once you get that out its all out.
Here's my original one, the one from 1A Auto, not only is it going to control your wipers, high beams and cruise control correctly it's also going to work nicer because it's not all worn off and dirty. All the connections, this is the new one, this is the old one. Connectors are all the same has the same cruise control connectors and everything, so everything's going to bolt in and plug in just like the original. When no harnesses come they are the cruise control leads they are kind of taped to the harness. Basically, what I'm doing here is fast forwarding through removing that tape, pulling the harnesses apart as far as those cruise control leads and then taping them back together. Nice and set-up, so this harness comes out of there and this one comes right out of there. Put this right up in here, we connect it. We've got one connected up there and we're feeding up those harnesses over like that. Next we'll put this on like that down. Start that top one in. Start this one in a little bit. I'm going to fast forward here as I just tighten up those two T27 screws to hold the assembly on.
You just want to make sure you rout this lead up and then over your steering column and then back and around and hook it in right there. Connect these back in just connect them back, they can only go one way. Connect in, make sure you go nice and straight in. Use your 8mm wrench here. Now it's working because my flashers were set on, it started blinking. You can turn your key on. Wipers work. Washers work. Light works turn those off. High beams and low beams and the flashers, the only thing I can't really test is the cruise controls. I put the wire together and I put the shield back around them as best as I could. Now I can put the pan back in place and we'll fast forward here as I put that brace or pan back up into place and secure it with the four 10mm nuts.
To keep this moving we will fast forward here through putting the steering column trim on. You just want to do this carefully, be aware you need to put a lip in to the back of the steering wheel. You need to keep checking just to make sure that it's lined up correctly around the shifter around the ignition and around the turn signal. Then you want to make sure you get the shift boot up into place, then you can move your steering wheel up. Put the lower trim on. Same thing, make sure it lines up correctly. Make sure all the tabs and clips line up between the bottom and top. Clip it together and then turn your wheel a few times make sure nothing's interfering with the wheel. Move it around a little bit.
Now you can put your tilt lever in permanently, and just do another check. Then you can put your lower panel on just clip the bottom, push it in. We'll do the bolts at a later time and now the turn the key on. Put your shift lever down and put that upper instrument panel trim on. Here, last but not least, finish up by putting those two 7mm bolts back into the bottom of your lower trim panel and then if you have a brake controller put that back up into place as well.
We hope this helps you out. Brought to you by www.1AAuto.com. Your source for quality replacement parts and the best service on the internet. Please feel free to call us toll free 888-844-3393. We're the company that's here for you on the internet and in person.
Shop Products

How To Replace Turn Signal Switch 2004-08 Ford F-150
Check out this video to learn how to replace the wiper, turn signal, and high beam switch on your 04-08 Ford F-150. 1A Auto will show you how.
