How to Replace Combination Switch 1997-2005 Chevy Venture Part 2
Created on: 2011-02-10
As part 2 of a 2 part video, this video will show how to remove the turn signal switch, connect the wiring, and reinstall the trim panels
-
step 1 :Beginning the Repair
- This is Part 2 of a two part video
- Please consult Part 1 for prior instructions
- Perform the steps outlined in Part 1
-
step 2 :Fastening the Turn Signal Switch
- Line up the horn button as you move the switch into place
- Start the top screw
- Start the bottom screw
- Tighten the top screw
- Tighten the bottom screw
-
step 3 :Connecting the Wiring
- Pass the cruise control wire over the steering colum
- Connect the cruise control wire
- Connect the wiring harness
- Slide the black harness into place
- Slide the grey harness into place
- Connect the wiring harness
- Tighten the wiring harness bolt
- Reattach the plastic wiring clip
- Secure the wires with wire tires
-
step 4 :Reattaching the Steering Column Trim
- Replace the top steering column cover
- Make sure the shift boot is placed correctly
- Insert the top cover screws with the E5 bit
- Insert the ignition lock cylinder with the triangle lock tab pointing up
- Hook the lower steering column trim onto the upper steering column trim
- Make sure to place the lower steering column trim around the shift boot
- Clip the upper and lower trim together
- Reattach the steering tilt lever
-
step 5 :Reattaching the Dash Panels
- Lower the steering wheel
- Push the upper dash panel into place
- Clip the dash panel at the bottom
- Clip the dash panel at the top
- Press the radio/heater panel into place
- Insert the two T25 screws in the lower steering column trim
- Install the access panel with the two locating pins
- Clip the top of the access panel into place
- Insert the three 7mm screws at the bottom of the access panel
- Push in the push pins
- Reconnect the battery
Tools needed
-
Flat Blade Screwdriver
E5 Socket
Bent Tipped Awl
7mm Socket
Wire Ties
Ratchet
T25 Torx Driver
Brought to you by 1AAuto.com, your source for quality replacement parts and the best service on the Internet.
This is part two of a two-part series, replacing the multi-function switch on this GM minivan. A quick review of the tools that you'll need.
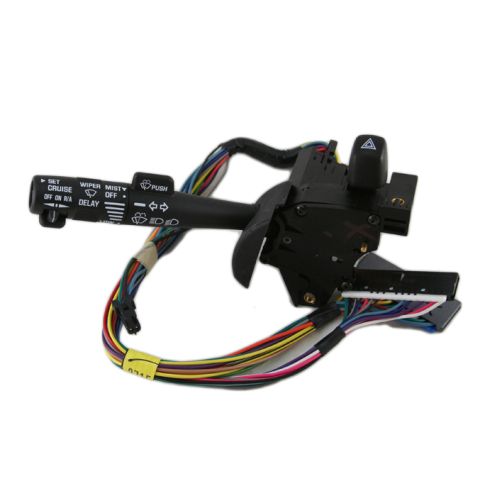
So here's our original switch and lever, and new switch and lever from 1A Auto. You can see everything is the same on the replacement. The plastic's a little bit darker, but that's really not usually not a big deal, especially if your old one is not working, and your new one will be. All the connections are going to be the same and everything. Even has the correct connection for the cruise control. For this vehicle, the original one is working fine so I am going to reinstall it because I'm not one to put in a part that doesn't need to be replaced. In a re-installation it's just the reverse of the procedure. So what you're going to want to do here, there's a button right here for the horn that can get hung up incorrectly. So when you put this in, you want to kind of, pull it and tilt it back and then rotate it forward, and make sure it goes down into place correctly. Start the top one here. Start this. As I'm trying to start this lower screw, I'm basically just shifting the switch a little bit to shift to places to get the hole lined up and then twisting the screw gently. This bolt should go pretty much straight in. Now I'm just using the T25 bit to keep it going. Got to use my wrench, just like before. Fast forward as I get that one started.
So now I'm going to tighten up my top on since I have that one started, and then just crank away at the bottom one here. Now with the top tightened up, just fast forward through tightening up the bottom one. So now what we'll do is re-hook everything up. First, take our cruise control wire and pass it up over the steering column. Sorry about the shot here, not the best. Now connect it in here. You can put that green lock in there. It's a little redundant, but we'll do that. Now as far as these harnesses go, they can only go in one way. Your gray one . got to get the black one first. You can see it's got middle slots here so it goes in on the side. Slide the black into place; the gray one comes underneath. It slides back into place. Reconnect that harness. We'll just fast forward through tightening that bolt up. Then, let's get all our harnesses back into this, loop at least and walk it back on. If you have a couple of extra wire ties, you can secure it even better like it had been before. Now we're going to put our top cover back on. As you put it on, make sure that you get the shift boot up in there correctly. Then again using our E5 bit here, start this screw down here. OK we'll just speed it up as we just put those screws on and then that one right up in there. Reinstall your lock cylinder. There's a little triangle tab, make sure the triangle tab that locks in is pointing up.
Now we're going to put the trim together. If you don't take your whole dash apart, this is the part that's pretty tough. You can see that hook right there, you want to clip it into the upper trim of the steering column. On the other side, same thing. Hook it into the upper trim. And then pull it back. Just make sure you get both sides. Kind of shooting this with one hand, so. And then on the other side, you need to make sure that . that's a good shot of my chin . that you get it up on around the shift boot right there. So just make sure you feed it up and then around that shift boot. As you push it up, make sure the shift boot goes up in there correctly. And then once you get it to a certain point, just make sure everything is lined up. Clip it back together. Clip it here; make sure it's all set. It's back together. You can put your tilt lever back on. Now I can put our main dash piece back on. You're going to feed it down in like this. You have to pull out on the bottom a little bit. You have to push it in on the top. Force it down in. Then I usually get the bottom clipped first, then clip the top. OK. That's all set.
This piece over here, you want to put in. Then you want to press it in and down and then lock the top. Now you can release your steering wheel back up and I'll fast forward through putting in those two T25 screws in the bottom trim panel. Now on this panel, you want to put it back in. There are two locating pins that go in the holes in the dash so you know you're putting it in the right spot. Then you clip the top in. Then you have your three 7mm screws at the bottom. We'll put those in, and fast forward through doing that. Once you have those three screws tightened up, then you want to just push your push pins back in. Obviously, reconnect your battery and you should be all set.
We hope this helps you out. Brought to you by www.1AAuto.com, your source for quality replacement parts and the best service on the Internet. Please feel free to call us toll-free, 888-844-3393. We're the company that's here for you on the Internet and in person.
Shop Products

How to Replace Turn Signal Switch 2005-16 Toyota RAV4
Check out this video to learn how to replace the turn signal switch on your 05-16 Toyota RAV4.
